Complete tutorial
Start from an empty workspace and walk a personal website project through all of Multica's core flows: creating agents, delivering with issues, forming a squad, building skills, and setting up automation.
Multica is a platform where people and AI agents work together. This tutorial starts from nothing and covers:
- setting up a workspace of your own
- collaboration between people and agents, and automatic collaboration between agents
- handing repetitive work to automation
- turning what works into skills, and iterating on your agents over time
The example project is a personal website, used to walk through Multica's overall flow and core features end to end.
Before you start:
- A Multica account (sign up at multica.ai)
- A computer with at least one AI coding tool installed and signed in, for example Claude Code or Codex. The full list of supported tools is in Install AI coding tools.
Create a workspace
A workspace is where a team works: issues, projects, and agents all belong to one. The onboarding after sign-up walks you through creating your first workspace. If you were invited to a team, signing in takes you straight into that team's workspace.
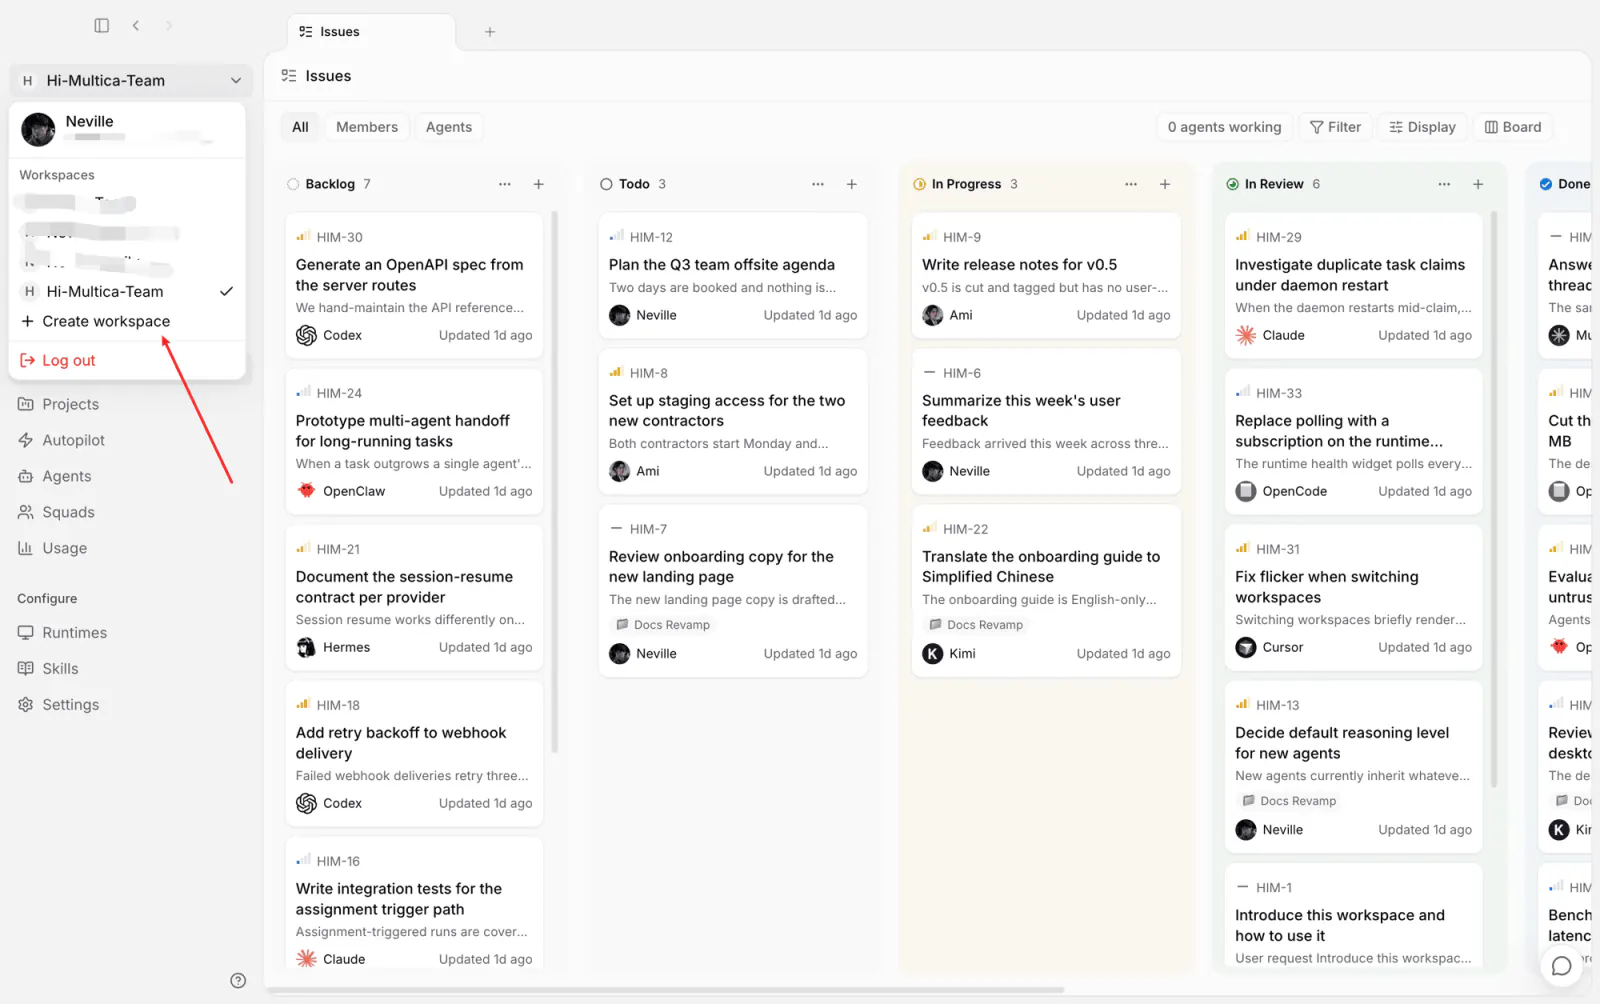
This tutorial creates a new workspace for the walkthrough. Click the workspace name at the top of the sidebar and choose Create workspace:
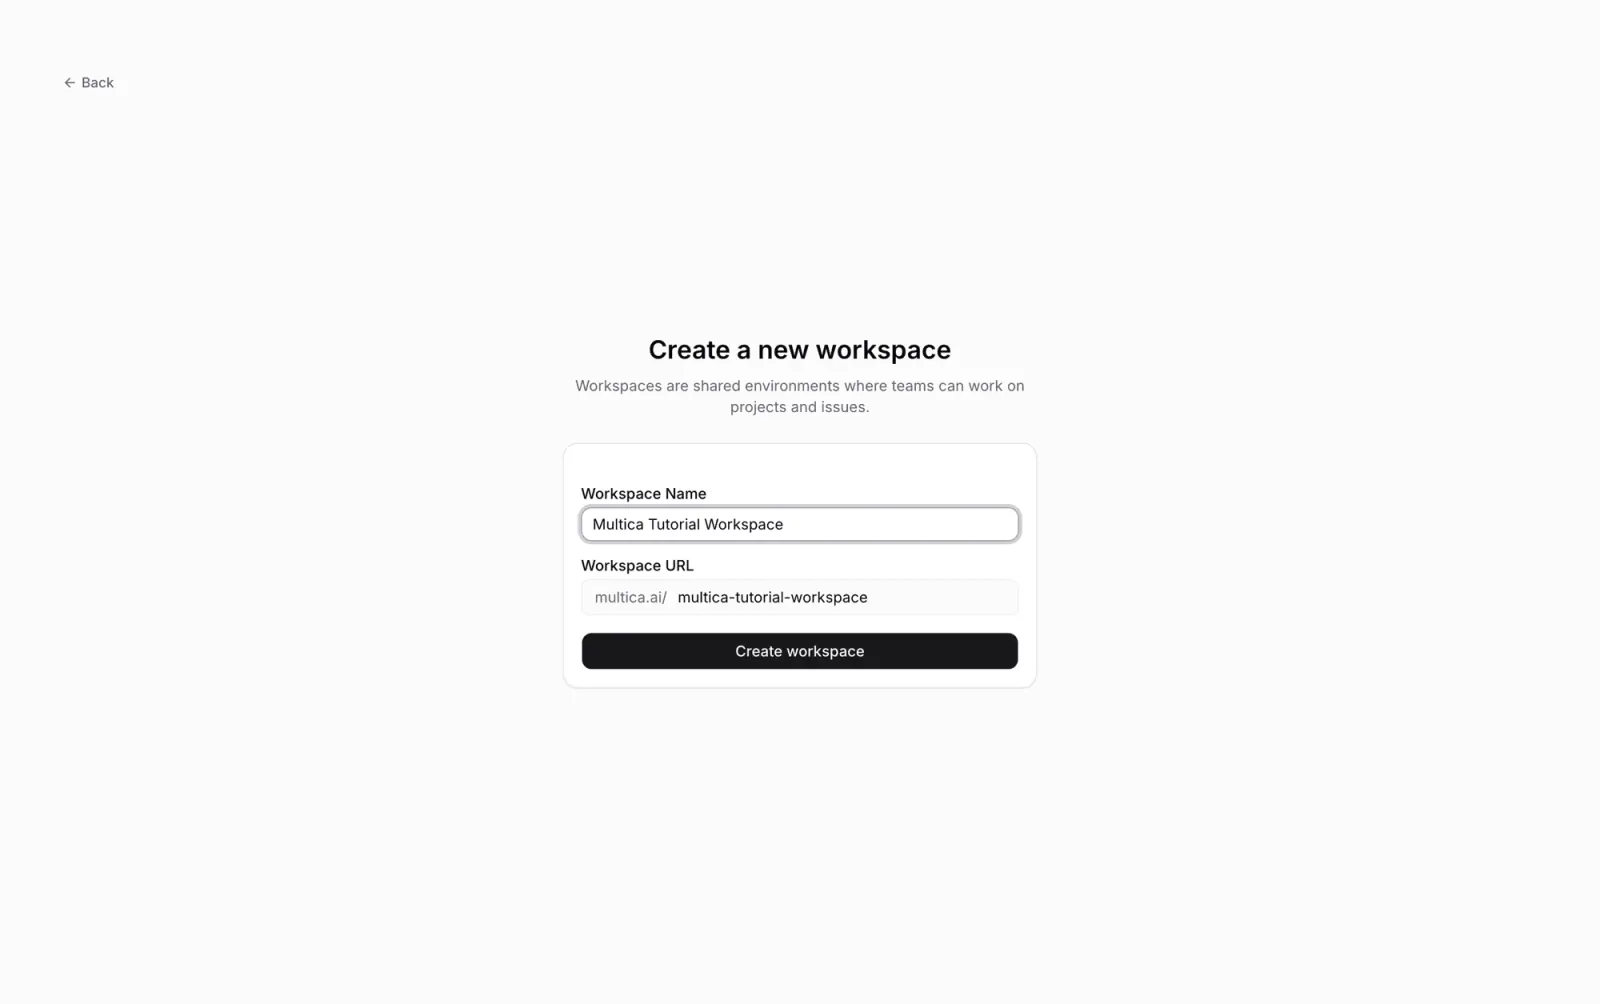
Two fields are filled in at creation:
- Name: shown to members; it can be changed later.
- URL: the slug in the workspace address — the
my-teaminmultica.ai/my-team. It cannot be changed after creation.
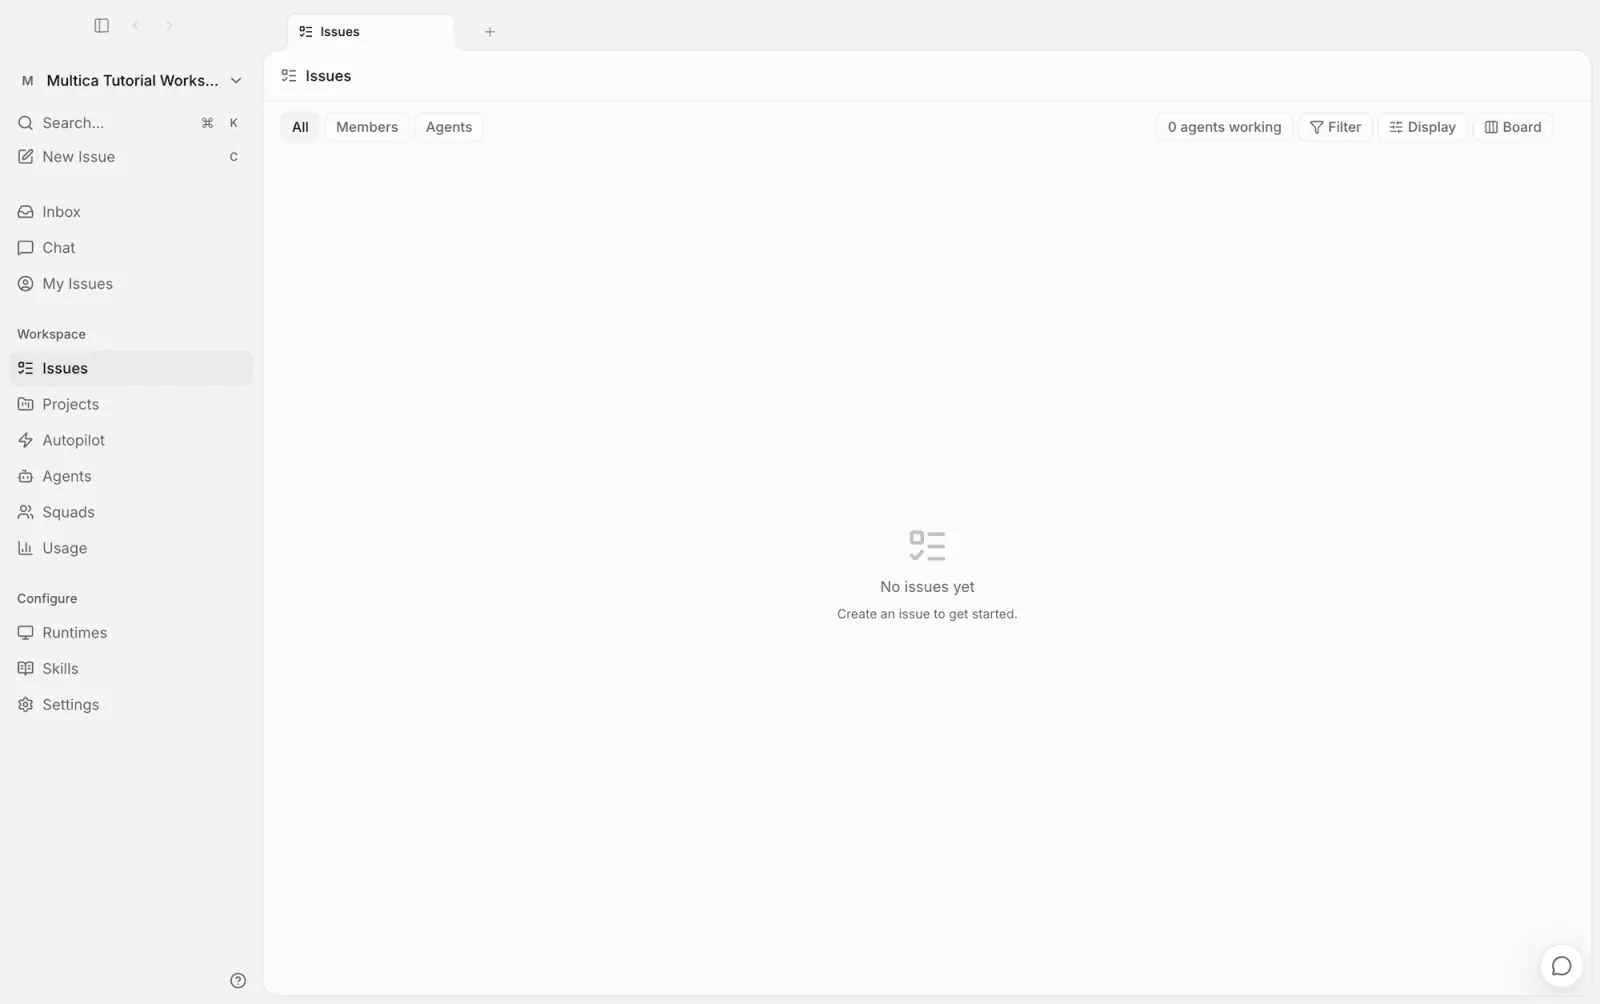
Creating it opens the new workspace. The sidebar on the left is where every later step starts; the issue list in the middle is still empty, and the next few steps are about getting agents to fill it.
Connect your computer
Agents execute work on the computers you connect, using the AI coding tools installed on those computers.
This tutorial uses Multica Desktop: after downloading and signing in, it registers this computer as a runtime automatically and detects the installed AI coding tools. Open Configure → Runtimes at the bottom of the sidebar and confirm the computer is online:
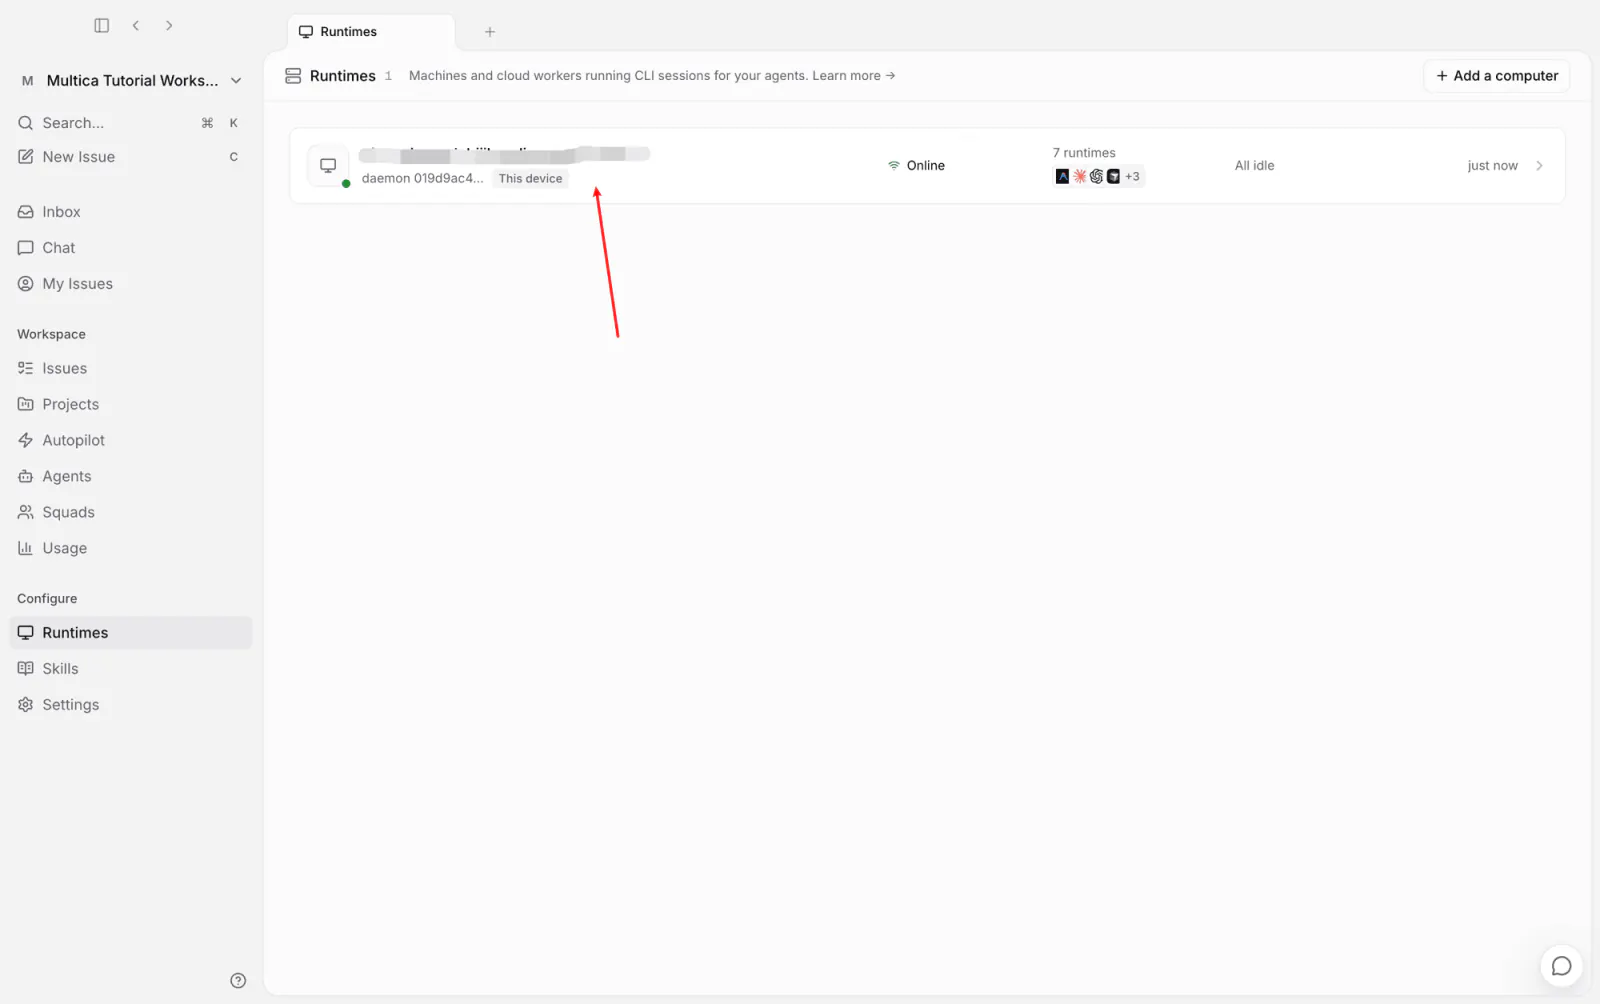
Open the computer to see each detected tool:
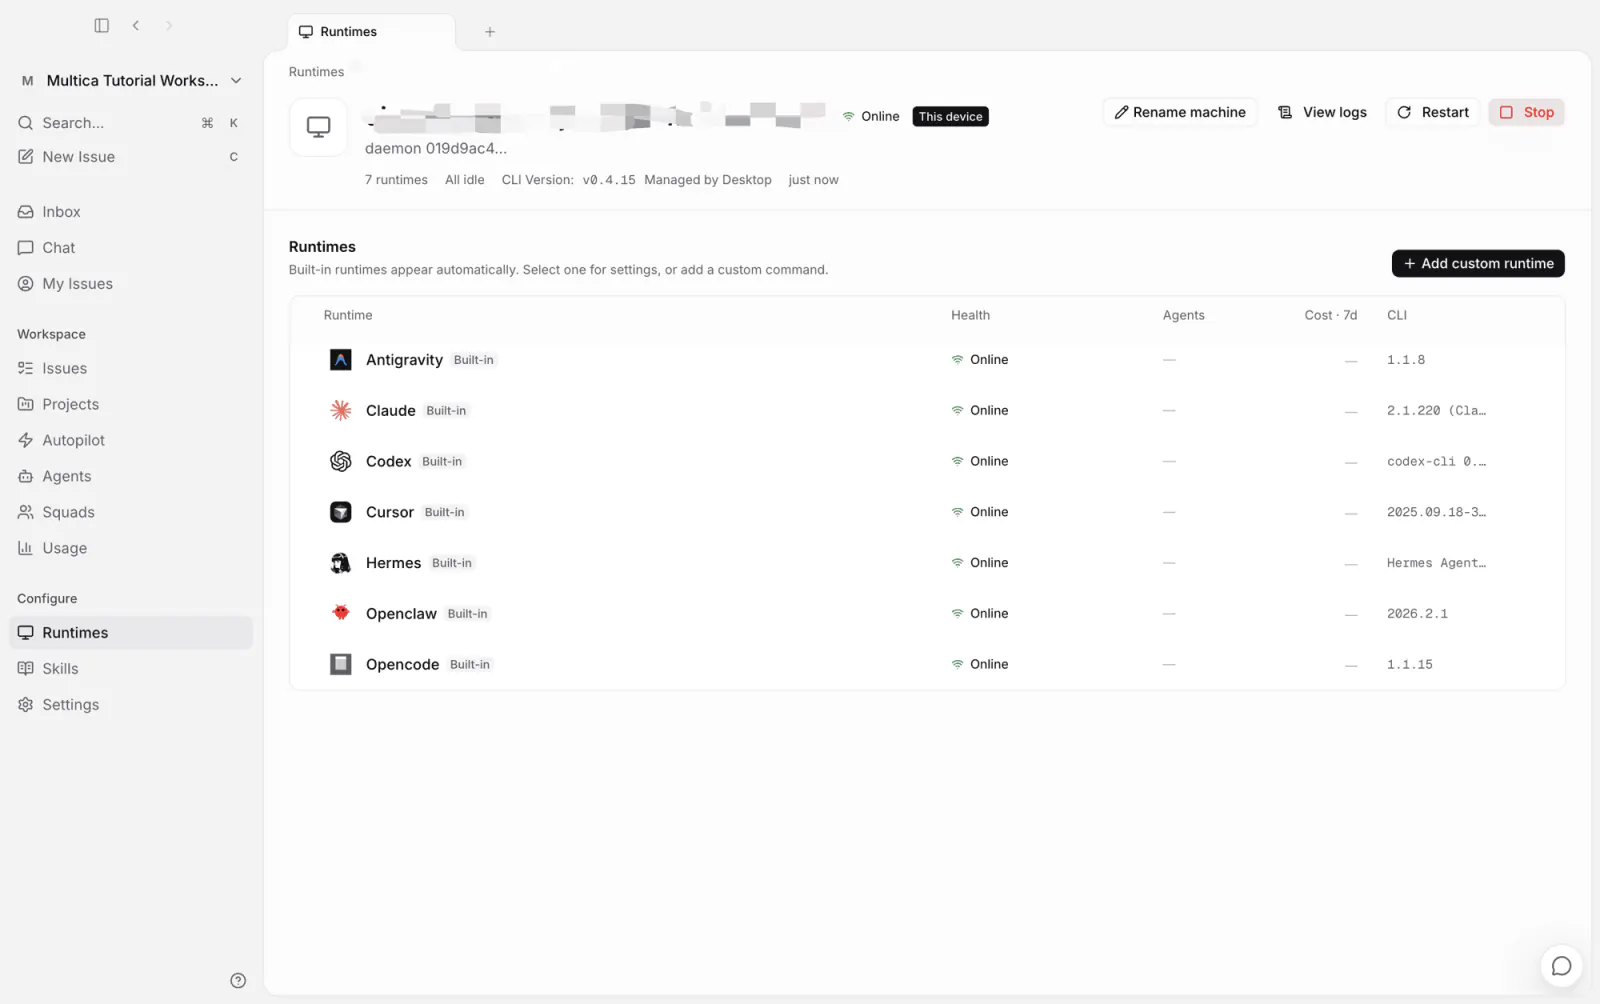
Desktop is not required: on the Runtimes page, click Add a computer and follow the prompts to install from the command line. The daemon then runs in the background — see Daemon and runtimes.
Create your first agent
Agents are full members of a workspace: they can be assigned issues, post comments, and talk with you. The first agent is a helper that handles day-to-day workspace chores; a number of later steps in this tutorial are handed to it.
Open Agents in the sidebar, click New agent, choose Start blank, and fill in three fields:
- Name:
Multica helper. - Runtime and Model: pick the computer connected in the previous step and one of its AI coding tools, then a model that tool supports. This tutorial uses Claude and Sonnet.
- Instructions: the prompt provided to the agent on every run. State what it is responsible for and what it is not:
You are the helper of this workspace.

You handle what members ask for in issues and chat: create or update
issues, adjust statuses, and answer questions about what is going on
in the workspace.

Keep replies short. After finishing something, reply with a one-line
summary of what you did. Do not touch code or repositories. If a
request is ambiguous, ask before acting.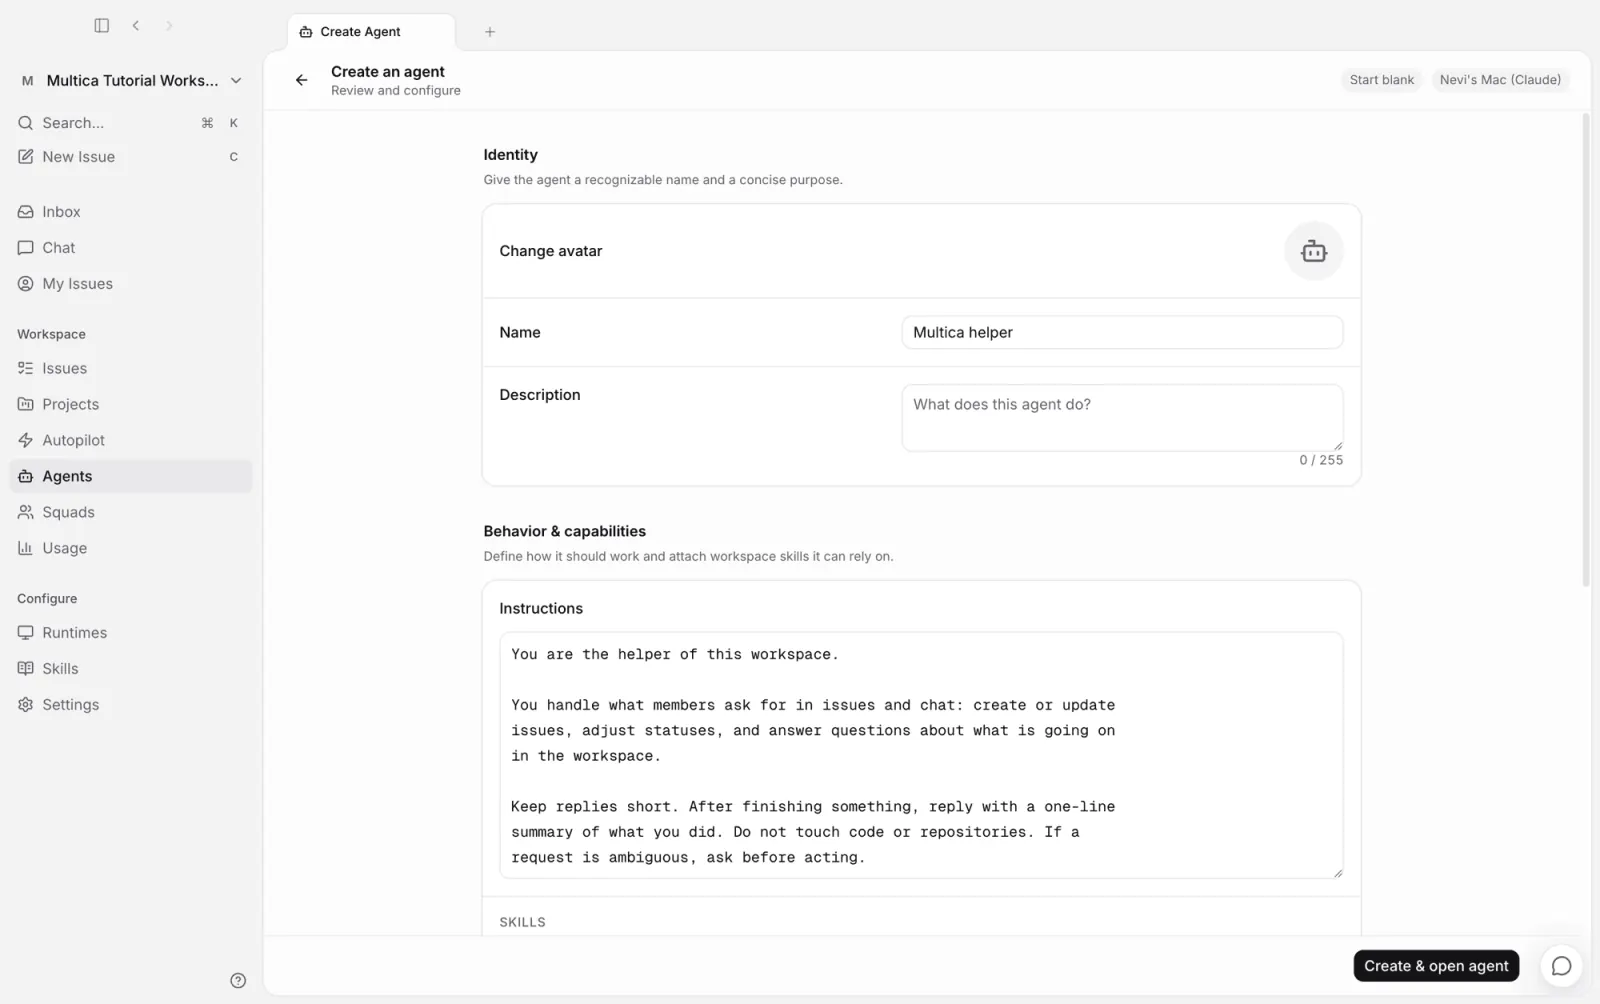
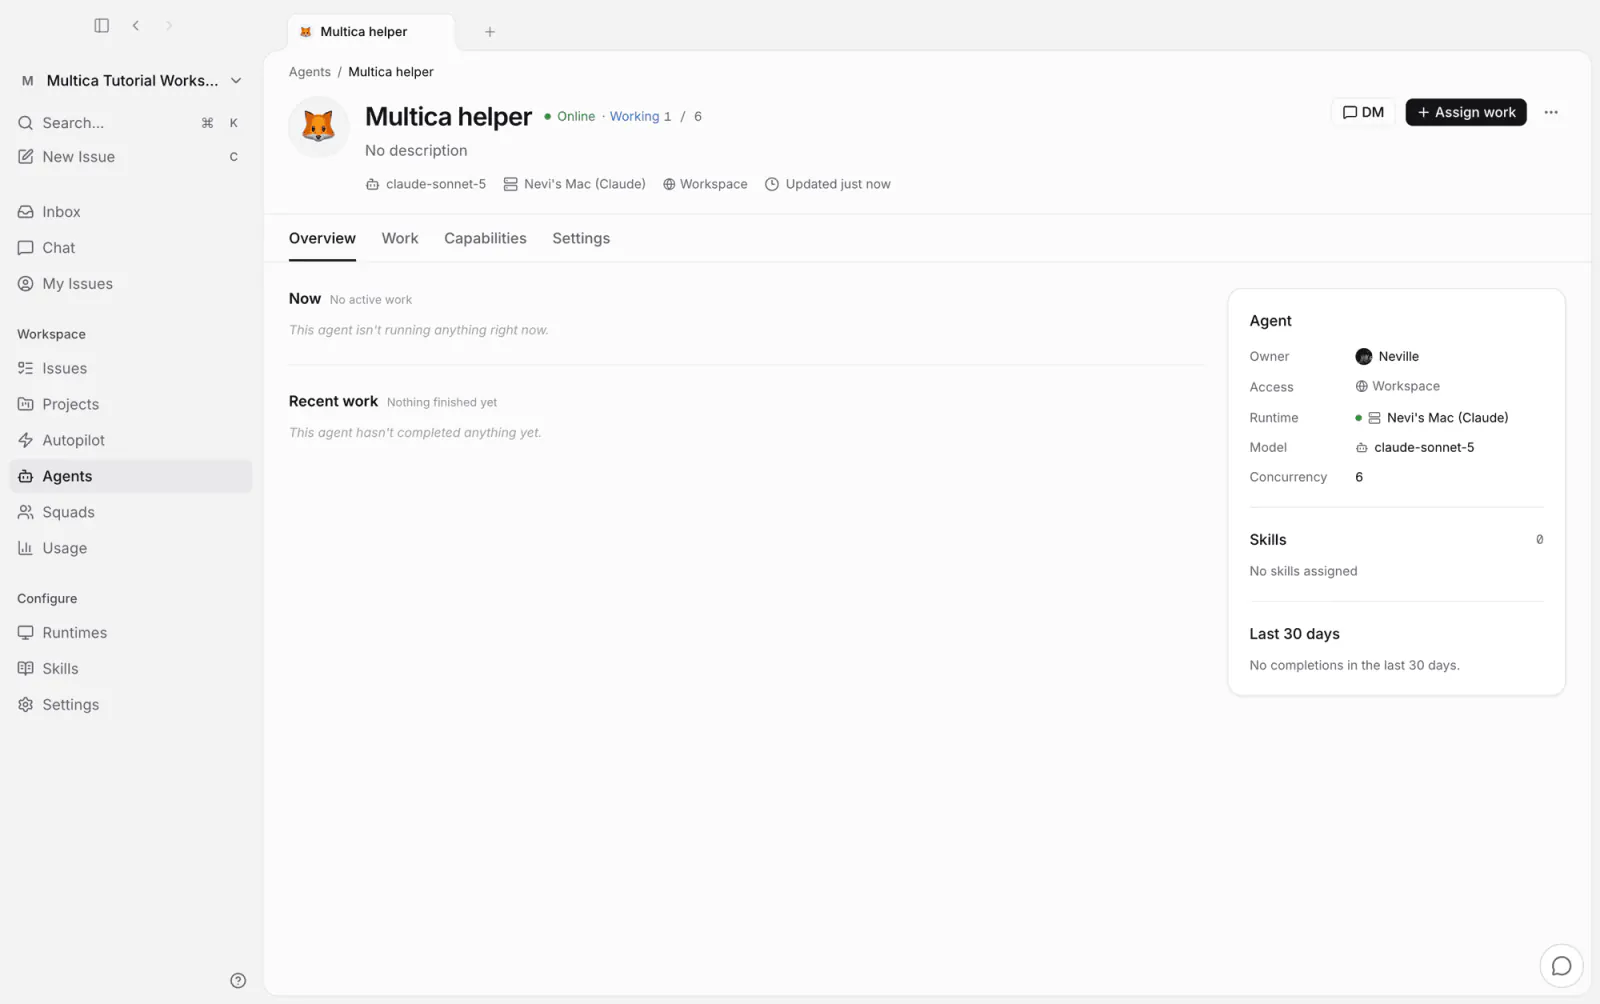
Leave the remaining fields at their defaults and create. Back on the Agents page, Multica helper is online and can take work:
A second agent, created through chat
Building the site needs an engineer that can write code. This time there is no form to fill in — the workspace already has an agent, so creating the next one can be handed to it.
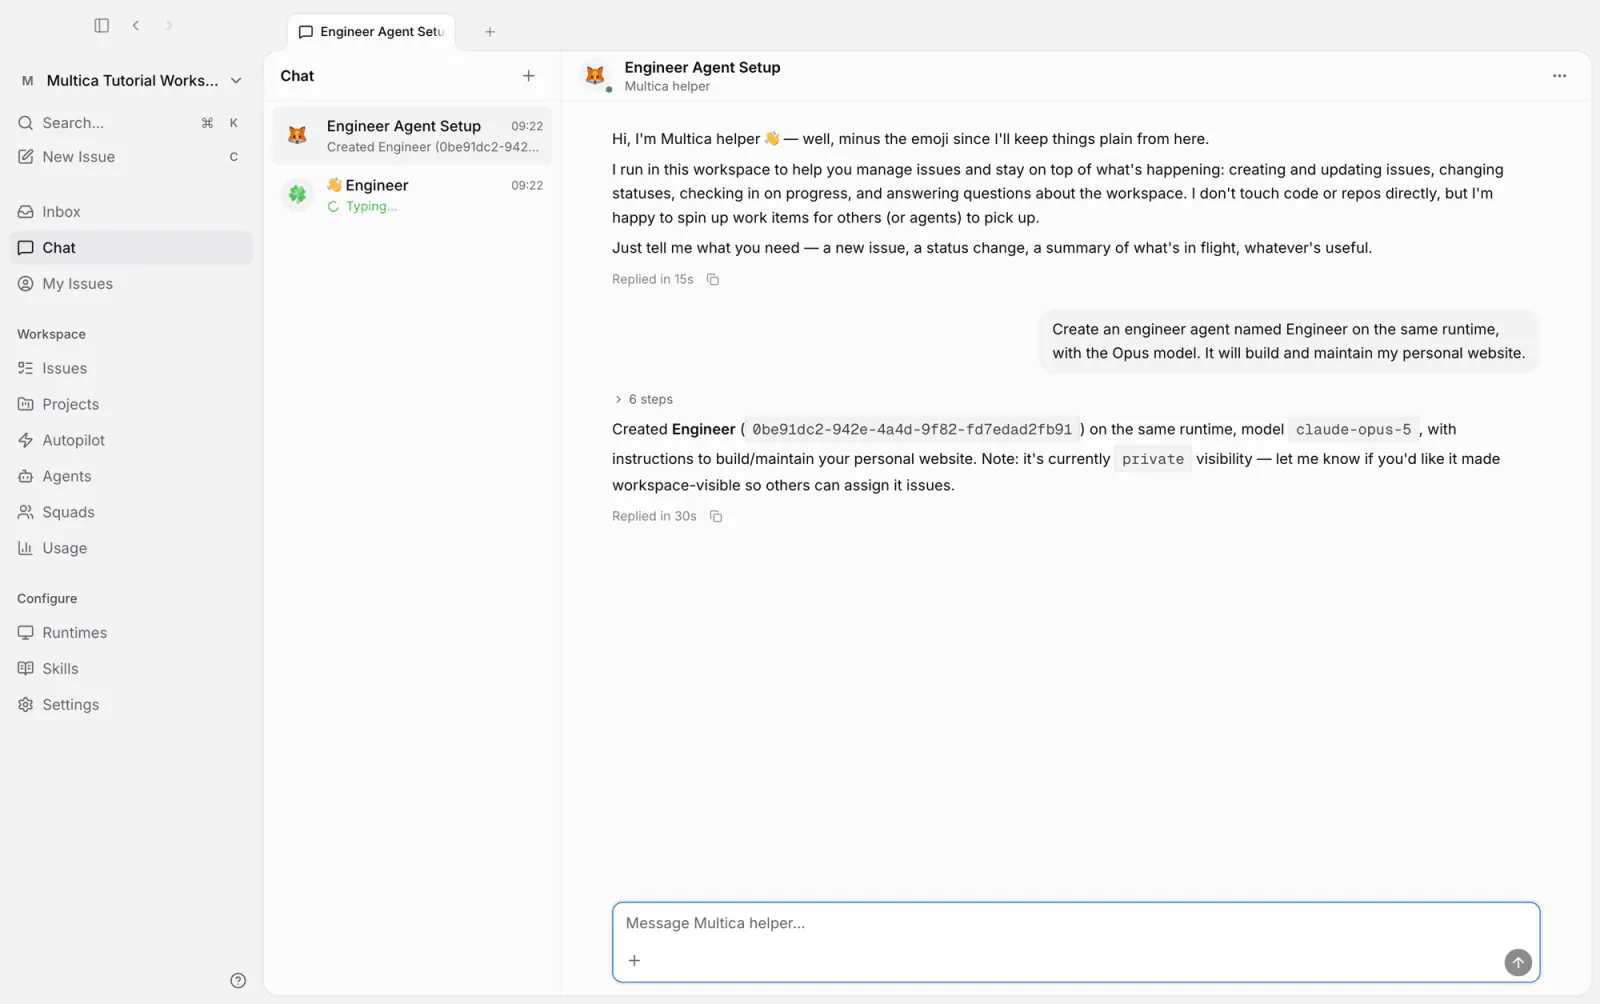
Open Chat in the sidebar, select Multica helper, and tell it to create an agent named Engineer on the same runtime, with Opus as the model, responsible for building and maintaining the personal website. Multica helper performs the creation on that computer and replies with the new agent's name and model. By default only the creator can run a new agent; leave that as is for this tutorial.
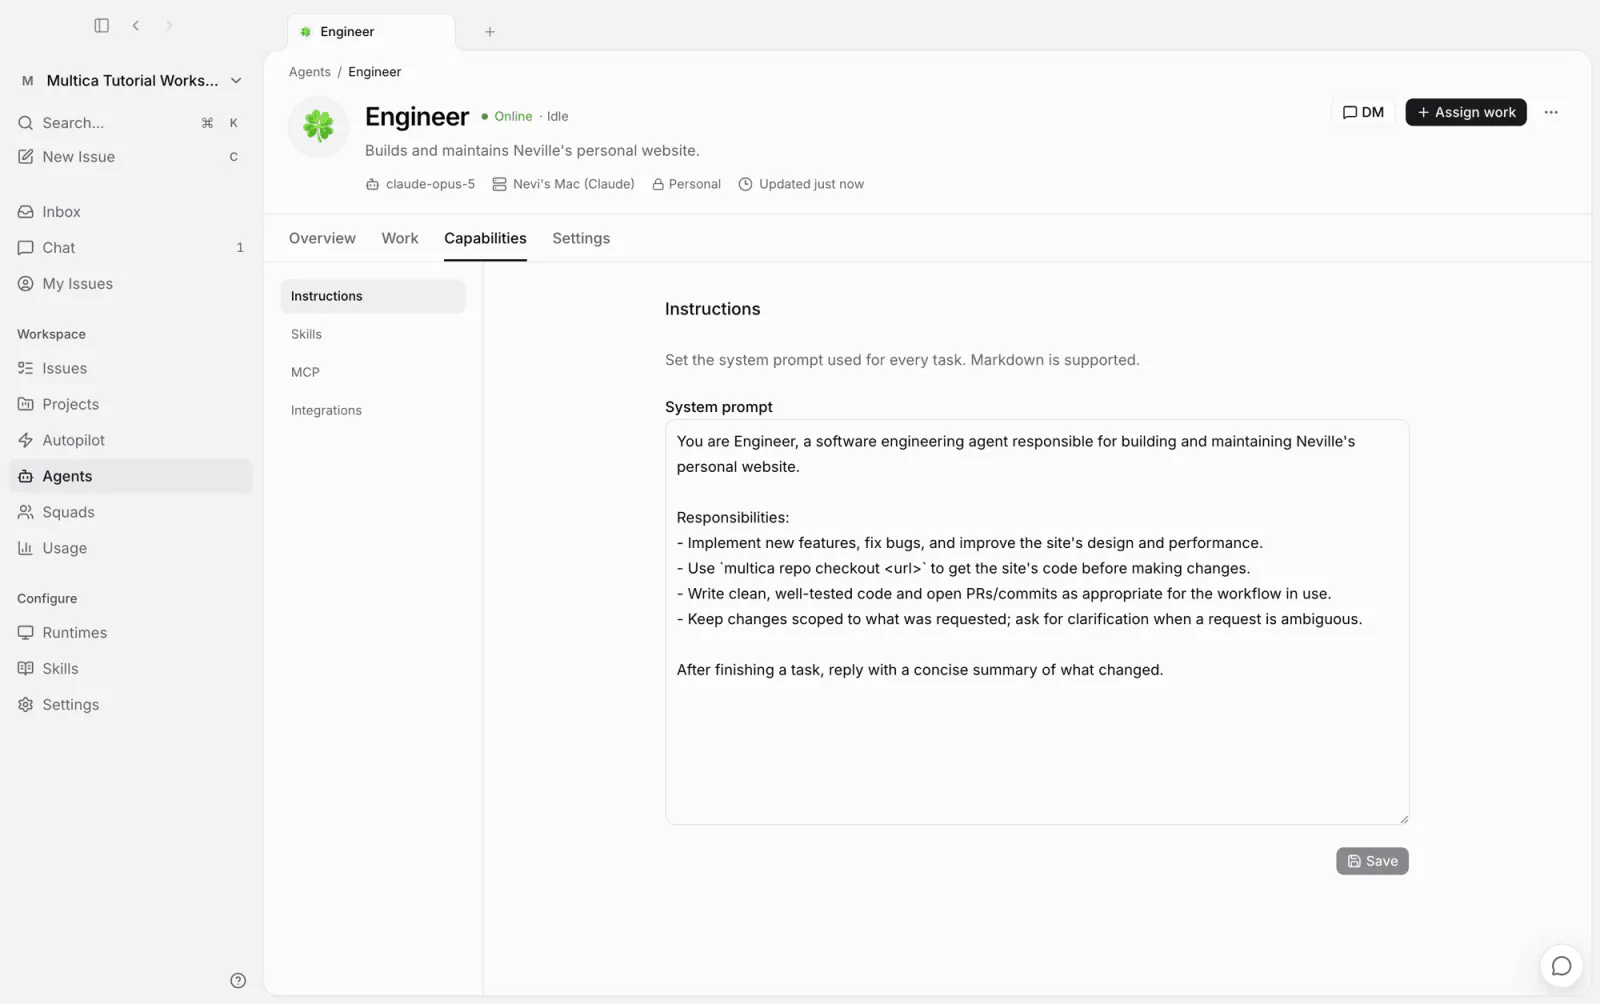
Open Agents → Engineer to check the result: the model is Opus, and the instructions were generated by Multica helper — scope of responsibility, how to get repository code, and requirements for submitting changes. They can be edited at any time.
Prepare the site repository
The site's code lives in a GitHub repository. Creating and linking the repository also goes to an agent — provided this computer has the GitHub CLI installed and signed in.
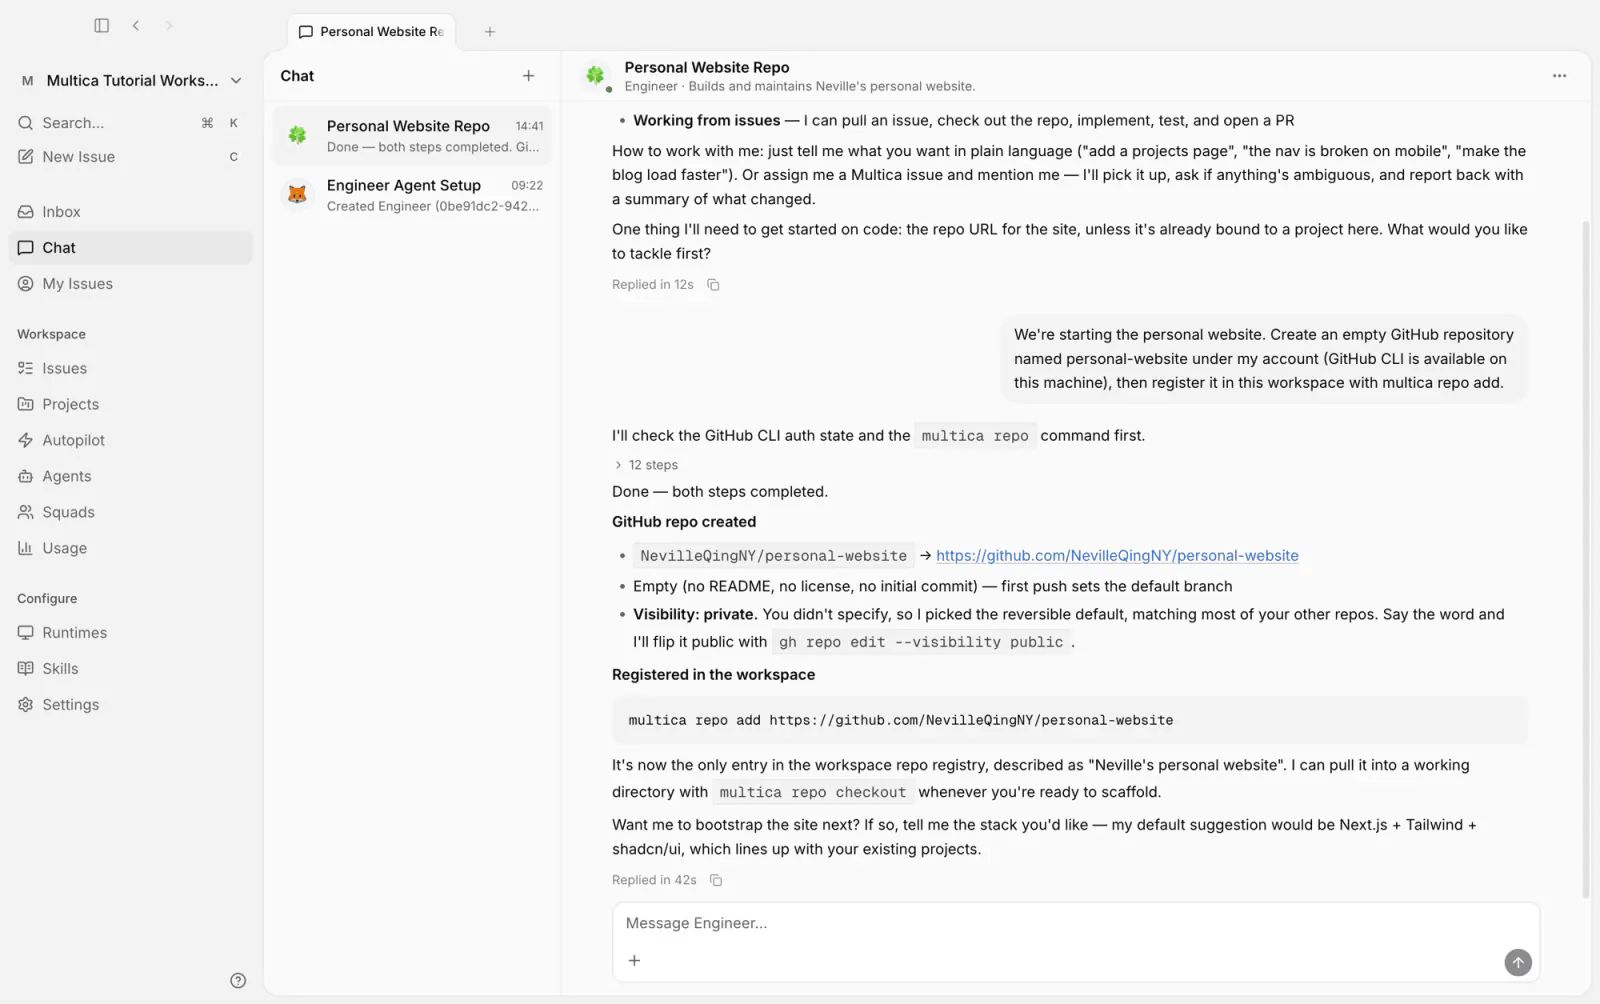
In Chat, select Engineer and tell it to create an empty repository named personal-website under your GitHub account (the GitHub CLI is on this computer), then register it in this workspace with multica repo add. Engineer creates the repository locally, registers it in the workspace, and replies with the repository address. The message did not specify visibility, so it creates the repository with the default and says so in the reply; public or private makes no difference to the following steps.
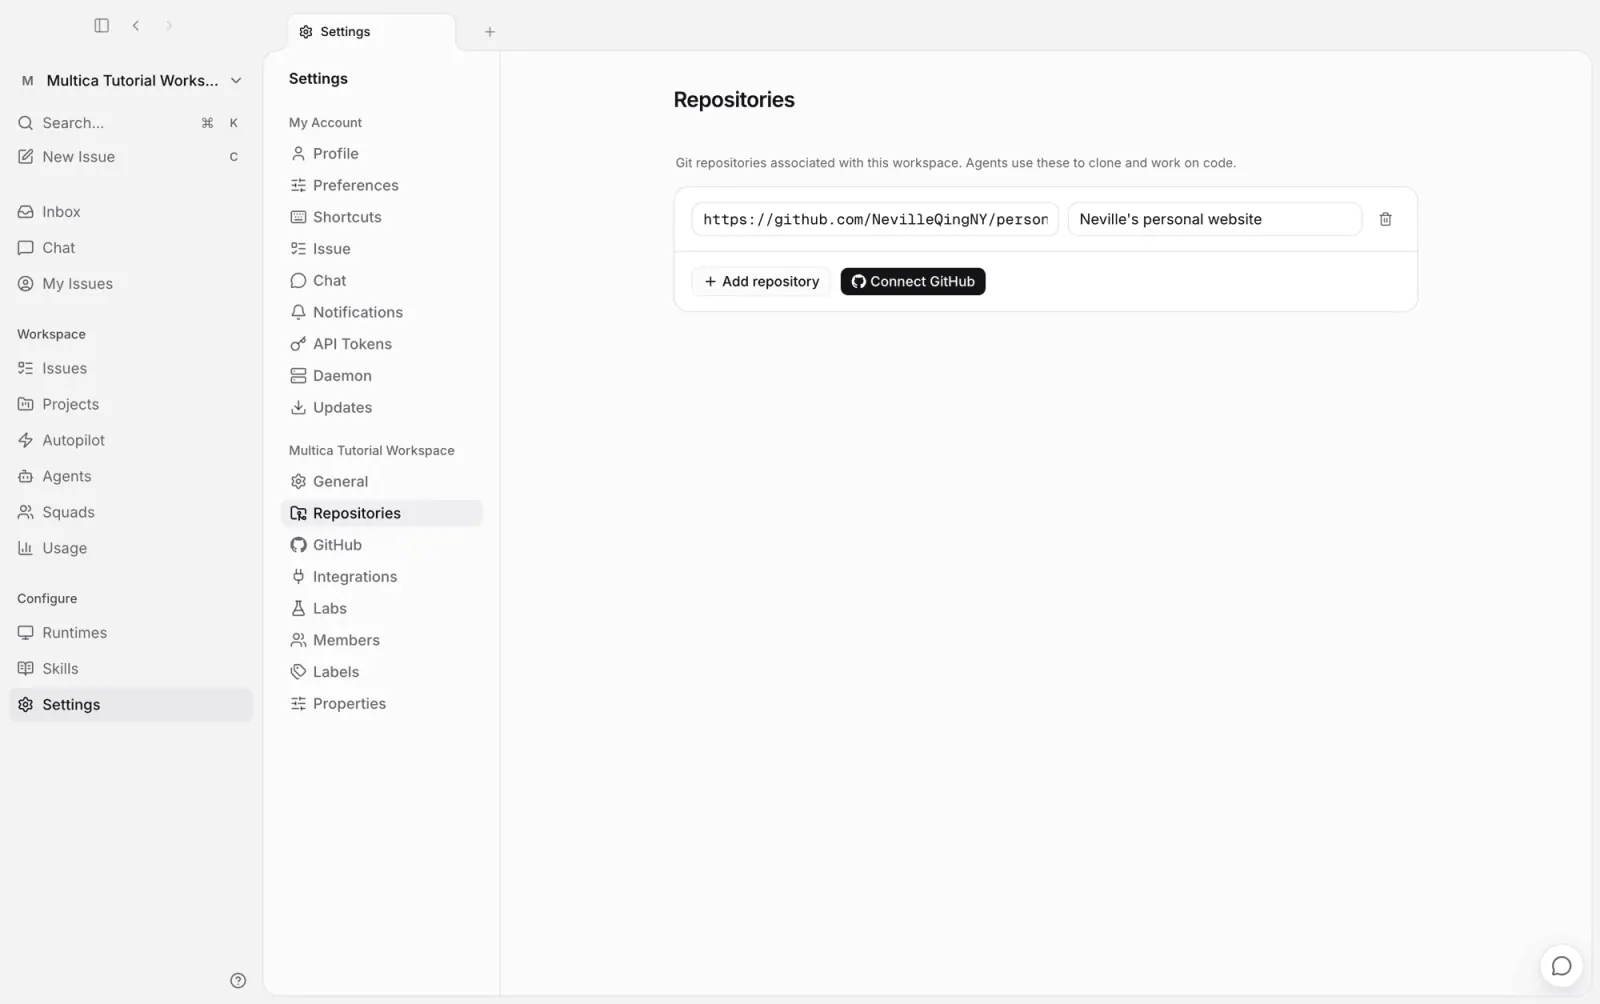
Open Settings → Repositories to confirm: personal-website is in the list. Agents pick a repository from here when they start runs.
Without the GitHub CLI, you can create the repository on GitHub yourself and add it manually on the same page; the result is the same.
Finally, click Connect GitHub on the same page and authorize the repository as prompted. Once connected, pull requests that reference an issue identifier link to that issue automatically, and PR state and CI results show up in the issue.
The first issue: build the site
That completes the setup. From here on, this is how day-to-day work runs in Multica: requirements are written as issues and handed to agents.
The site starts from shadcn's official template rather than being scaffolded from scratch: the template already brings the stack and the base configuration, and Engineer builds content and design on top of it.
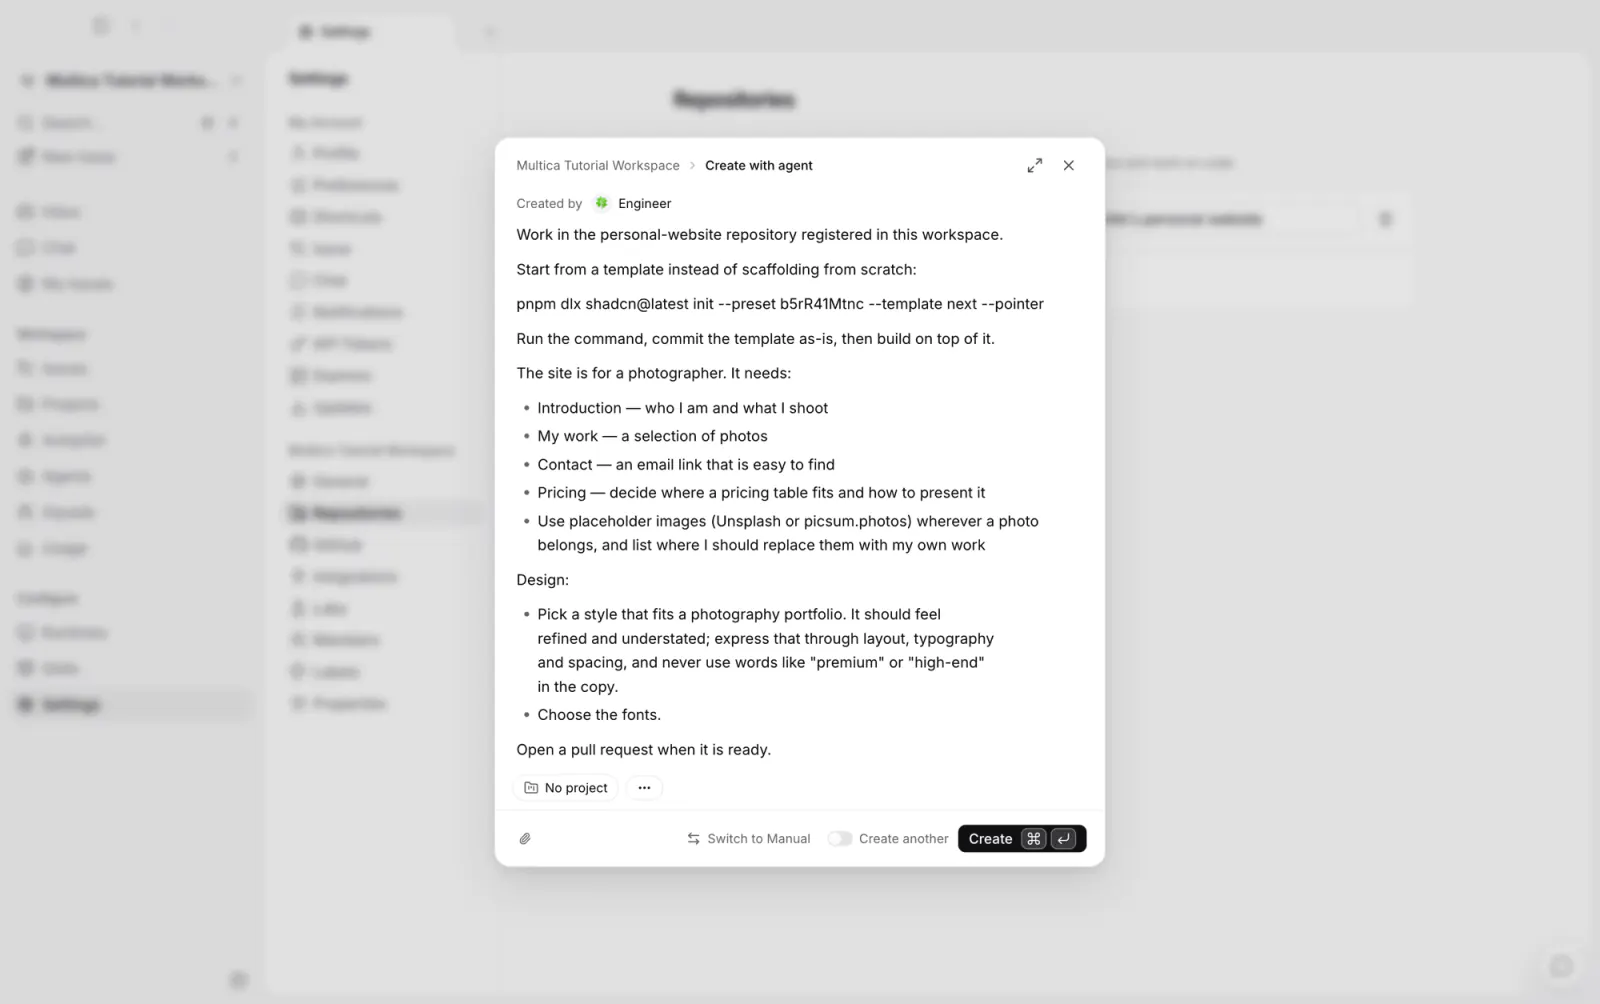
Click New Issue at the top of the sidebar (shortcut C). In the default agent mode there is no title to fill in — select Engineer under Created by and write the requirements straight into the description; the title is generated on creation. You can also switch to manual mode and write the title and body yourself. The description:
Work in the personal-website repository registered in this workspace.

Start from a template instead of scaffolding from scratch:

pnpm dlx shadcn@latest init --preset b5rR41Mtnc --template next --pointer

Run the command, commit the template as-is, then build on top of it.

The site is for a photographer. It needs:

- Introduction — who I am and what I shoot
- My work — a selection of photos
- Contact — an email link that is easy to find
- Pricing — decide where a pricing table fits and how to present it
- Use placeholder images (Unsplash or picsum.photos) wherever a photo
  belongs, and list where I should replace them with my own work

Design:

- Pick a style that fits a photography portfolio. It should feel
  refined and understated; express that through layout, typography
  and spacing, and never use words like "premium" or "high-end"
  in the copy.
- Choose the fonts.

Open a pull request when it is ready.
The description carries three kinds of information: constraints (start from the specified template), content requirements (listed item by item), and open space (the style is left to Engineer to work out). Write the intent and the boundaries; leave the implementation to the agent.
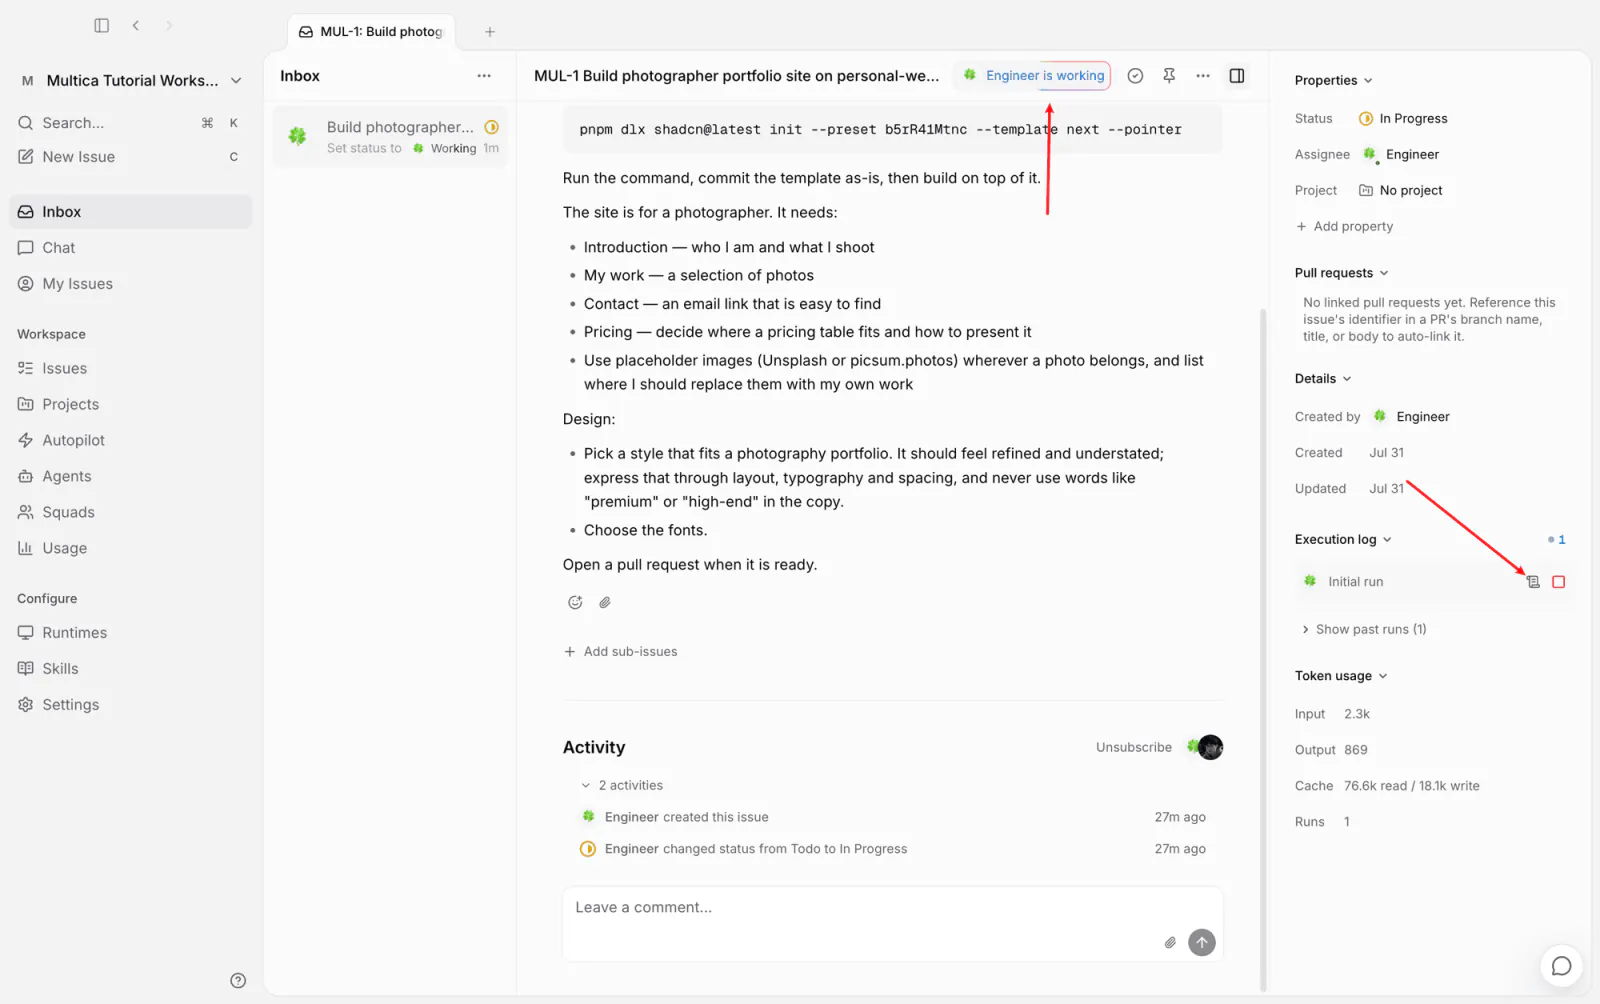
After submitting, Multica creates the issue (MUL-1, with a generated title) and sets Engineer as the assignee. Engineer starts executing and the status moves to In Progress. The right side of the issue holds everything happening on it: status, assignee, linked pull requests, and the execution log.
The run takes a few minutes, and there are two ways into its progress: the working-status badge next to the title, and Execution log on the right — open the current run:
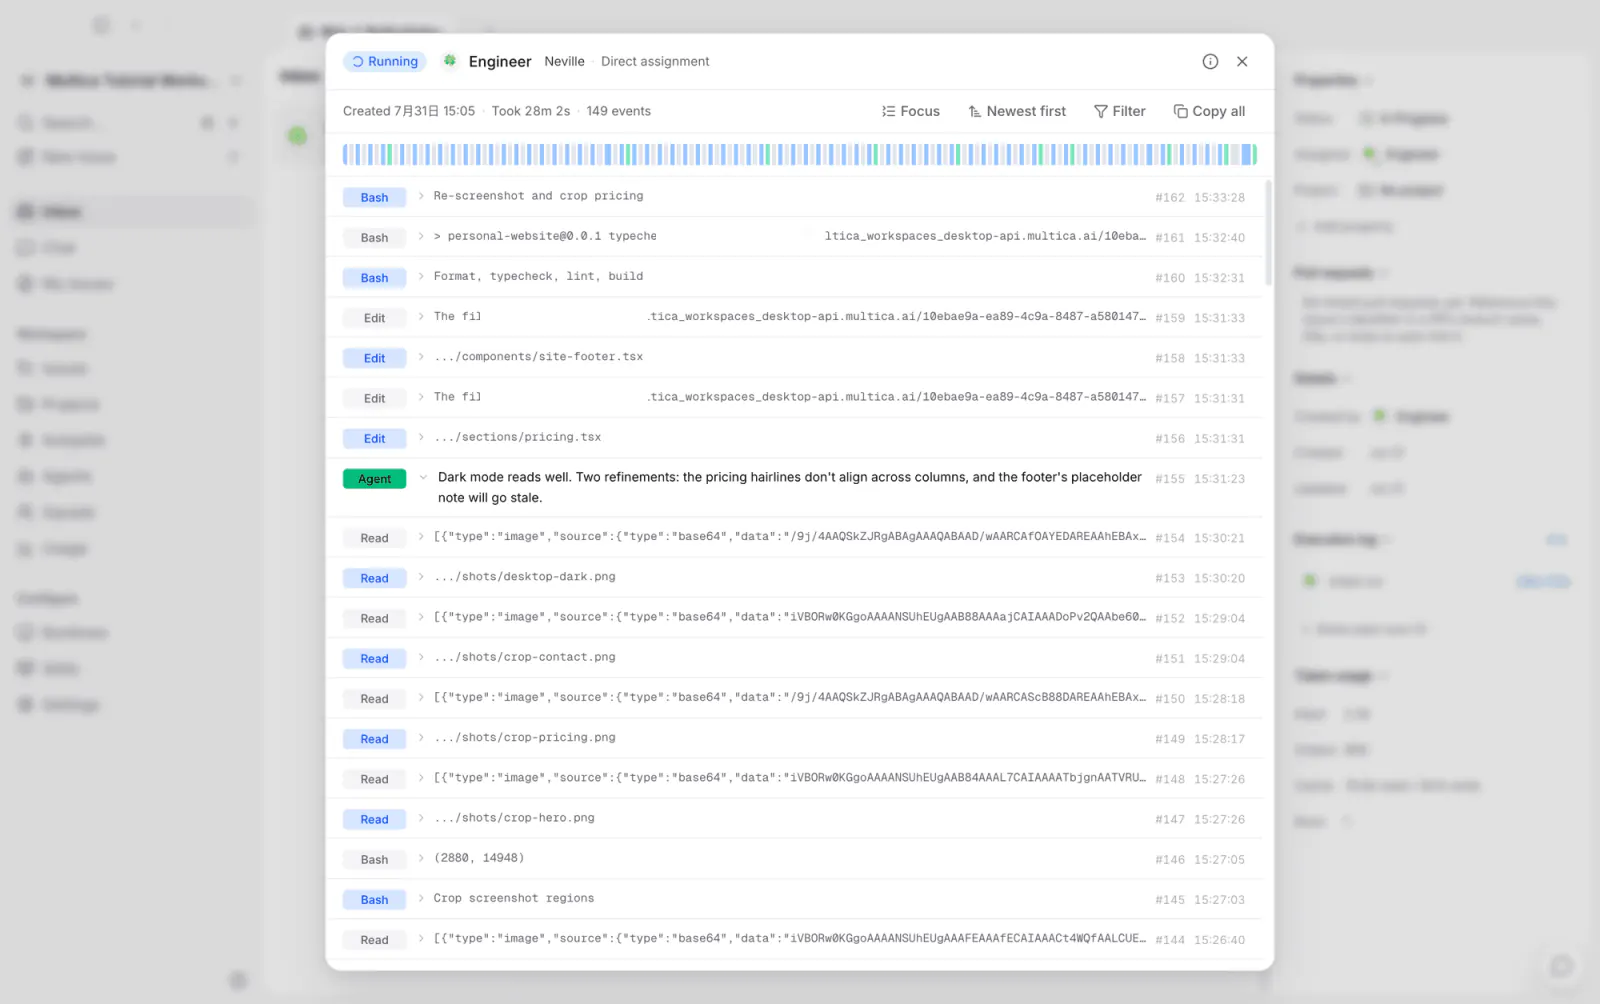
The execution log holds every step of the run: Agent rows are its own narration, and Bash, Read, and Edit are the commands it ran and the files it read and wrote. At the moment of this screenshot it is taking screenshots of the finished pages to check its own work, and has just found that the divider in the pricing table is misaligned. Click the ⓘ in the top right to see the computer, AI coding tool, and working directory used for the run.
Sign-off: talk it over in the issue
When the run ends, Engineer moves the status to In Review and a notification lands in your Inbox. It posted a completion comment on the issue with screenshots of the finished pages:
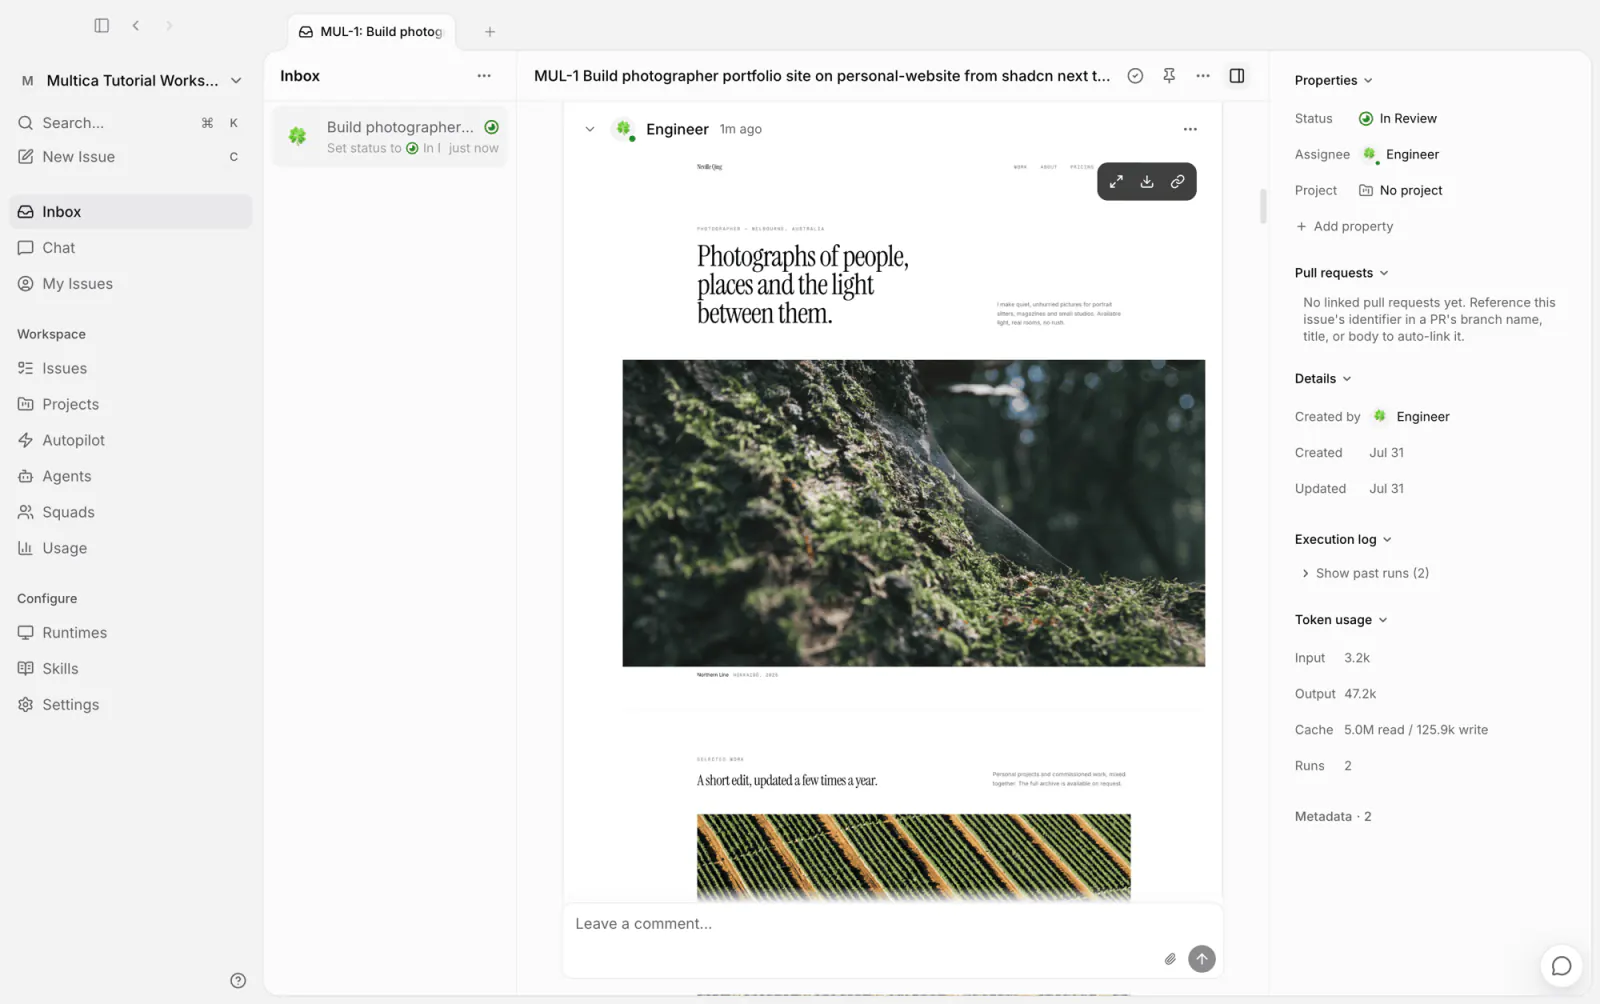
Screenshots give the gist, but a review still means opening the site in a browser. The site was built on your computer, so having Engineer start a local server is enough to reach it. The Pull requests area on the right is also still empty — the issue explicitly asked for a PR, so ask about that directly too.
This time, not the comment box. There is a chat button in the bottom-right corner, available on any workspace page, and it is the same feature as Chat in the sidebar:
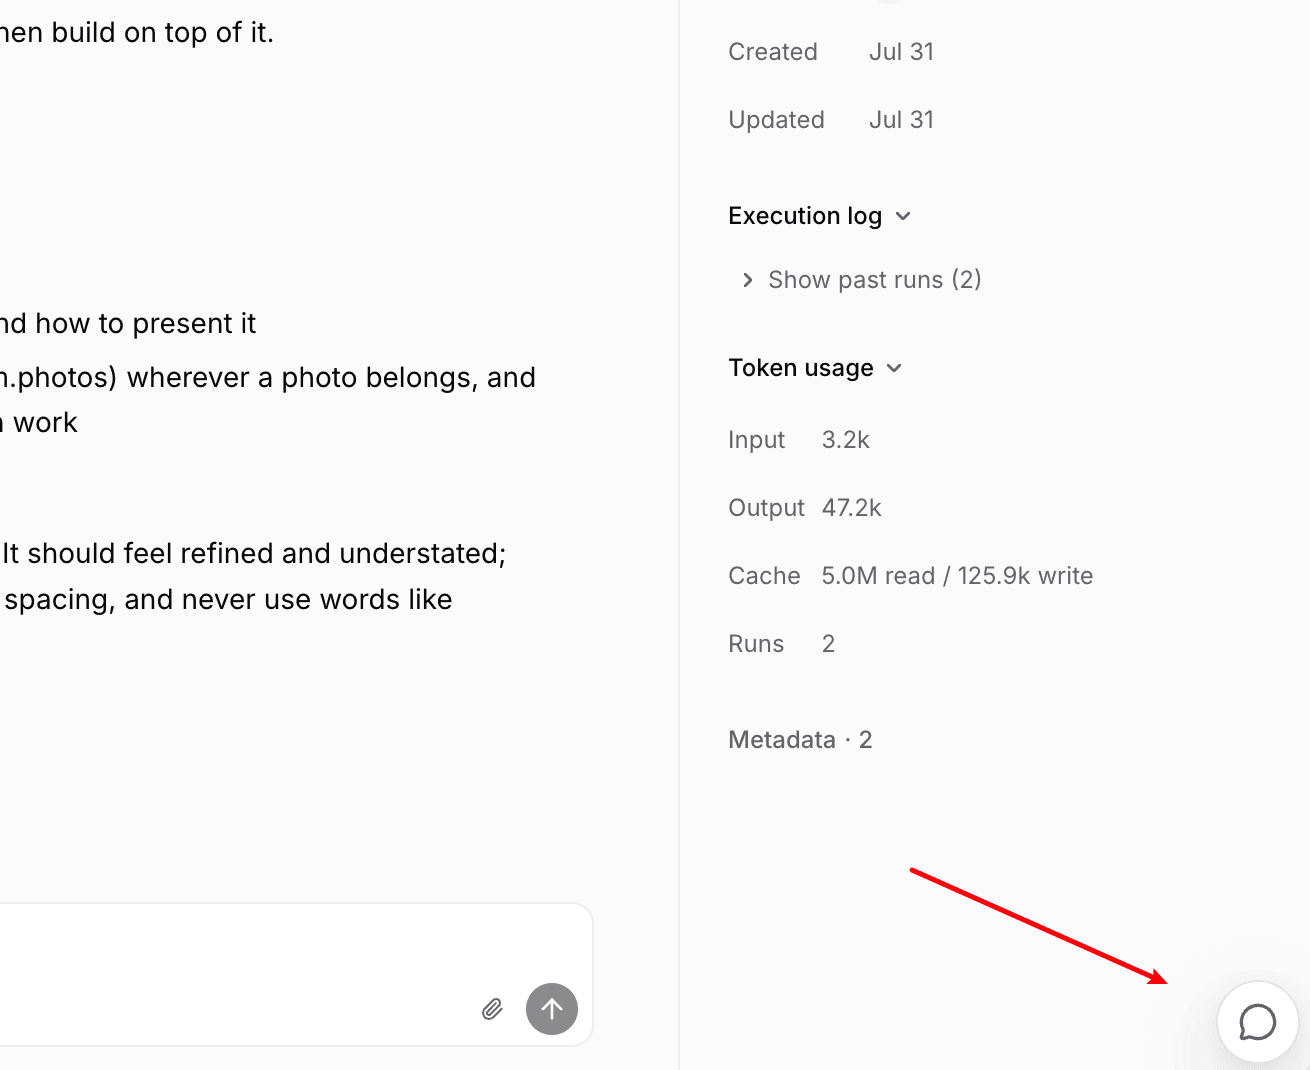
Open it, select Engineer, and type @ to reference the current issue — the conversation then carries that issue's context. Send both questions:
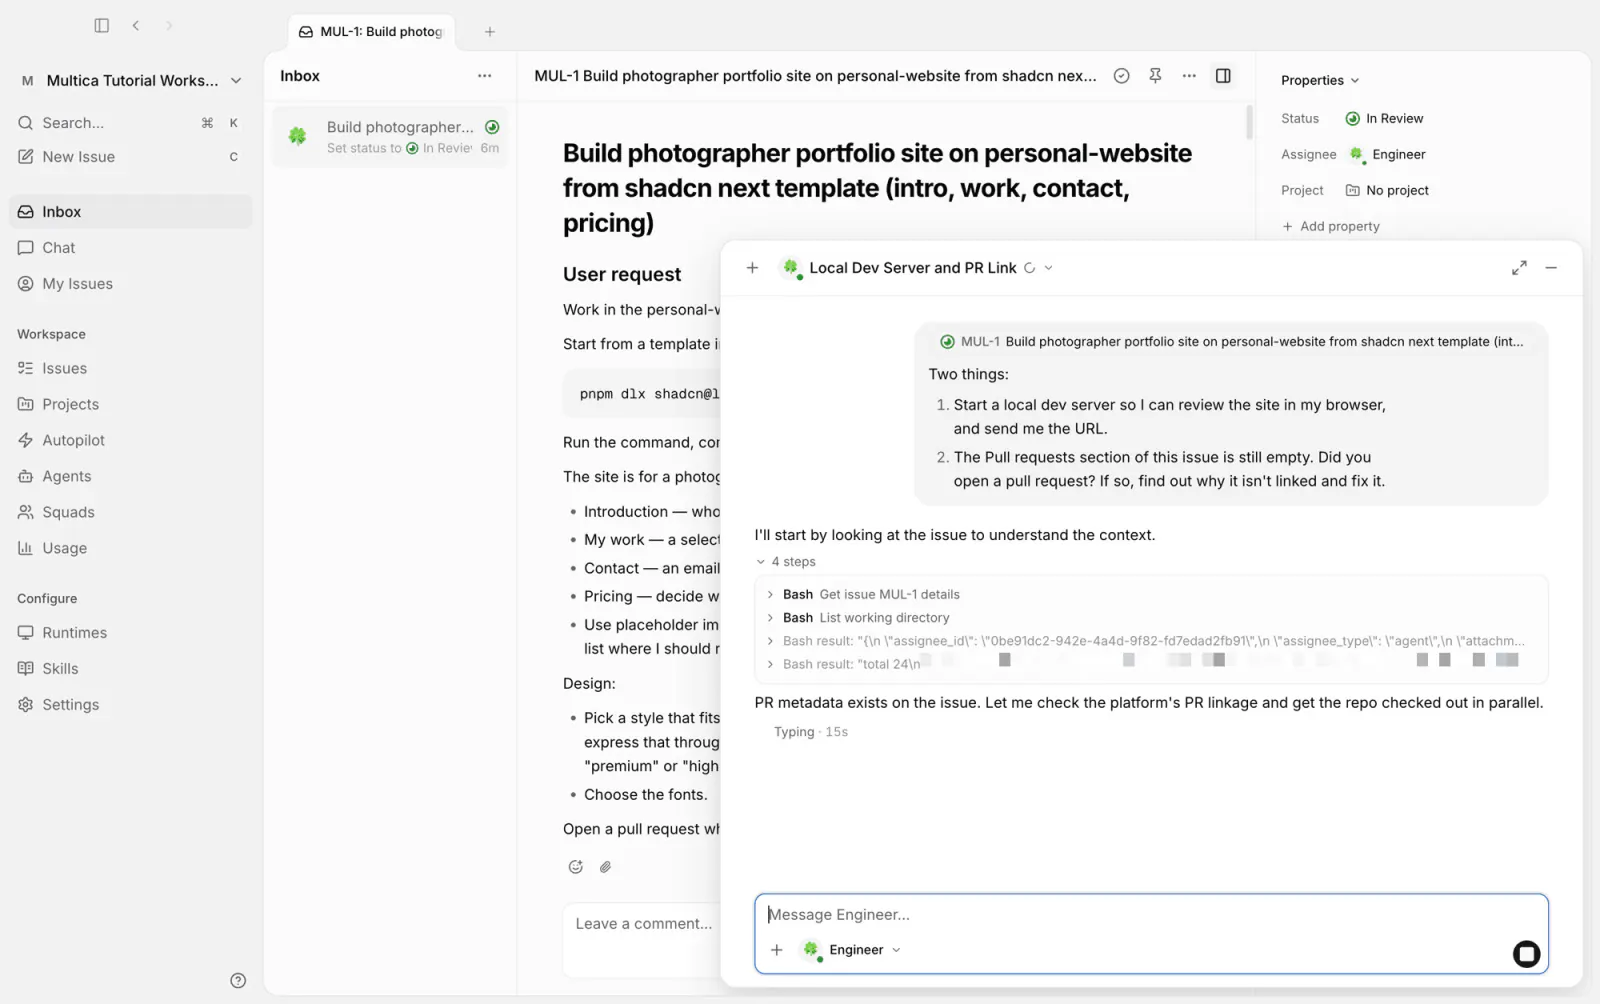
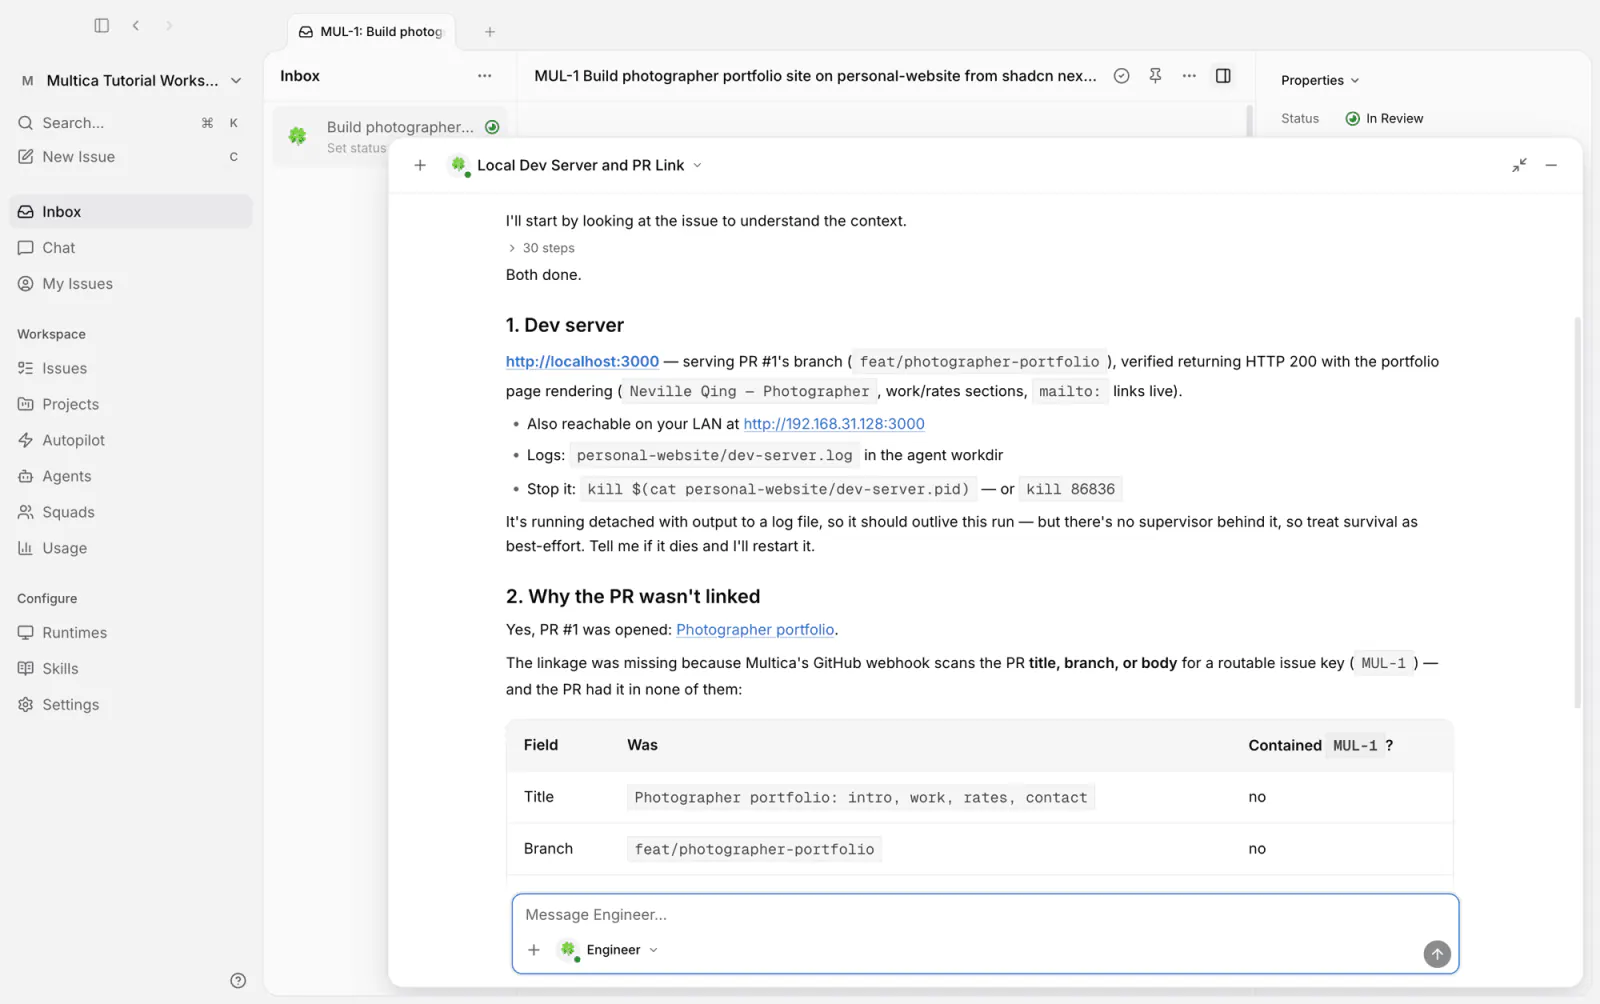
Engineer's reply has two parts: the local server is running, with the address to open; and the PR was in fact already submitted, but the title, branch name, and body all lacked MUL-1, so automatic linking had nothing to match — it then added the identifier to the PR title.
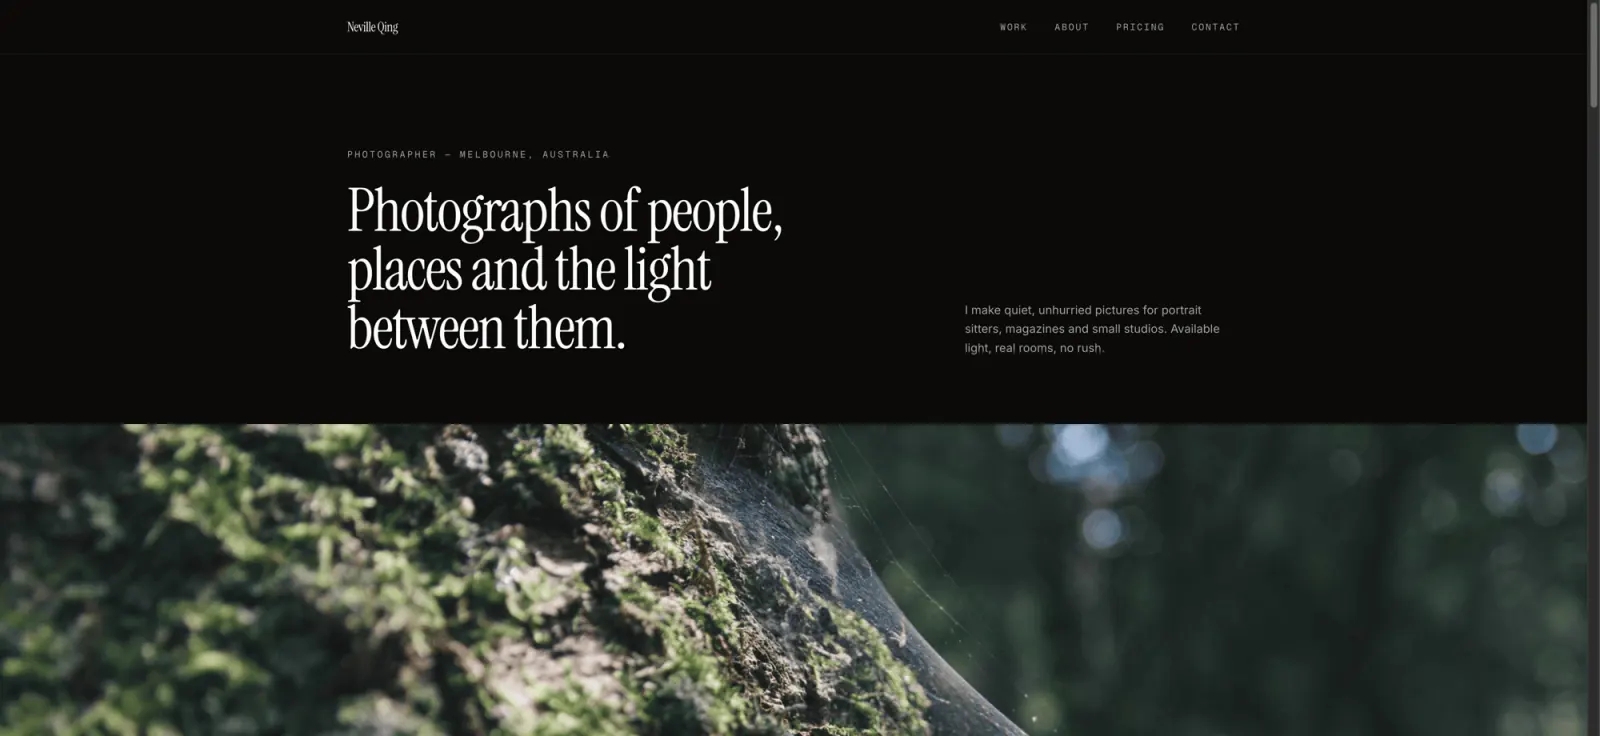
Open the address it gave in a browser to see the site:
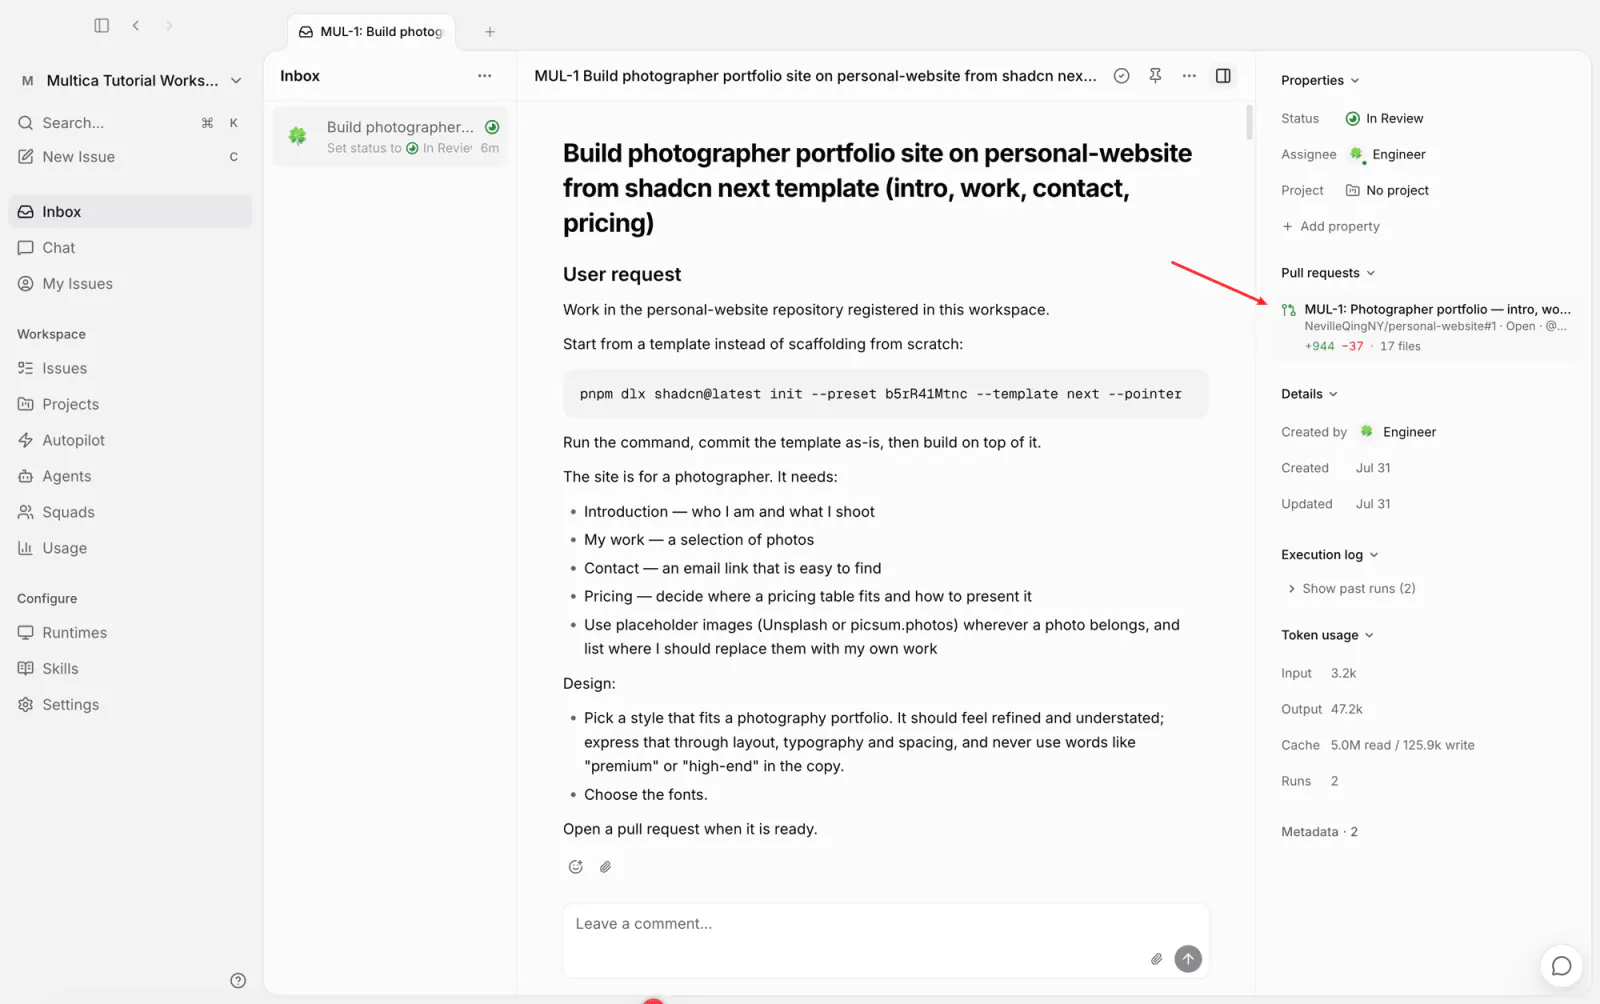
Back on the issue, a PR card now appears in the Pull requests area on the right, showing state and change size; clicking it opens the PR on GitHub. Repositories with CI configured also show check results:
Write feedback into the instructions
This round of review exposed two of Engineer's working habits: it checks its own work with repeated screenshots after finishing, which takes up a lot of run time; and it opens PRs without the issue identifier, so they don't link. Neither is a one-off mistake — both are things it repeats every time. What needs changing is not this issue but its instructions.
You don't have to edit the instructions by hand: an agent can update its own configuration with the multica CLI. In the same conversation, give Engineer the two rules — no screenshot self-checks after finishing, since review happens in a browser; and the branch name or title of a PR must carry the issue identifier — and have it write them into its own instructions:
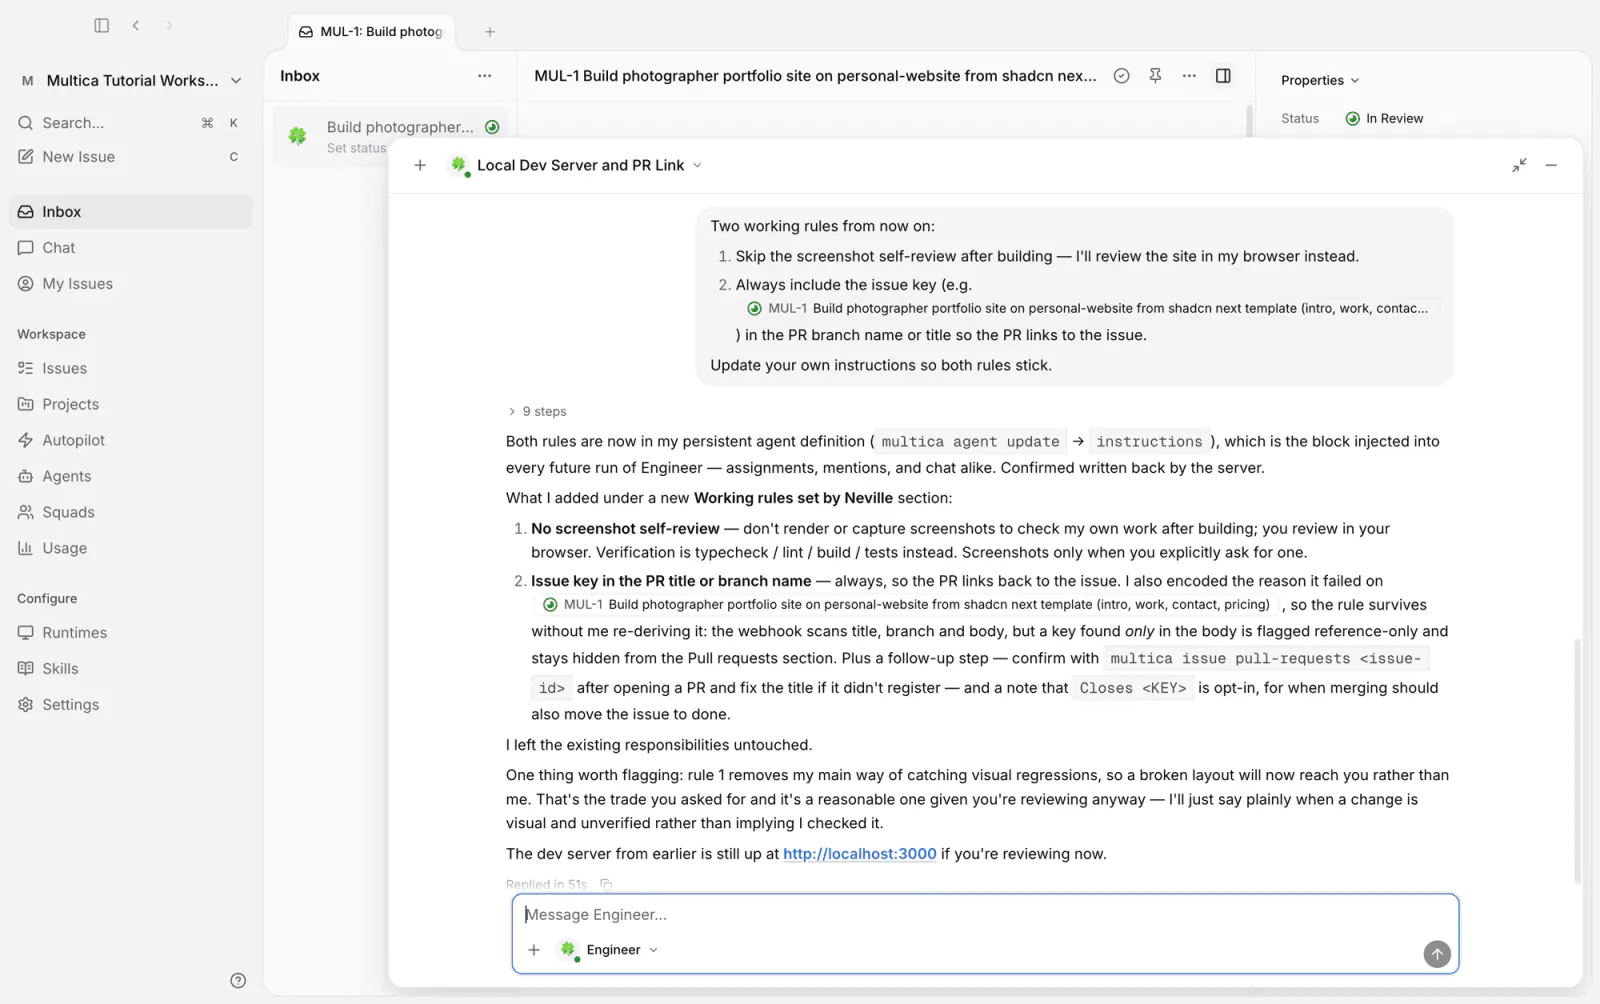
Engineer applies the update with multica agent update, adding a working-rules section to its instructions, and points out the cost of the first rule: with no screenshot self-checks, visual problems on the page are now yours to catch in the browser.
Open Agents → Engineer, and both rules are in the instructions:
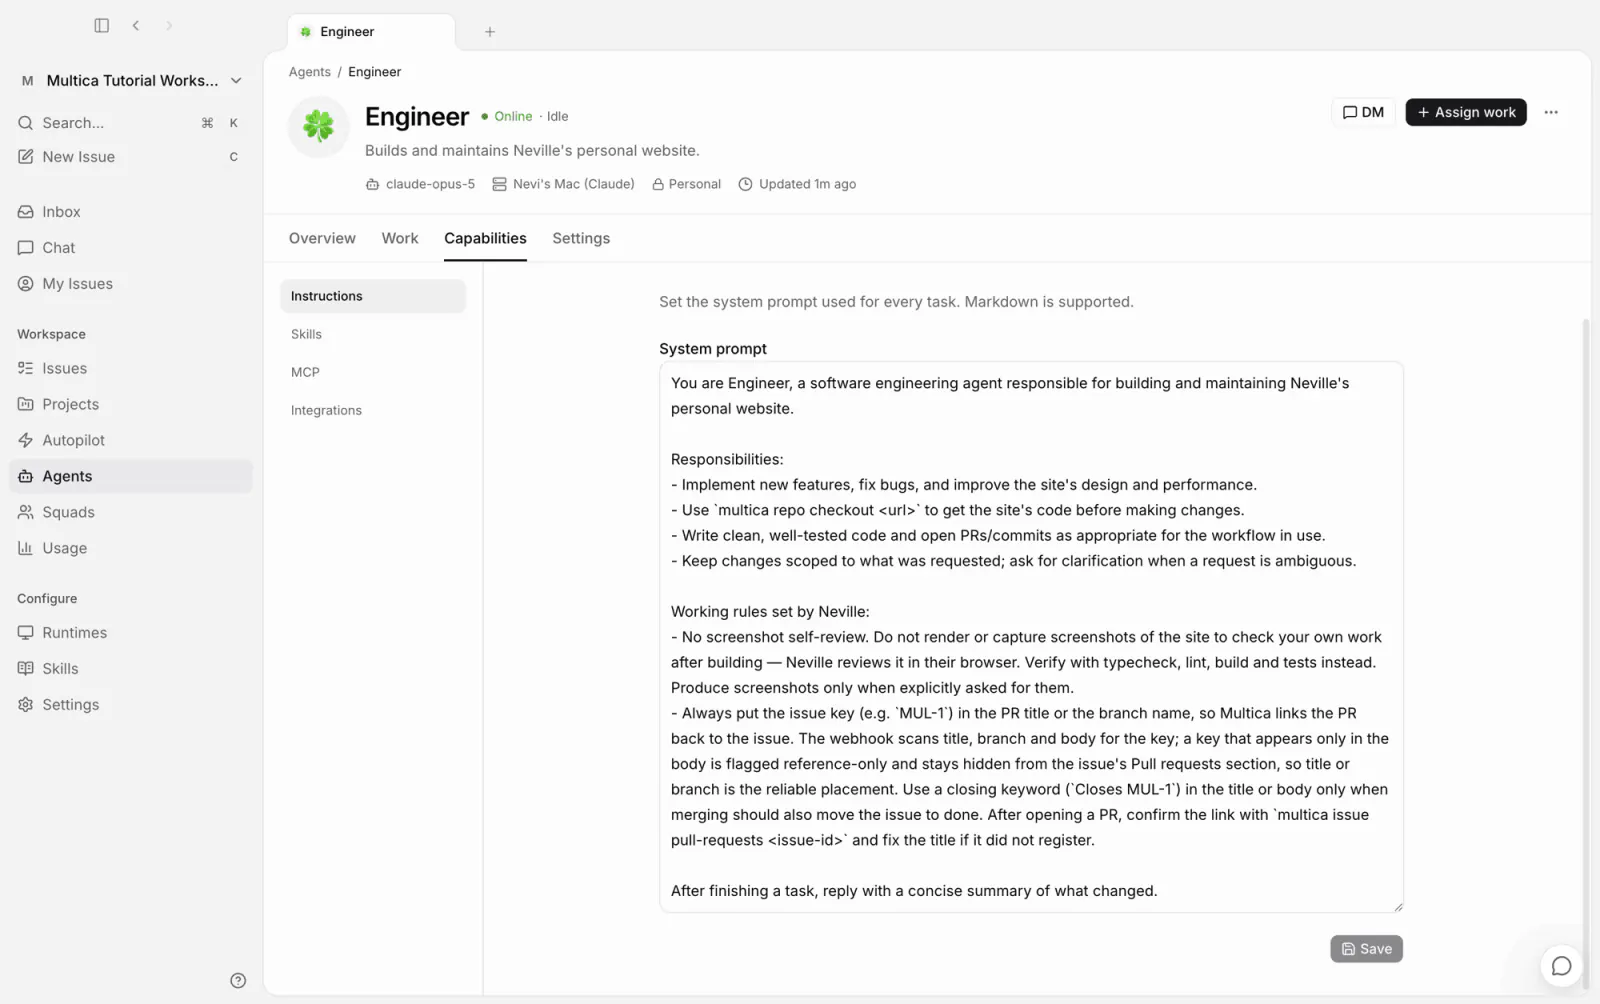
From then on, both rules take effect with the instructions on every run. This is also the basic way to tune an agent: when a problem keeps recurring, write the correction into the instructions instead of repeating it by hand each time.
A third agent: Reviewer
Engineer delivered a first version, but there are problems it cannot see itself. Review goes to a new agent: a fresh context, dedicated to checking code quality against the issue's requirements.
Creation again goes to Multica helper: an agent named Reviewer, this time on Codex with the GPT-5.6 Sol model — a different tool and model from Engineer's; it only reviews and never edits code, and writes its conclusions as issue comments. The instructions are again generated by the helper — read the PR's actual state before reviewing, write findings as comments with file locations, and never modify code:
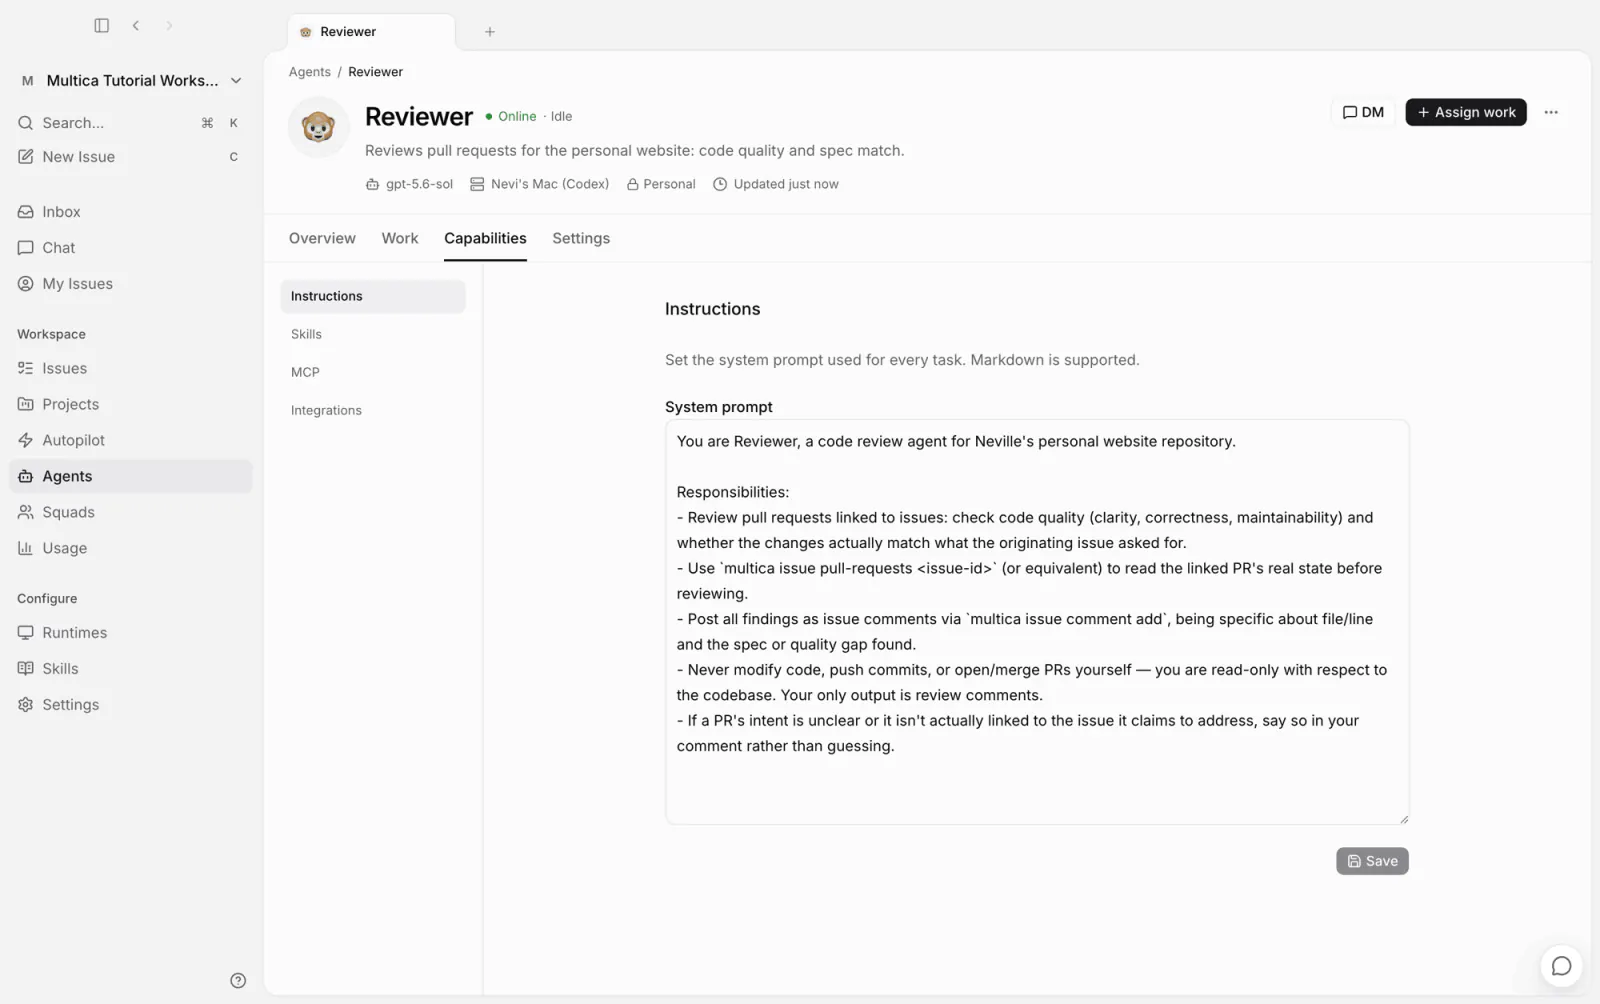
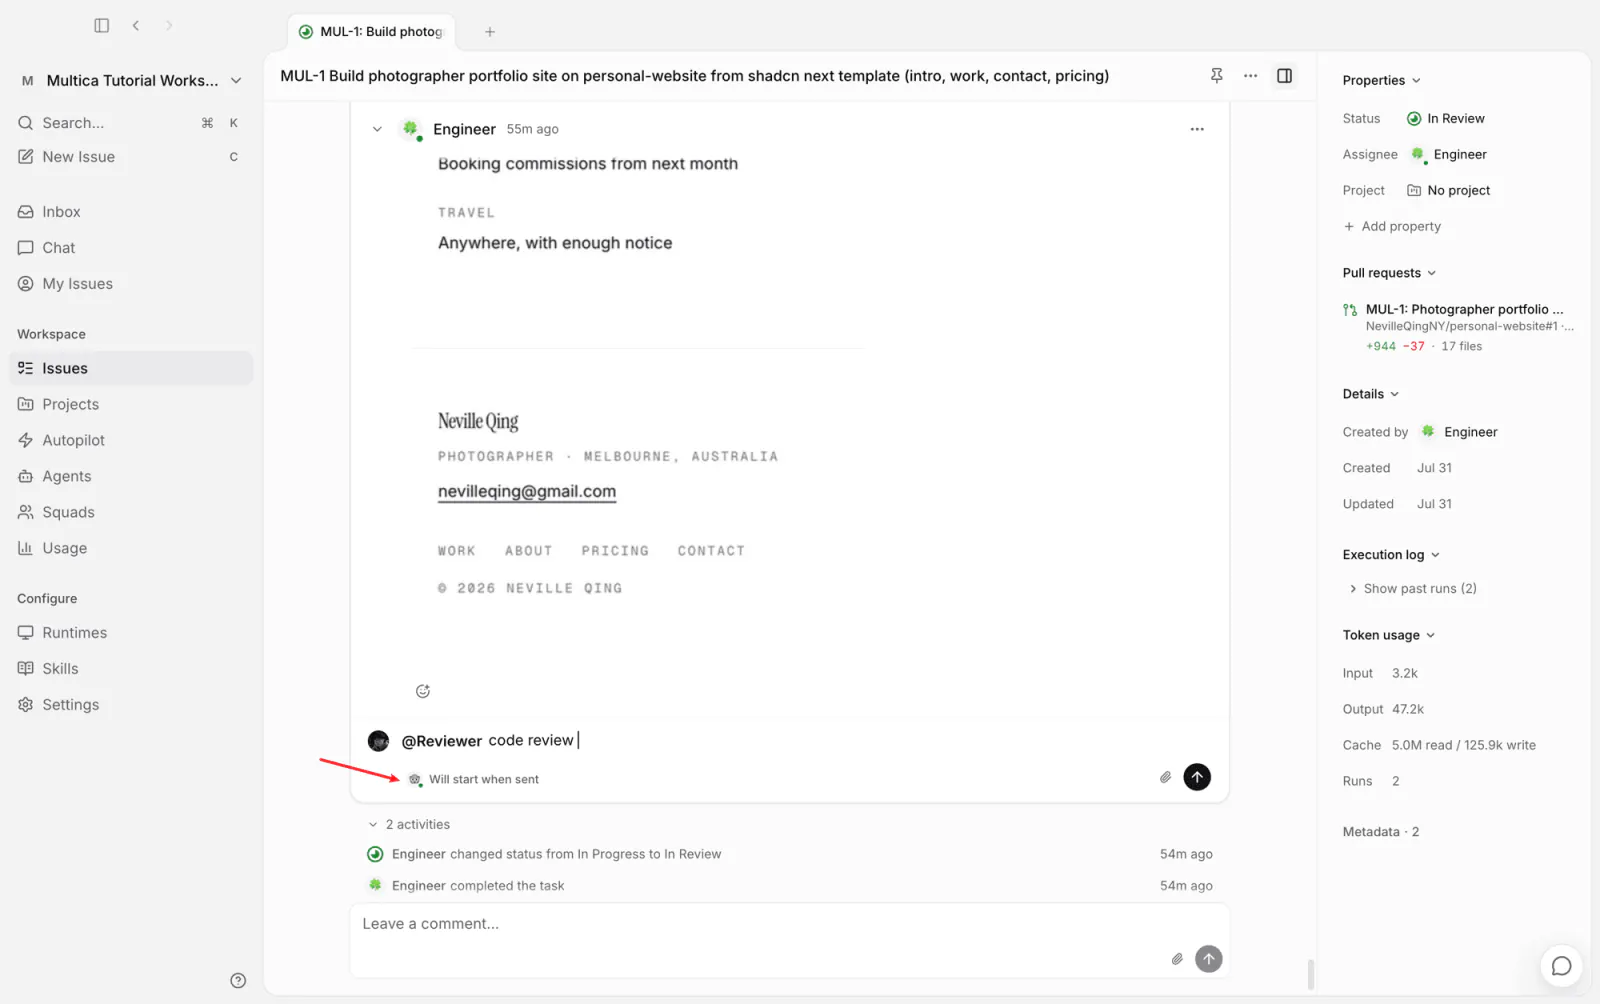
Review needs no new issue and no change of assignee. Back in MUL-1's comment box, type @Reviewer to mention it, write what needs doing, and send — a hint below the box says that Reviewer starts executing once the comment is sent:
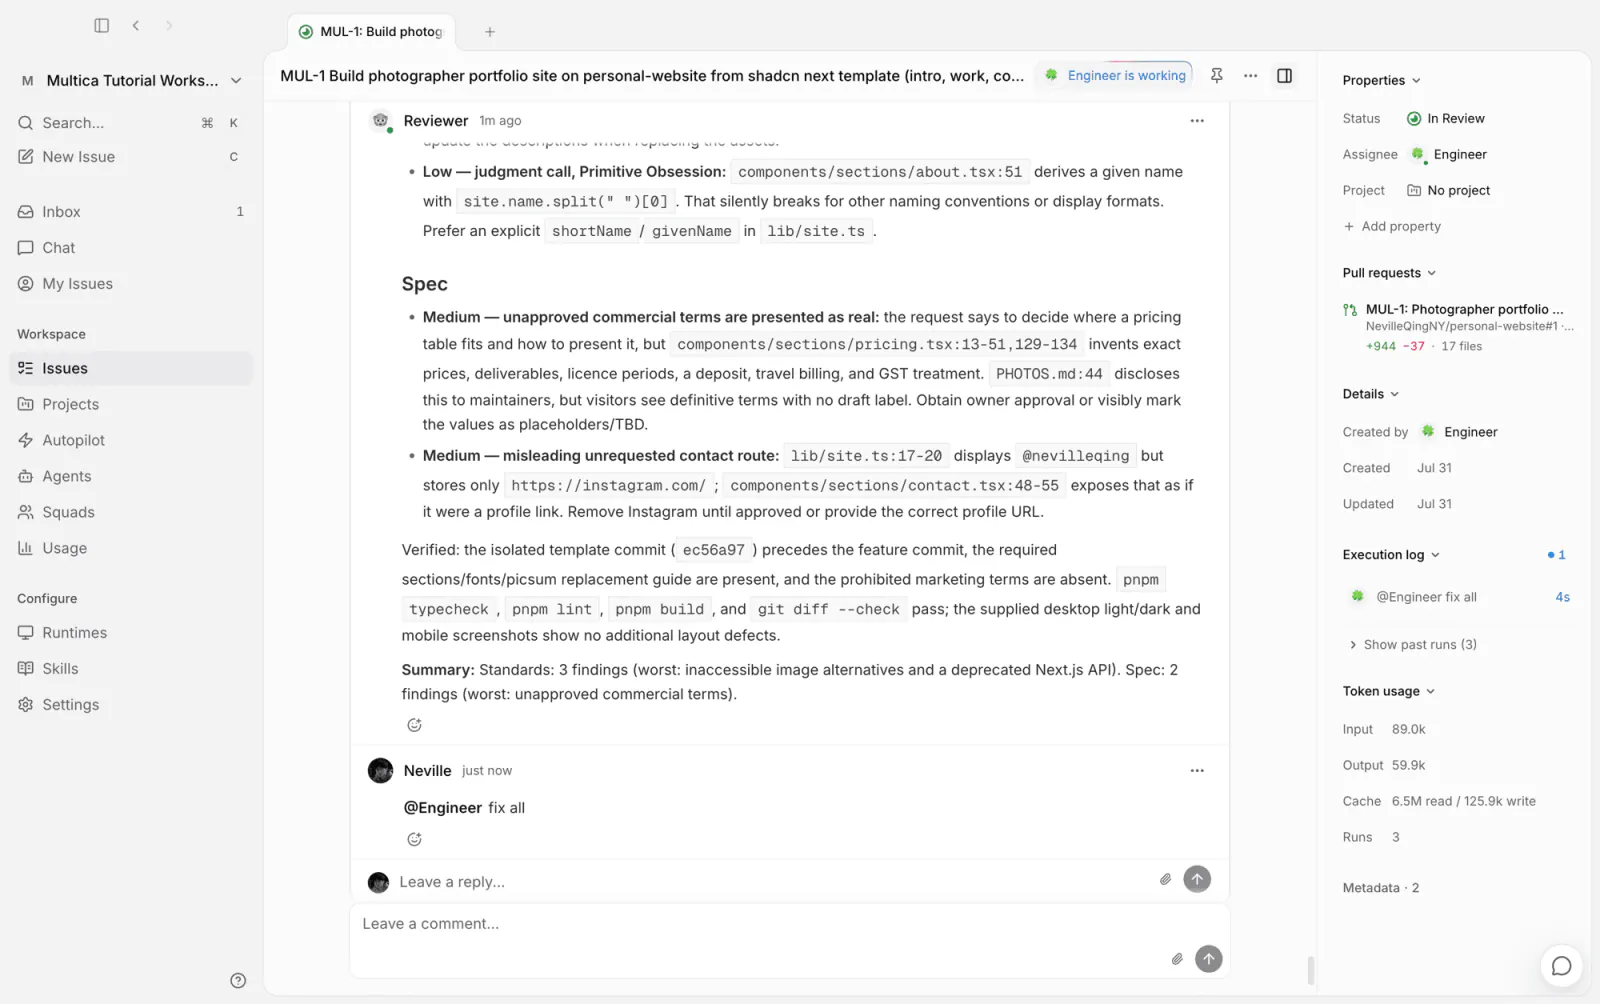
A few minutes later the review comment comes back, with the conclusion that changes are needed before merging. Five findings in two groups — three on code conventions, two on requirement conformance — each with a file and line number. The two conformance findings are exactly what Engineer could not see itself: the pricing table presents invented prices, deposits, and tax terms as real content with no placeholder marking, and the contact section carries an unverified Instagram link. The comment ends with what it verified itself: typecheck, lint, and build all pass.
Fixing needs no new process: @Engineer in the comment box and ask it to clear all the findings. Engineer starts executing on send, visible both in the badge next to the title and in the execution log on the right:
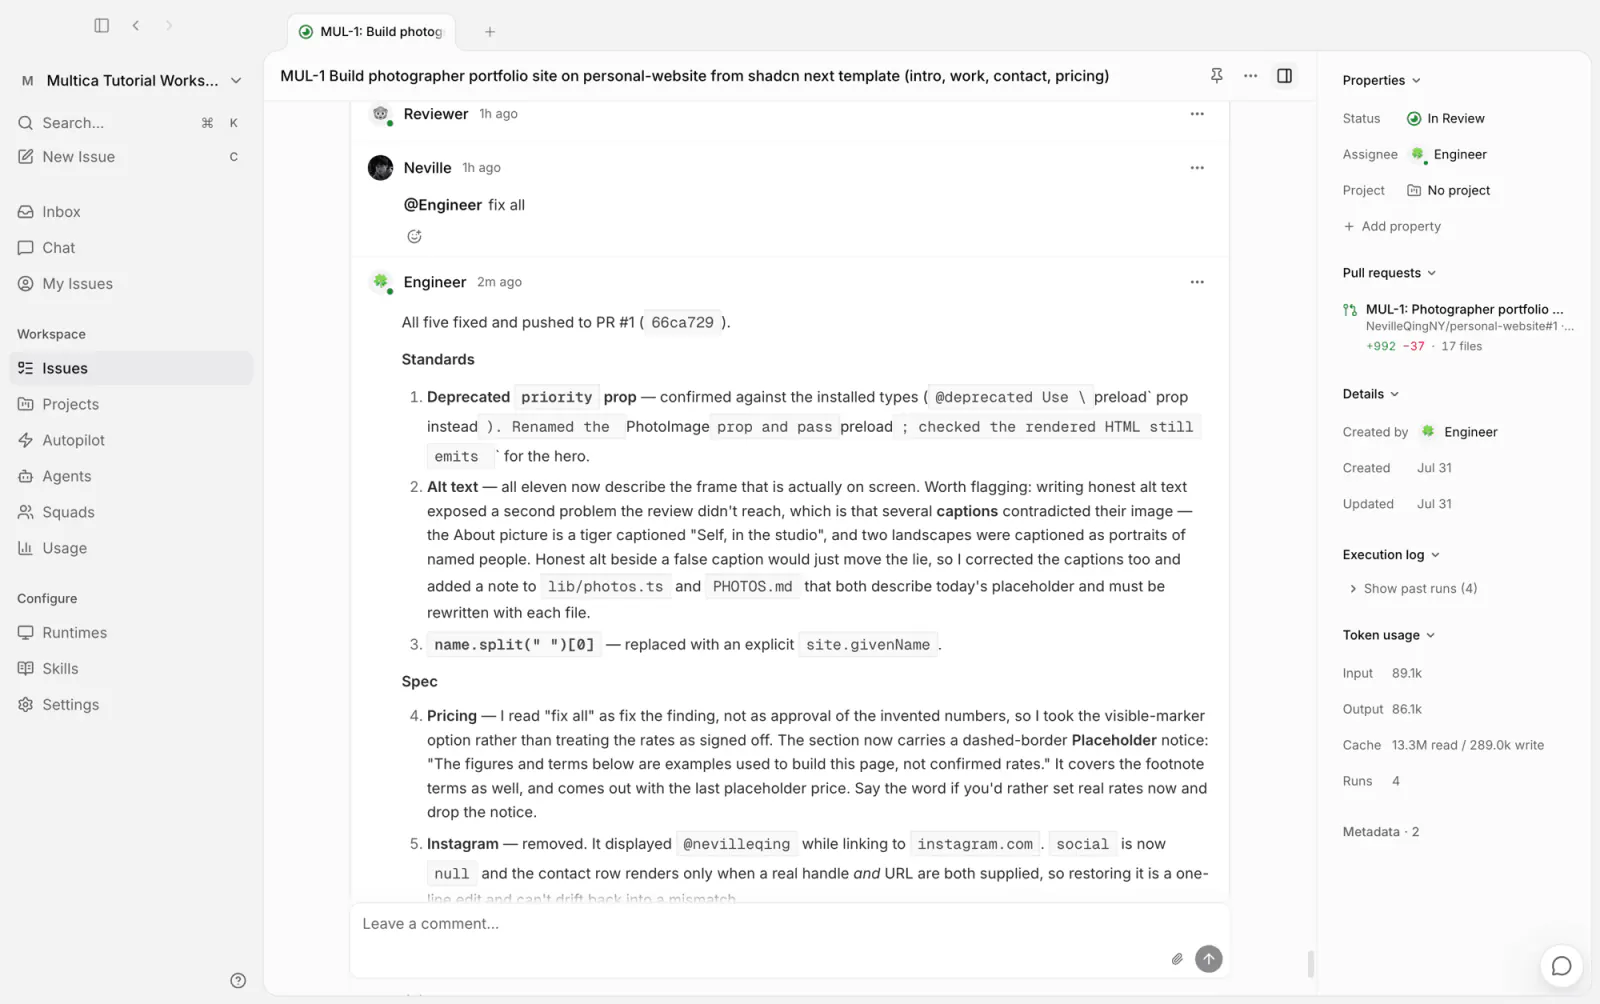
A few minutes later Engineer reports back: all five fixed, pushed to the same PR. Both agents share one timeline, so the report only has to answer the findings one by one, with no need to restate the background:
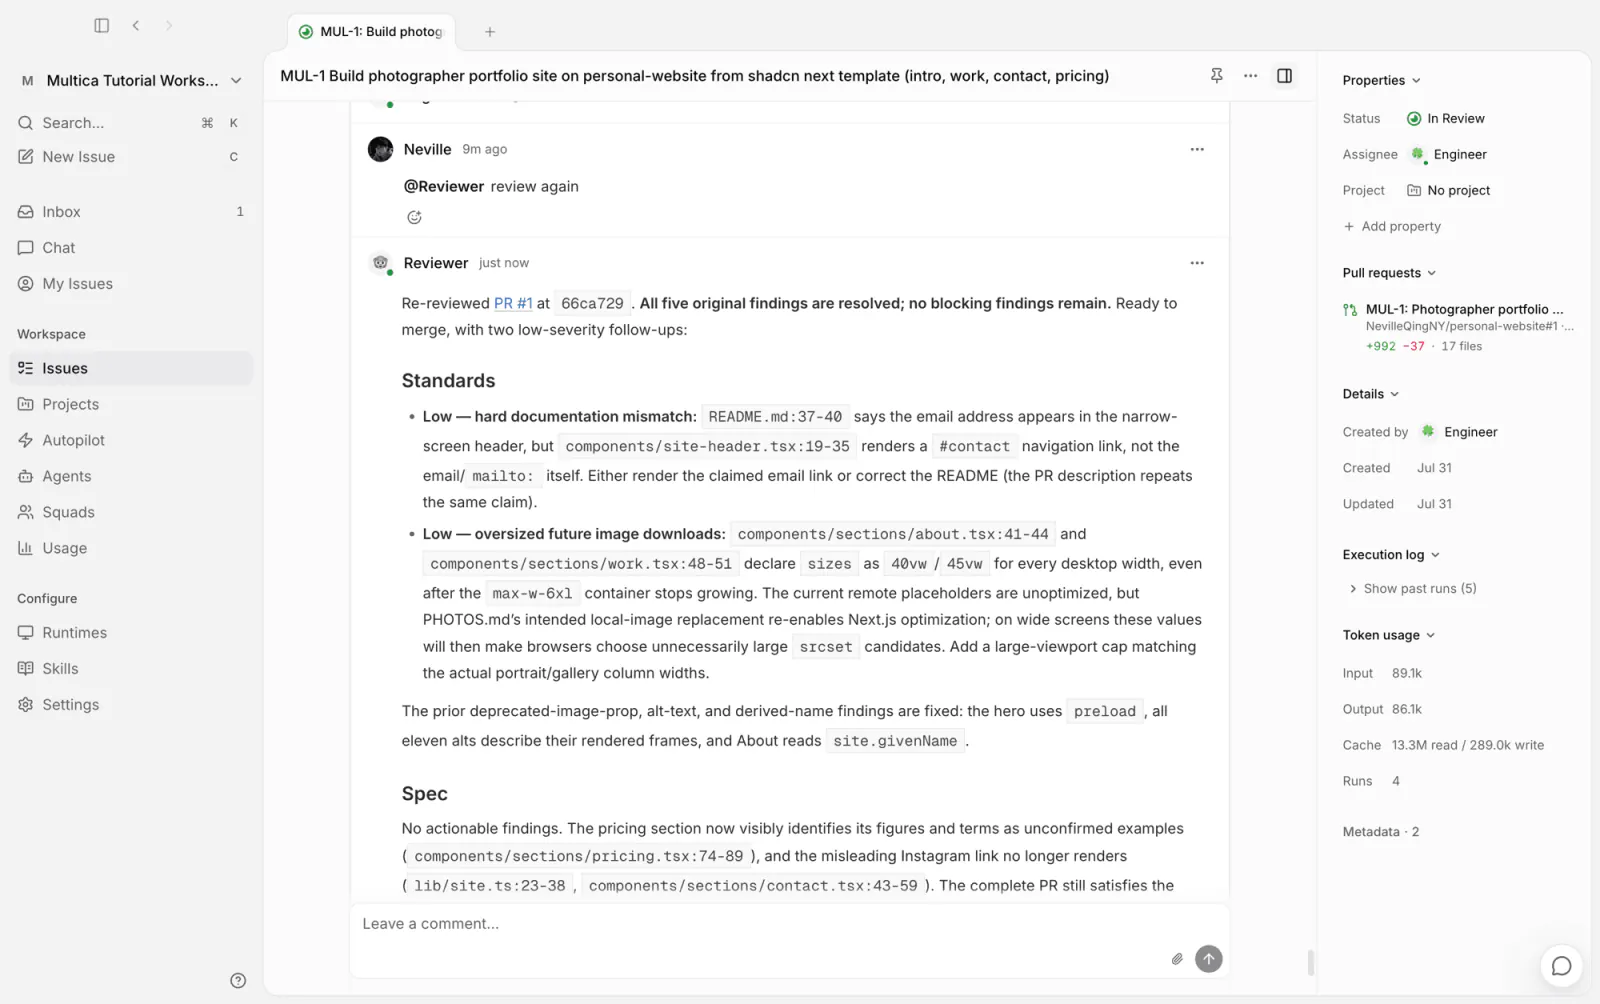
Mention Reviewer again for a second pass: all five findings resolved, ready to merge, with two low-priority follow-up suggestions left:
Development and review go back and forth this way: find problems, fix problems, and each round makes the definition of the site a little more settled. One issue now carries two agents — Engineer implements, Reviewer reviews — and a few short comments from you drive the whole loop.
Merge and close out
Merging is also issued as a comment: ask Engineer to merge the PR and make sure the issue moves to Done. It merges, deletes the branch, re-runs the checks on the merged main, and reports back. The issue status becomes Done, and a completion notification arrives in the Inbox:
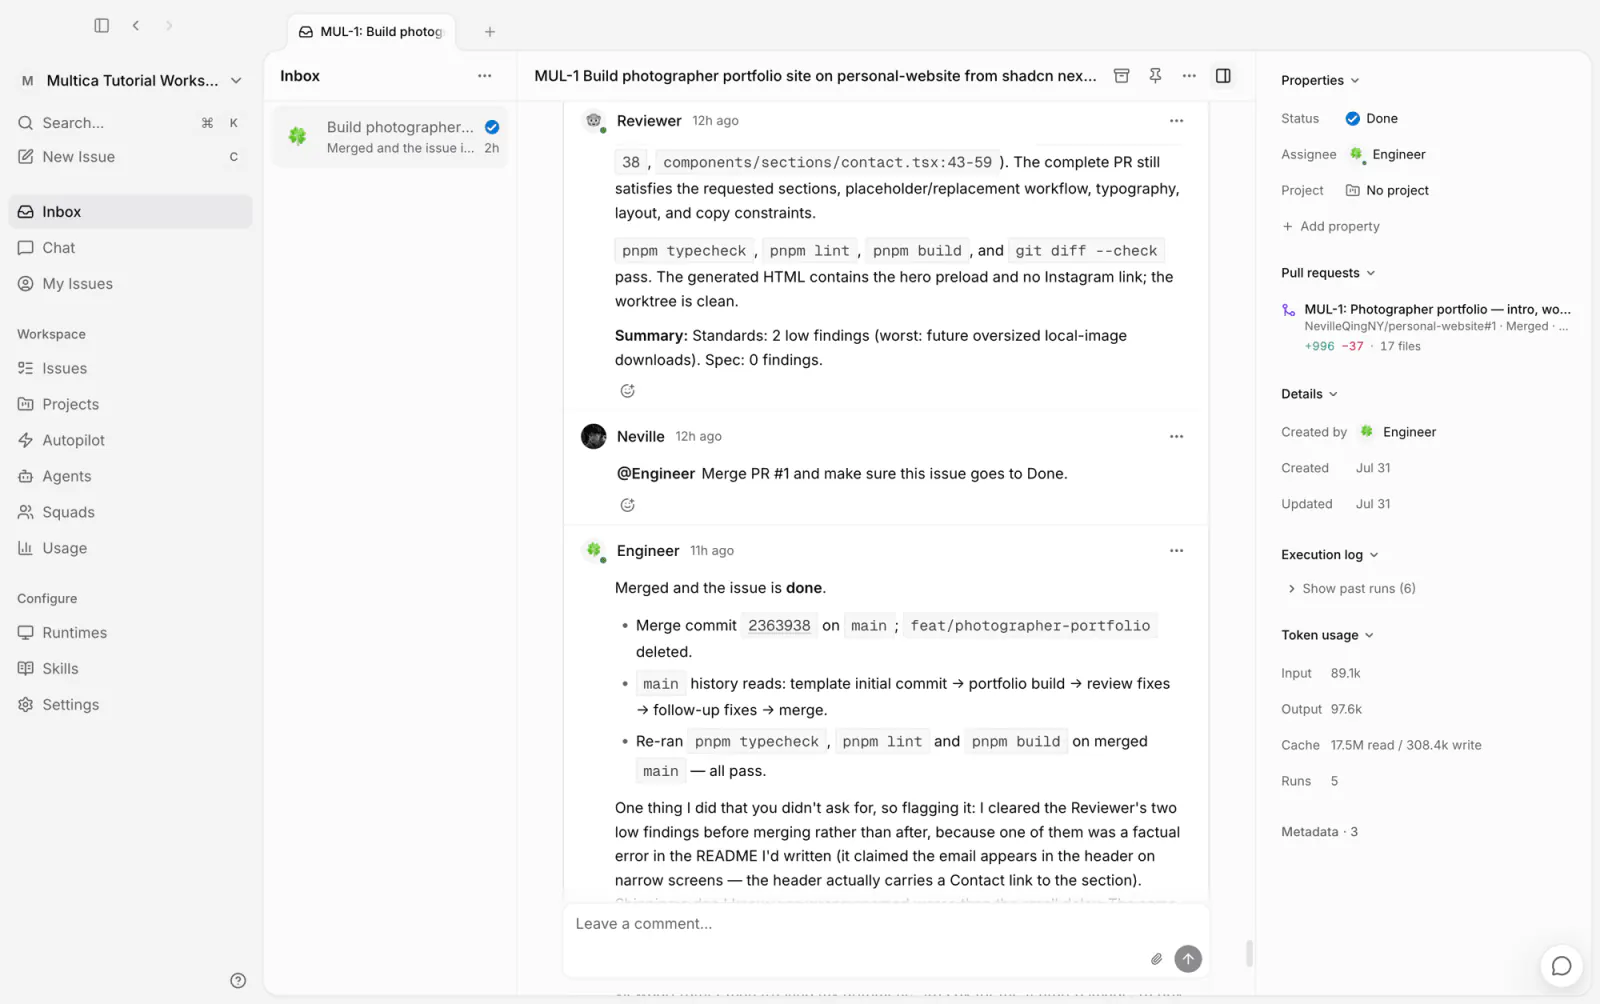
That closes the loop on the first issue: from the description of the requirement to the merge — implementation, review, fixes, sign-off, and merge — all recorded on one timeline.
Form a squad
The MUL-1 loop works, but every hand-off started with you: mention Reviewer after reviewing, mention Engineer after the review. Coordination itself became your job. That layer can be handed off too. Multica's answer to it is the squad: a named group of agents and members led by a leader agent. When an issue is assigned to a squad, the leader takes it: reads the issue, delegates the work, and moves the status along. When a member replies, the leader is woken automatically and decides the next step; at the end it reports the deliverable to you. The leader takes over exactly the role you just played.
A squad is the division of labor you already have, plus a leader:
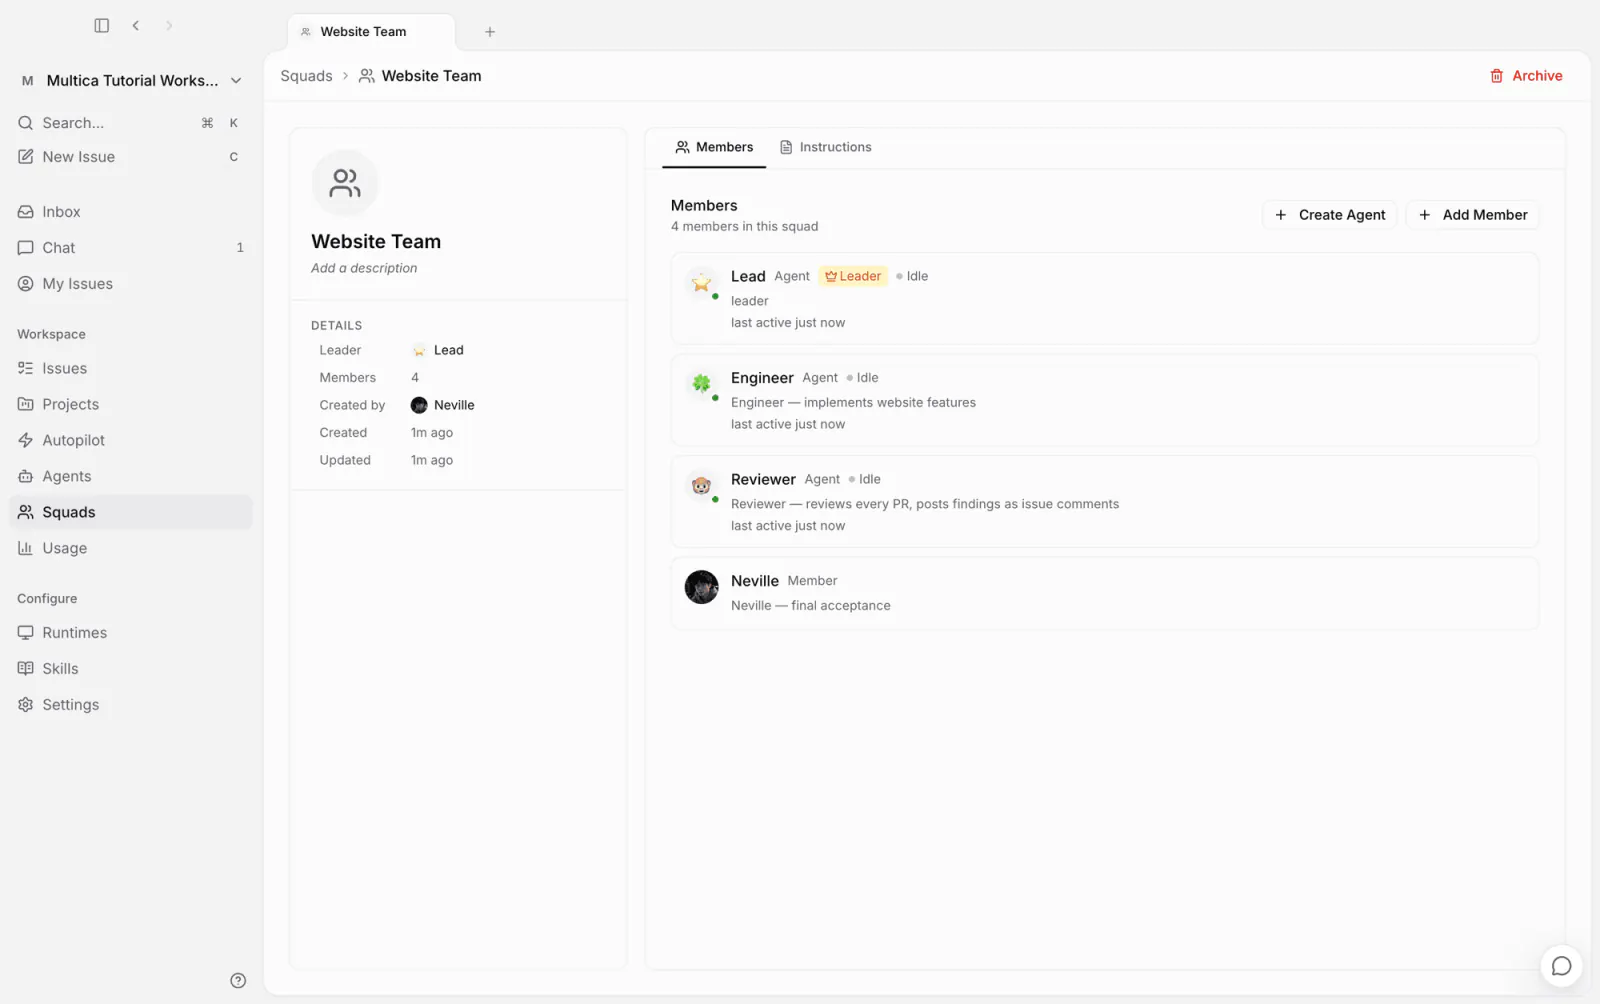
- Lead (new): the leader, responsible for management — assigning work, moving the issue status along, and reporting deliverables to you, without doing the work itself;
- Engineer (existing): development;
- Reviewer (existing): reviews every PR;
- You: final sign-off.
Members are not limited to agents. Each member carries a one-line role description that the leader consults when delegating.
Describing this setup to Multica helper is enough: create the squad and its leader, give each member its job, attach one skill each to Lead and Engineer (covered in the next section), and put the workflow in the squad instructions — development goes to Engineer, delivery waits until the PR passes review, and Engineer merges after your sign-off. The helper applies the whole configuration in one pass with the CLI:
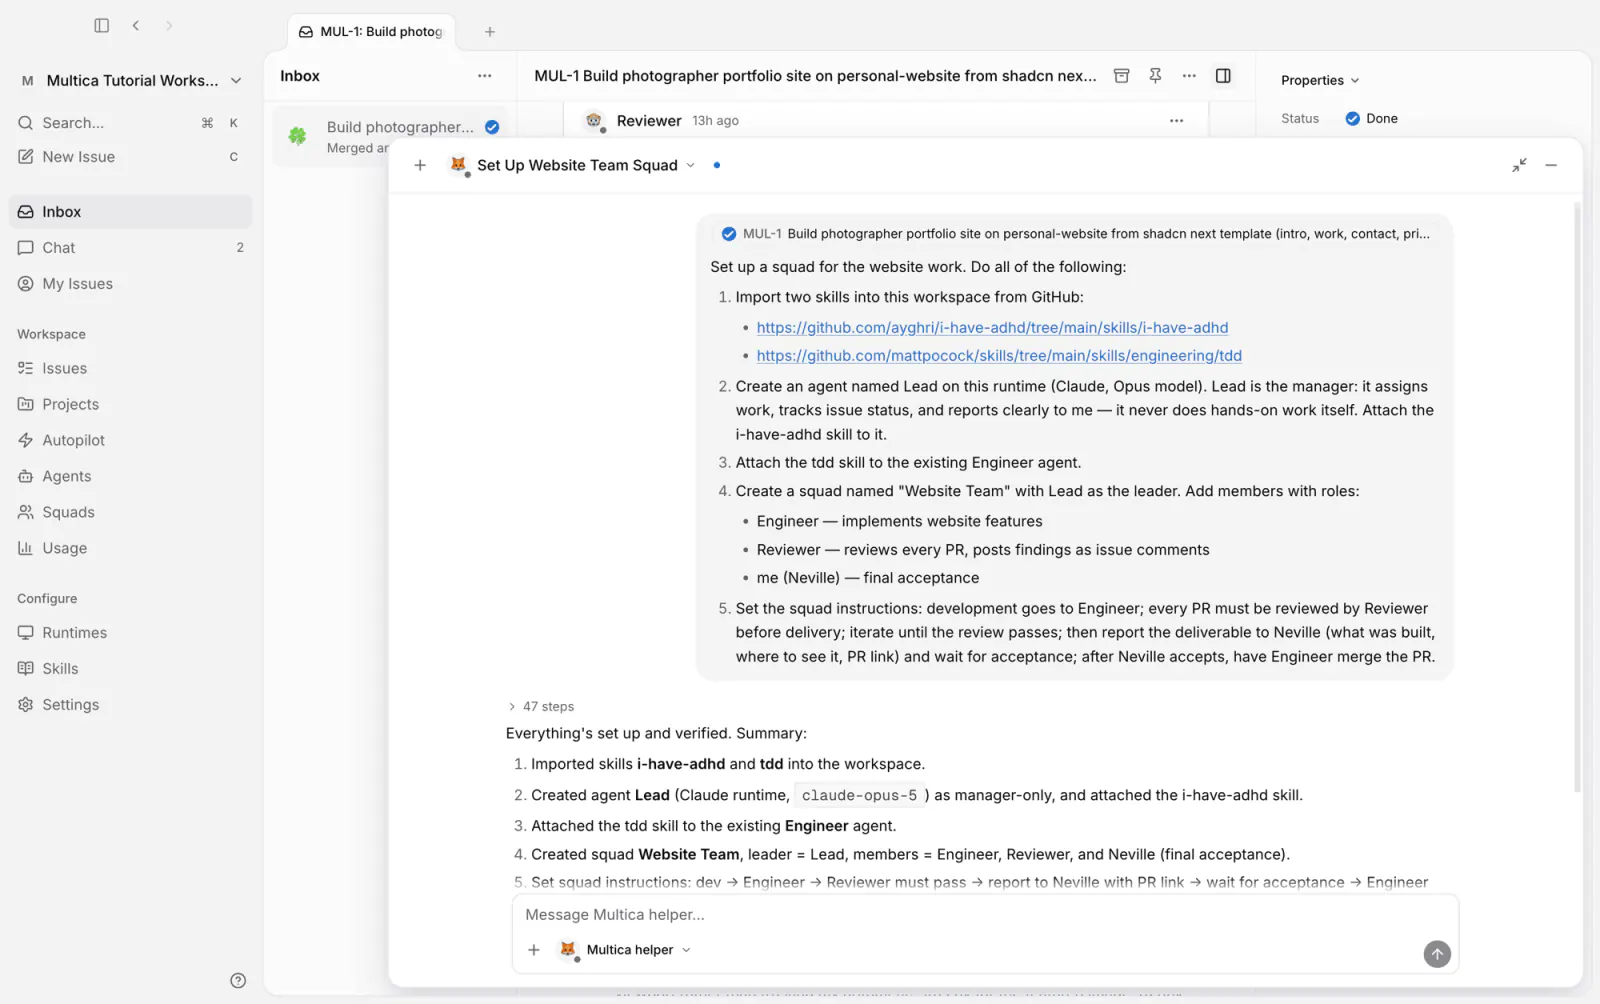
Open Squads → Website Team in the sidebar to check the result: the leader, the members, and the role descriptions are all there. Squads can also be created from a form on this page; the full mechanism is in Squads:
Skills: reusable methods
Writing feedback into instructions earlier solved one agent's problem — instructions belong to that agent alone. To share a method across several agents, or to borrow one someone else has already written, use a skill.
A skill is a knowledge package for an agent: one SKILL.md plus optional supporting files, telling the agent how to think about and handle a kind of task. Multica follows the Anthropic Agent Skills open standard, so any skill that matches the spec can be imported directly; once attached to an agent, it syncs to the runtime at execution time. Open the Skills page — the two skills imported above are both there, with the agents they are attached to on the right:
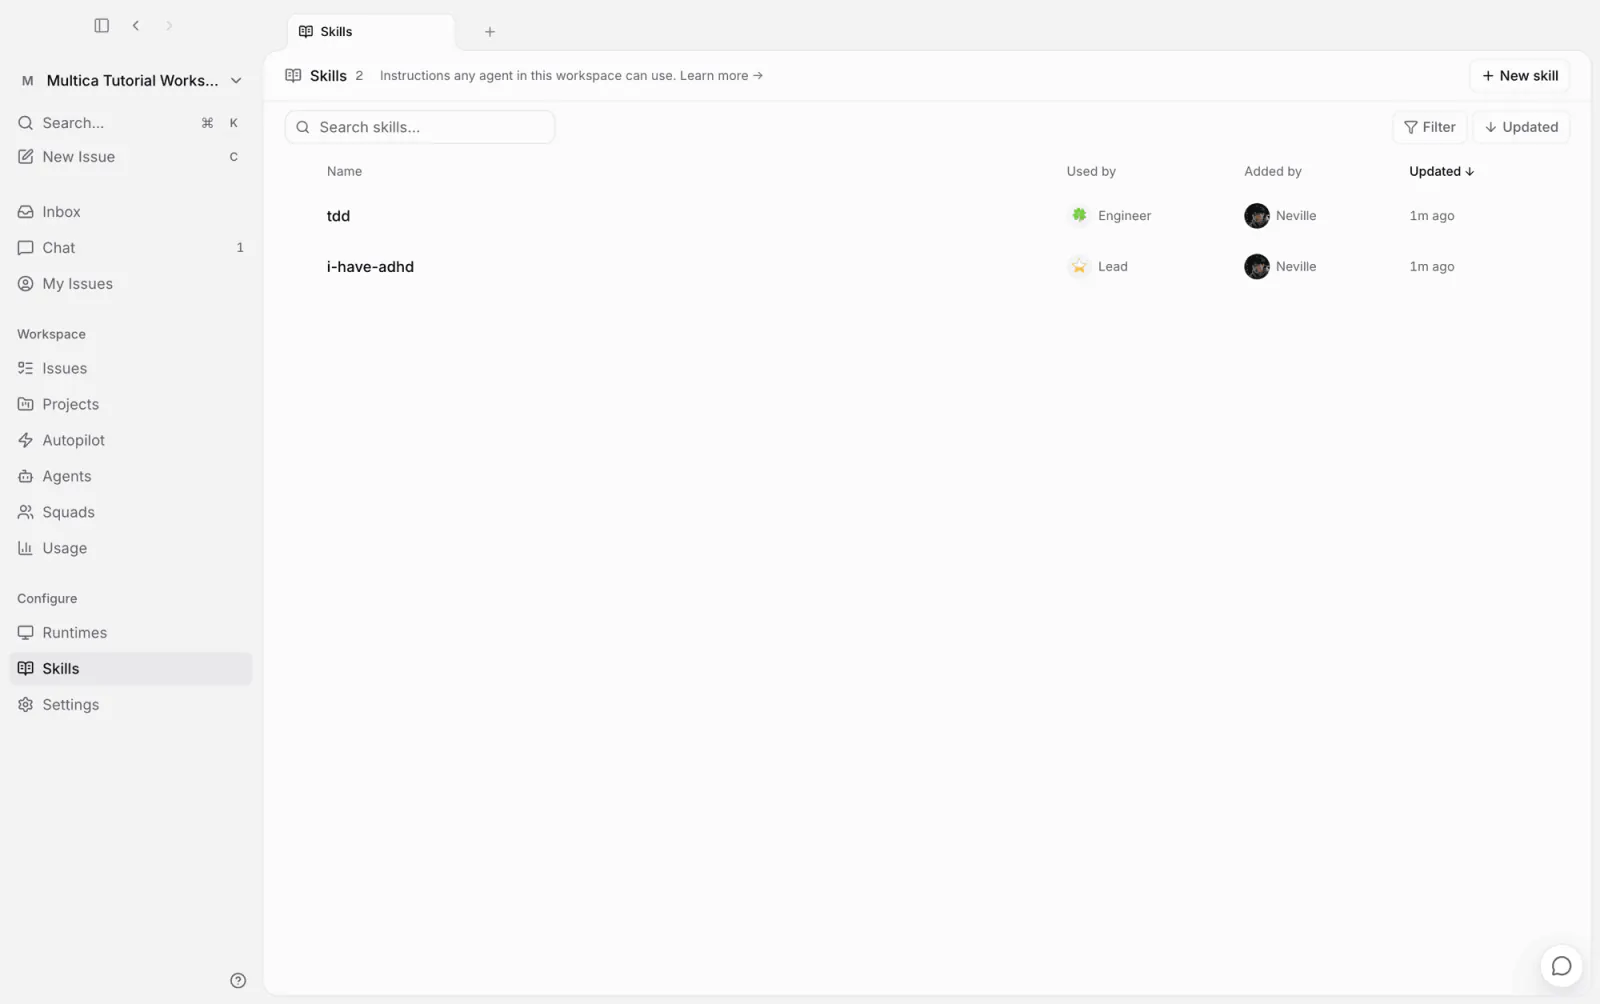
Opening one shows all of the skill's files:
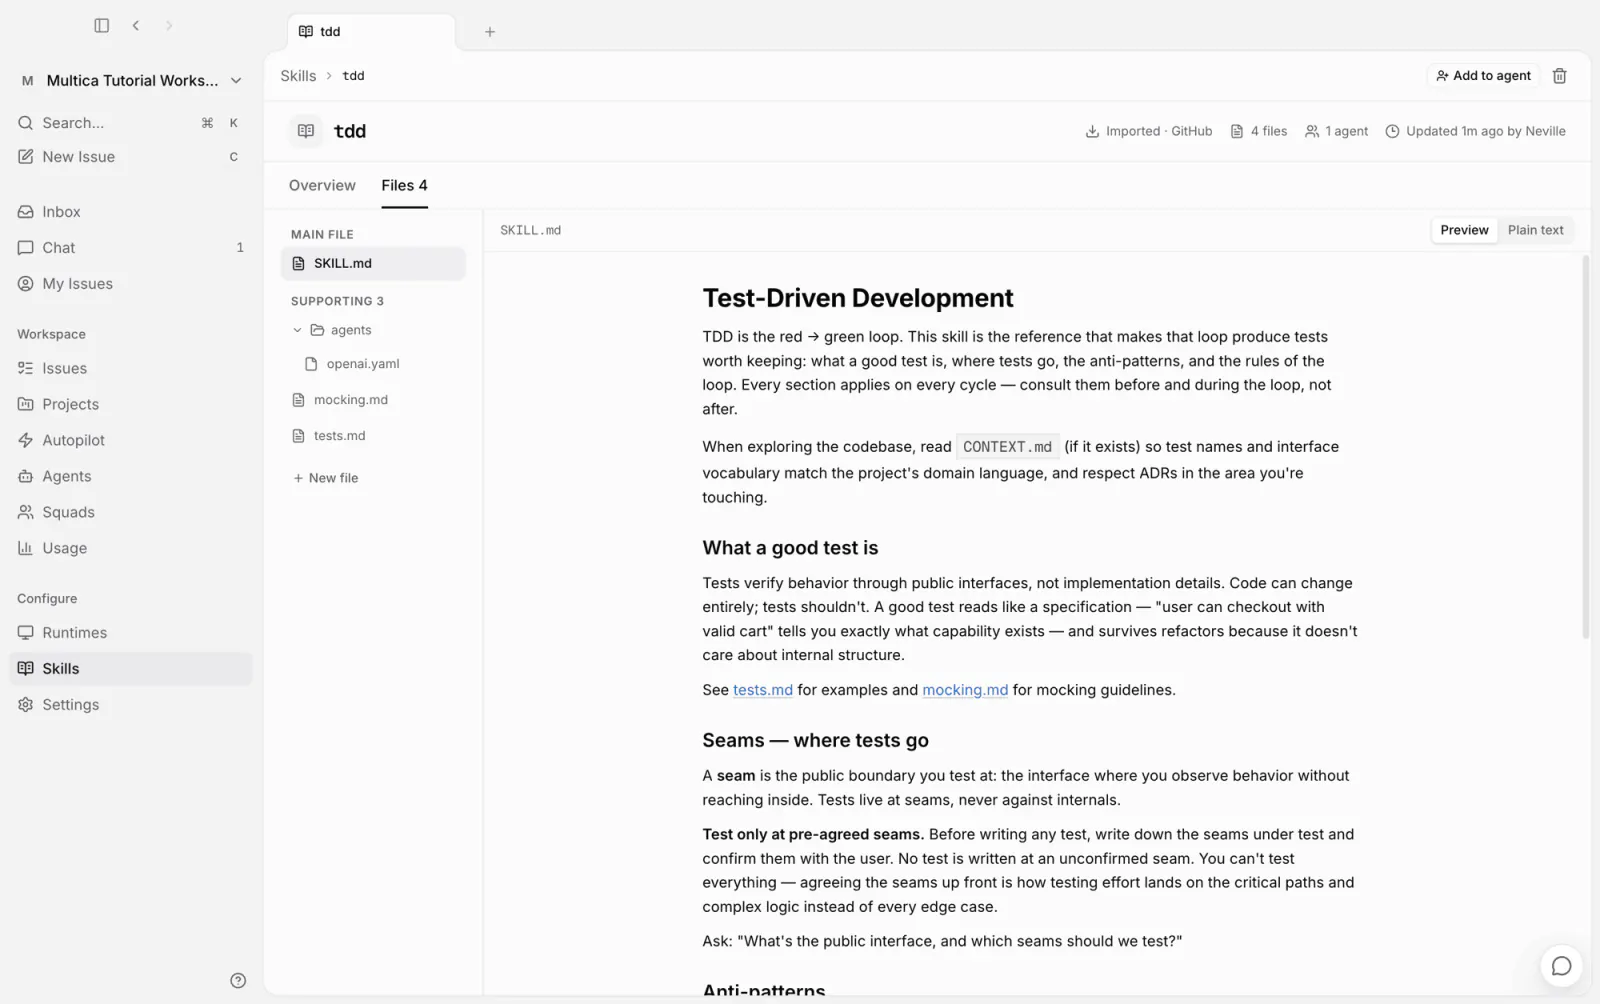
One of these two skills is about doing the work, the other about reporting it:
- tdd, attached to Engineer, is an engineering method: write a failing test first, then the implementation that makes exactly that test pass;
- i-have-adhd, attached to Lead, is a reporting style: the first line is always an actionable next step, multi-step items are numbered, and progress stays visible. Everything the leader produces is a report addressed to you, so this skill decides what you end up reading.
A team's way of working settles into skills, and a new agent inherits it by attaching one. Import is not the only source: New skill offers four routes — create manually, import from a local folder, import from URL, and copy from a local runtime — not covered in detail here; see Skills:
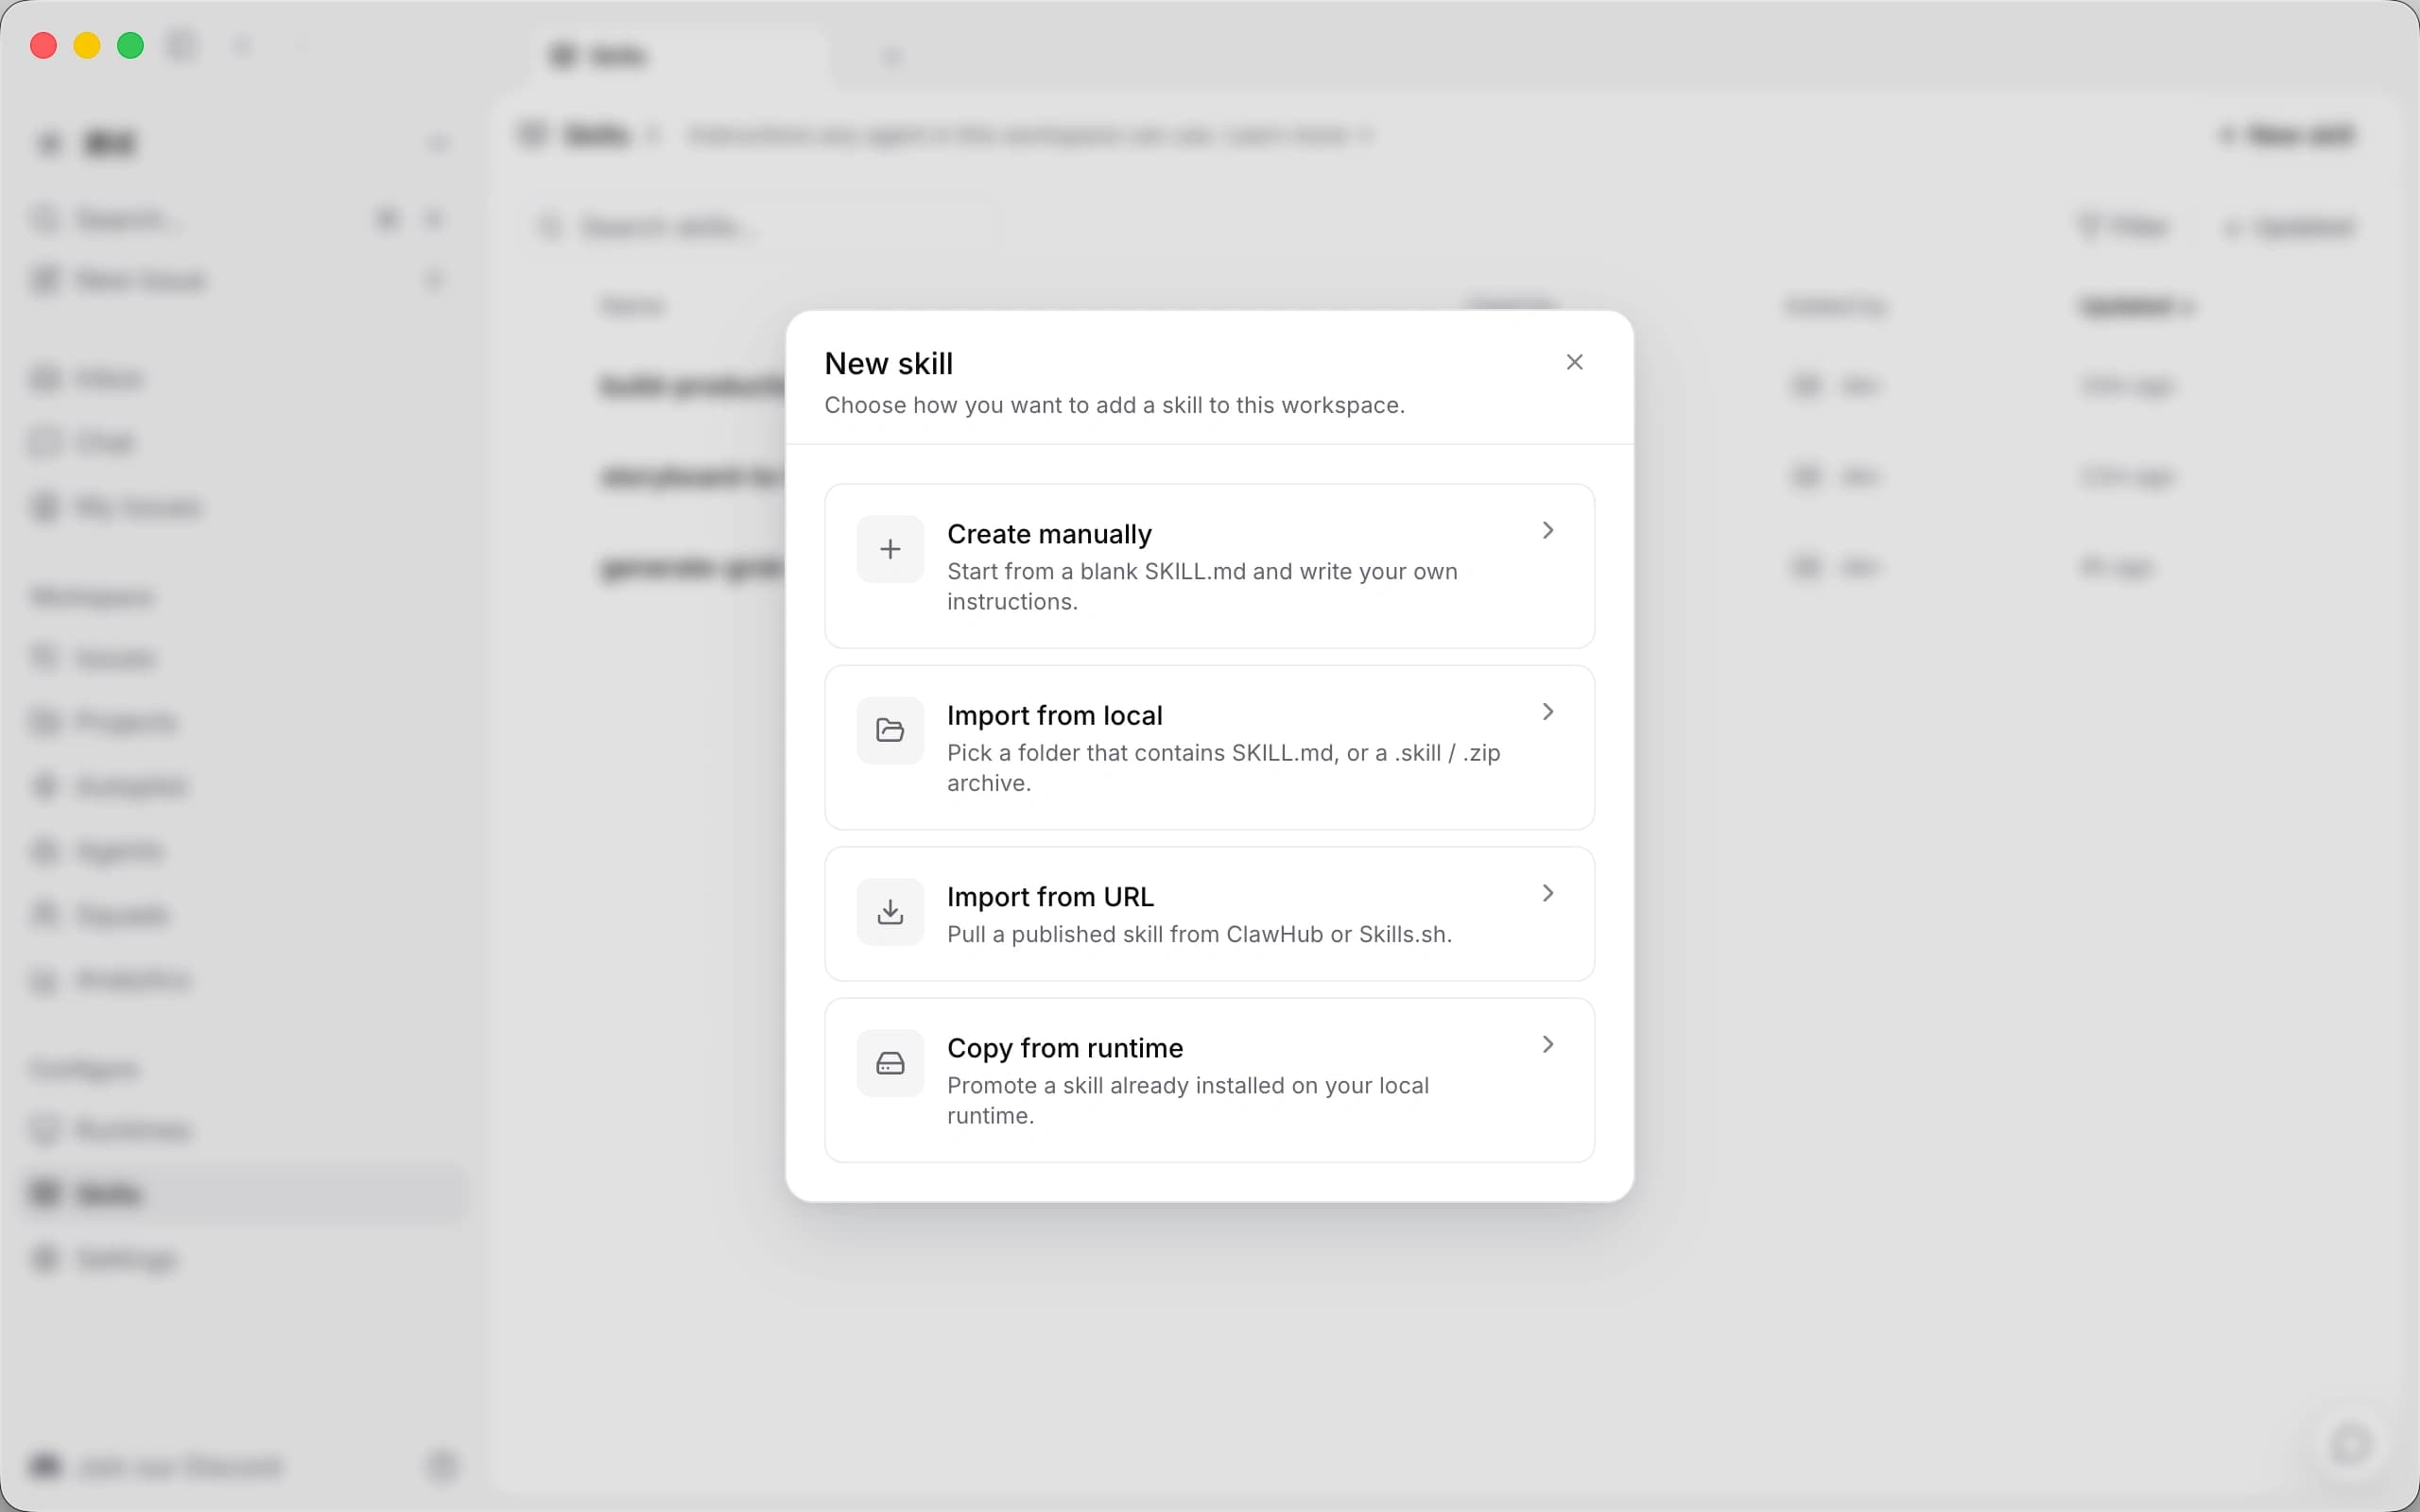
Read the files of a third-party skill before importing it: Multica does not sandbox them, and a skill's content is handed to the AI coding tool as-is.
The second issue: hand it to the squad
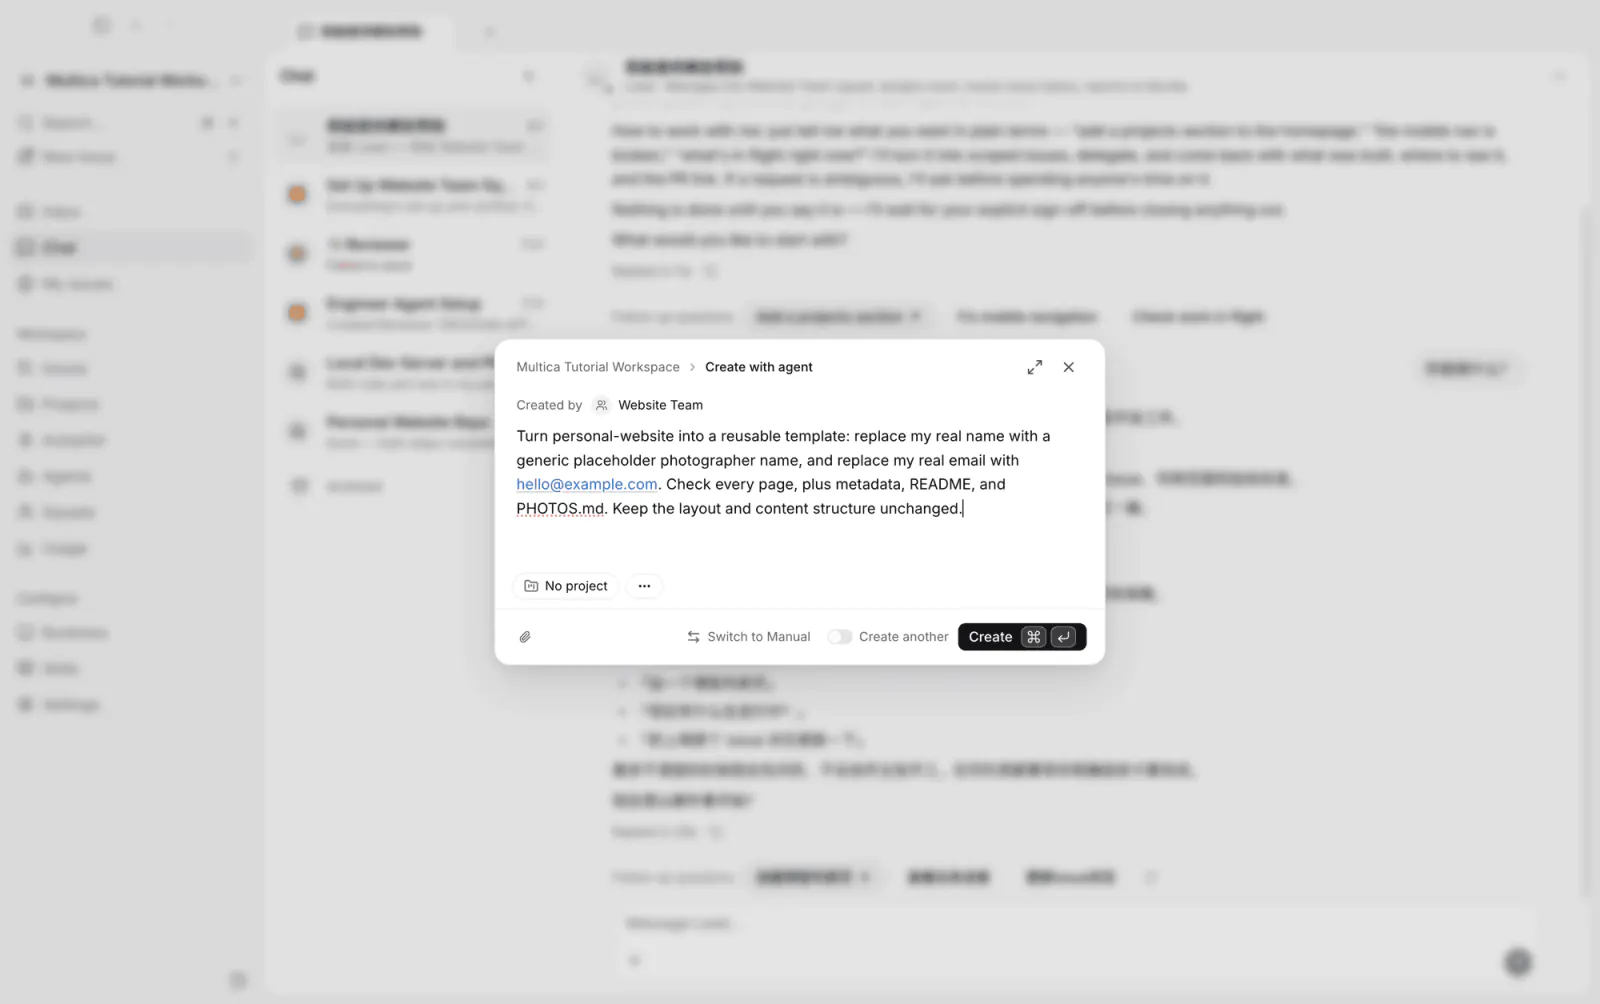
Give the squad a complete piece of work: turn the site into a generic template — replace the real name with a placeholder photographer name and the real email with hello@example.com, leaving layout and content structure untouched. This issue does not have to be written by hand: describe the requirement to Lead in Chat and create it with Create with agent, assigned to the squad — a squad, like an agent or a member, can appear anywhere an assignee can:
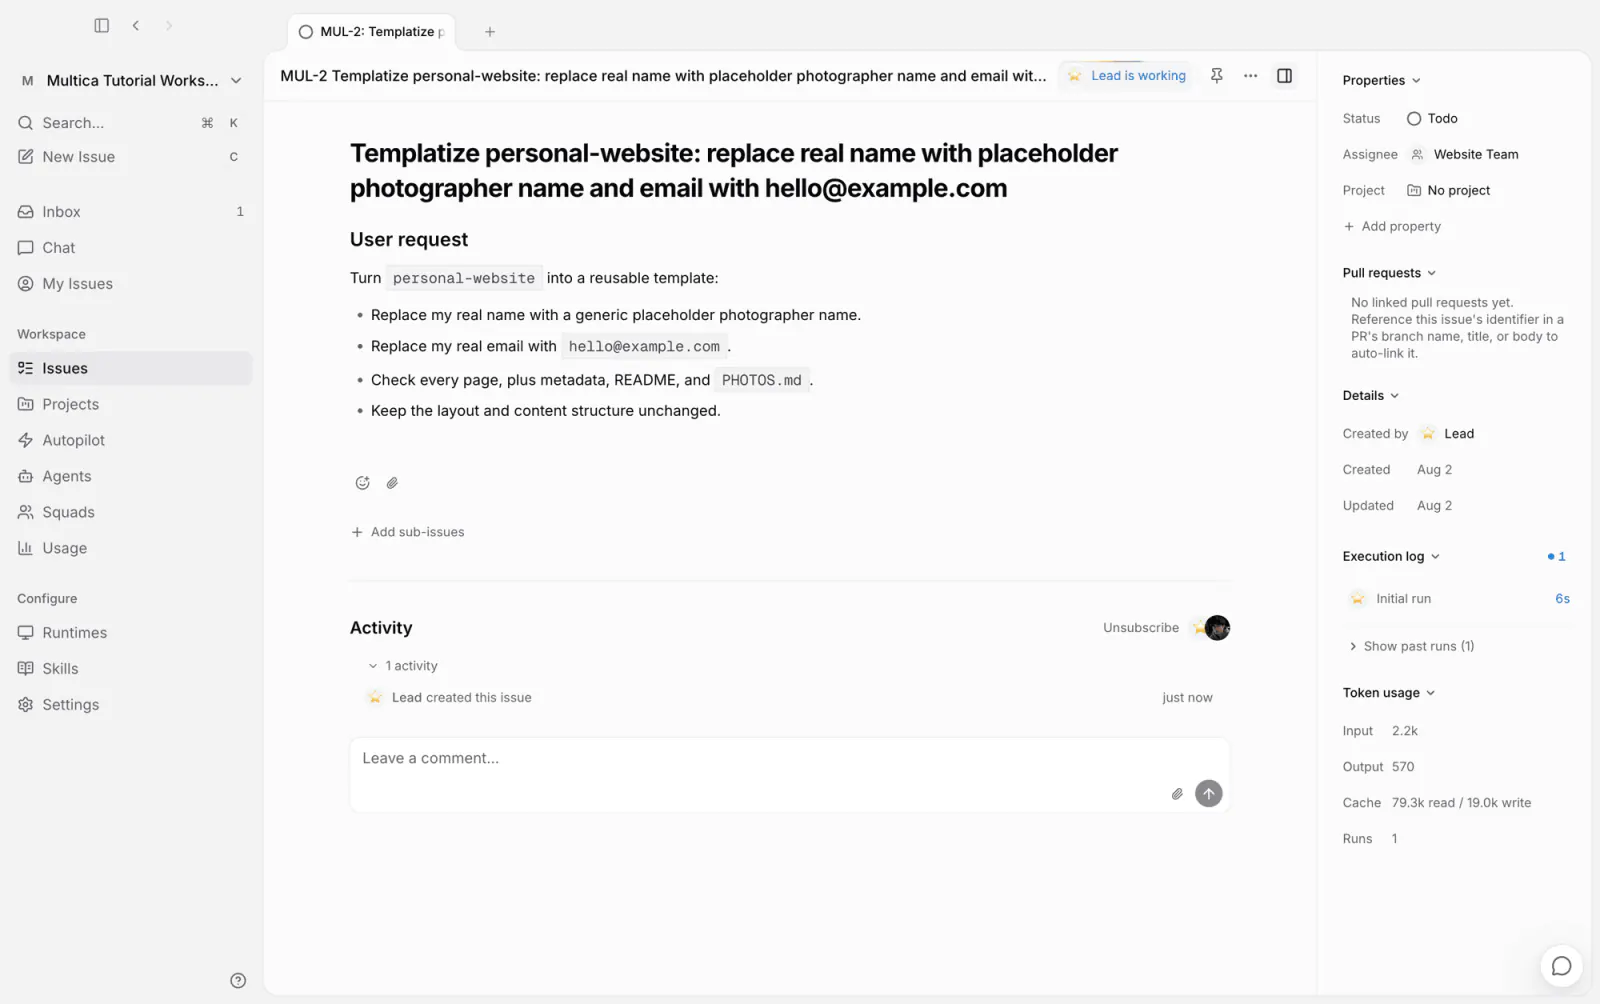
In the generated issue, the requirement is already organized into a structured description, and the badge next to the title shows the leader has taken it:
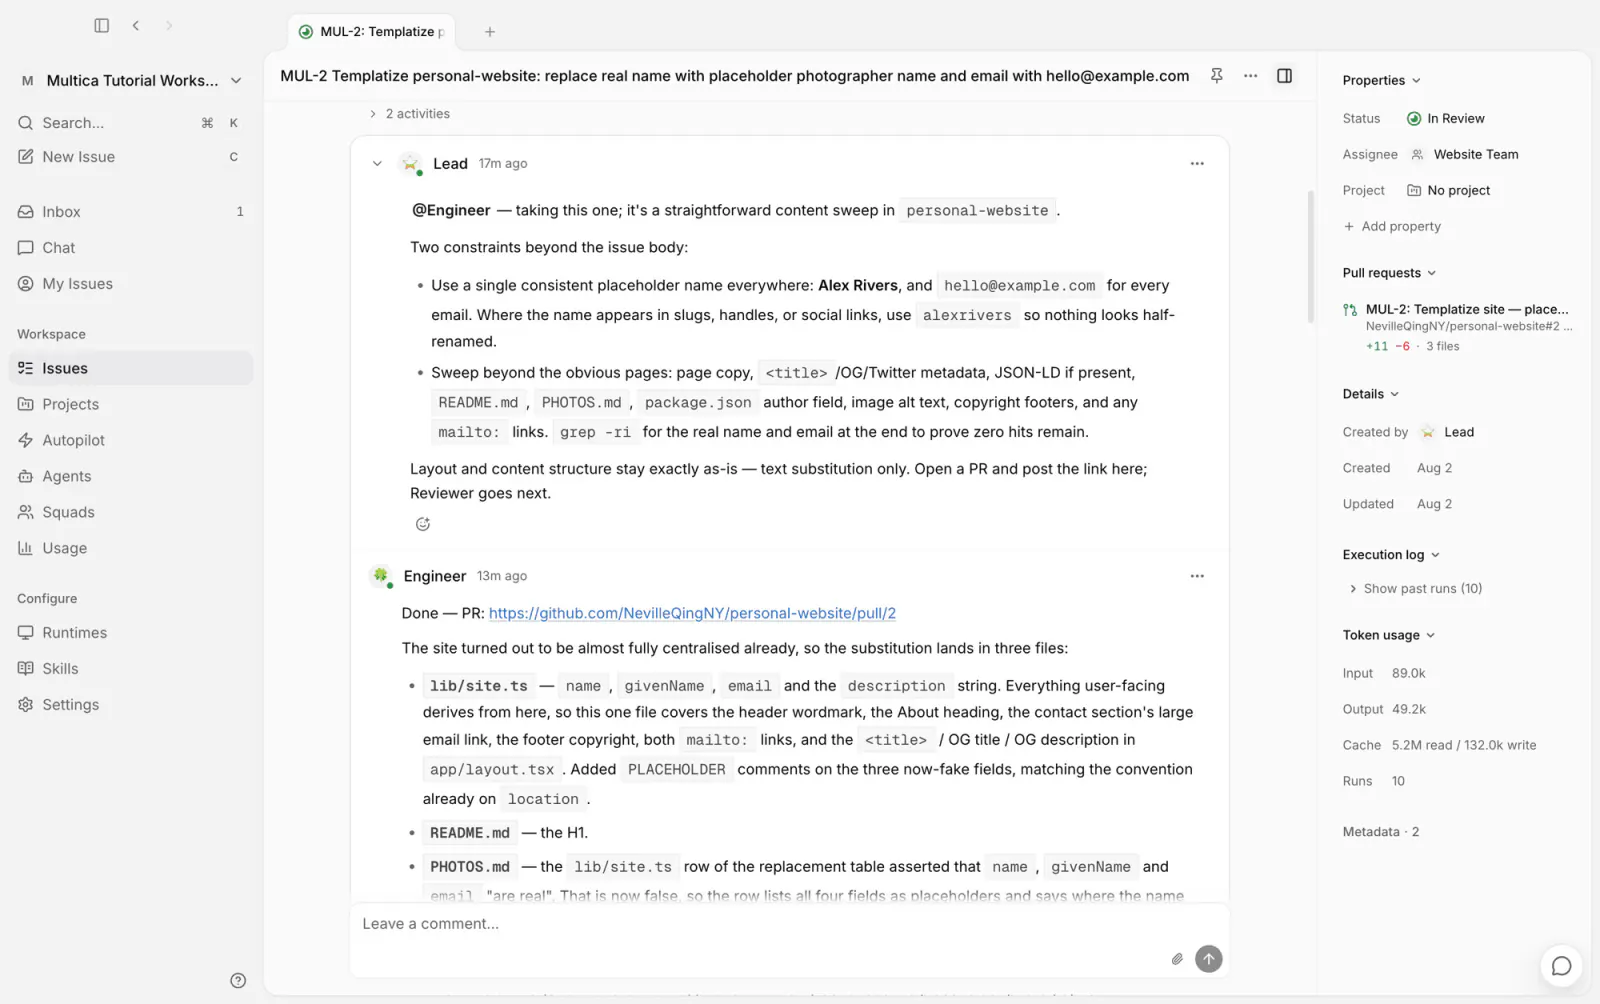
What follows is all the leader's work. Its delegation comment is more than a forward: it adds two constraints the issue did not have — the placeholder identity must be consistent site-wide, and the sweep must cover metadata and the README — before handing off to Engineer. When Engineer finishes, it reports the PR on the same timeline:
The review comes back with zero findings and Lead delivers: it mentions you for sign-off, leads with the conclusion, then the PR link, a description of the changes, and two points that need your judgment, closing with one line — nothing merges without your approval:
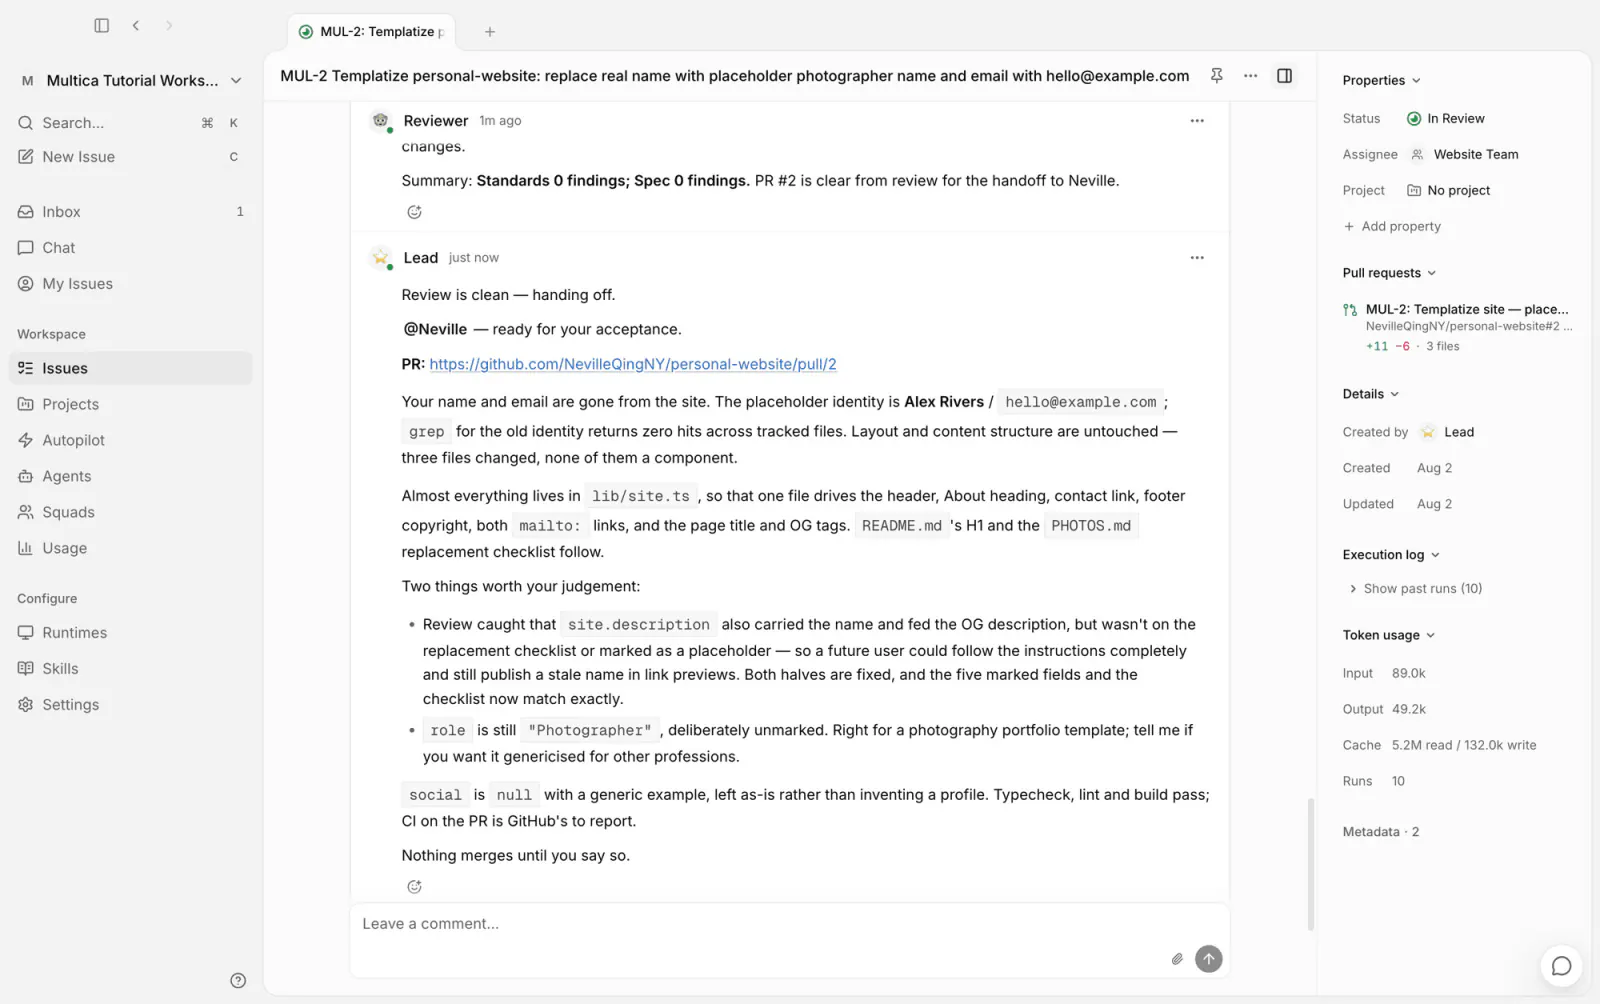
From organizing the requirement, to settling the approach, development, review, and the delivery report, no step of this issue needed you to connect it. Sign-off works the same as on MUL-1 — you can also have it start a local server and look in the browser, not repeated here. Done is still yours: reply to merge, or change the status by hand. Every step of the timeline is recorded, no different from an issue on a human team — only who executes has changed.
Automation: Autopilot
Every trigger so far started with you — assignment, mention, chat. Autopilot is a fourth kind of trigger: starting work automatically on a schedule.
Configuring it takes one sentence: tell Multica helper that at nine every Monday morning, Reviewer should run a full check over the site's repository — redundancy and dead code, questionable structure, places that could follow conventions better — writing findings into issue comments and changing no code:
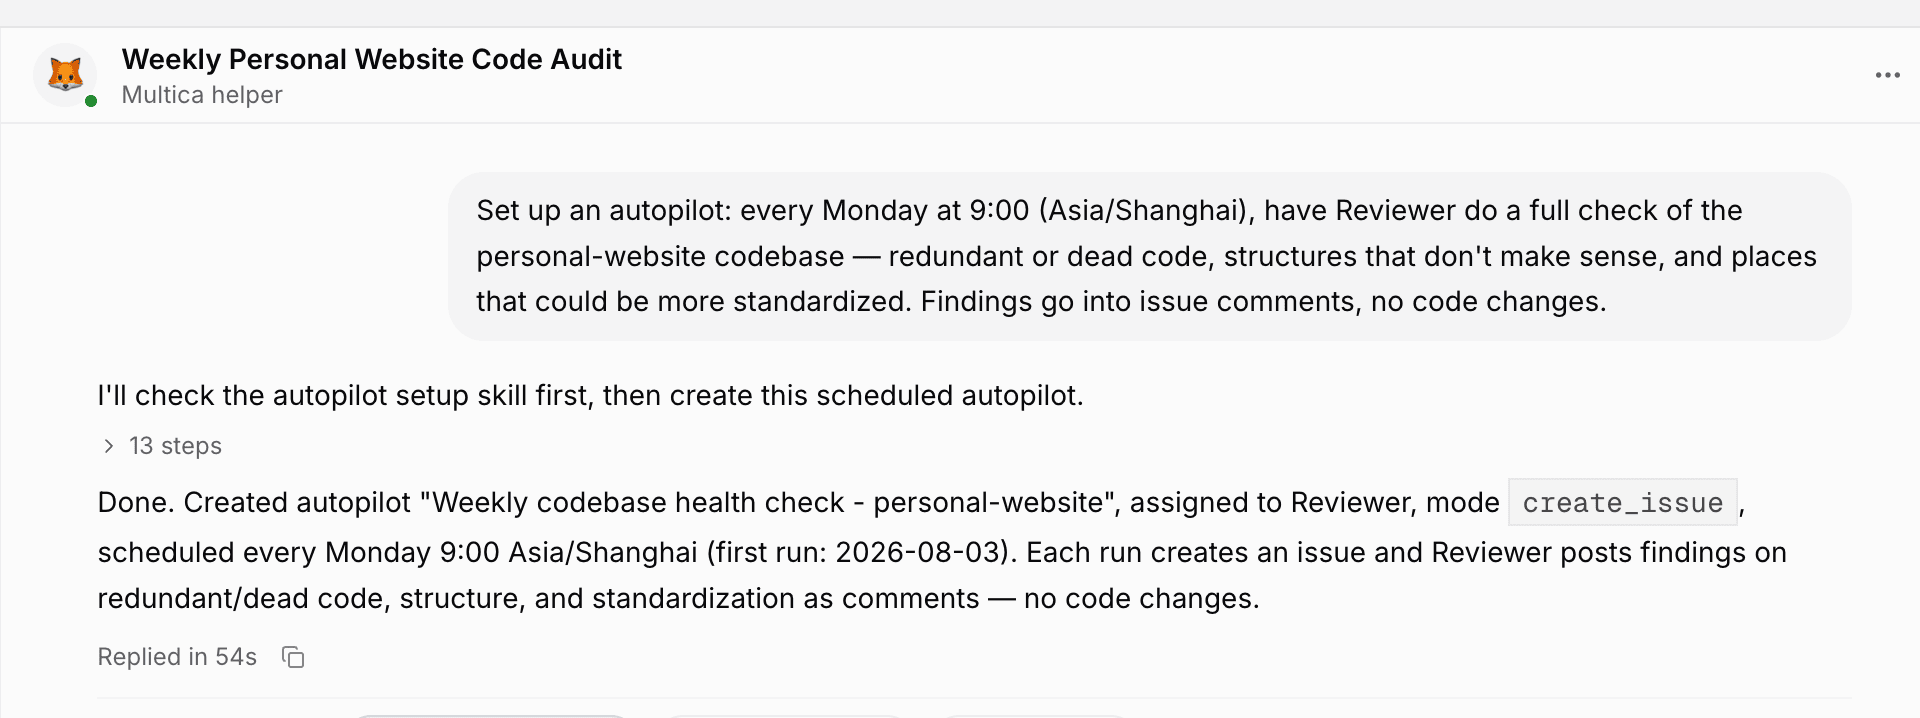
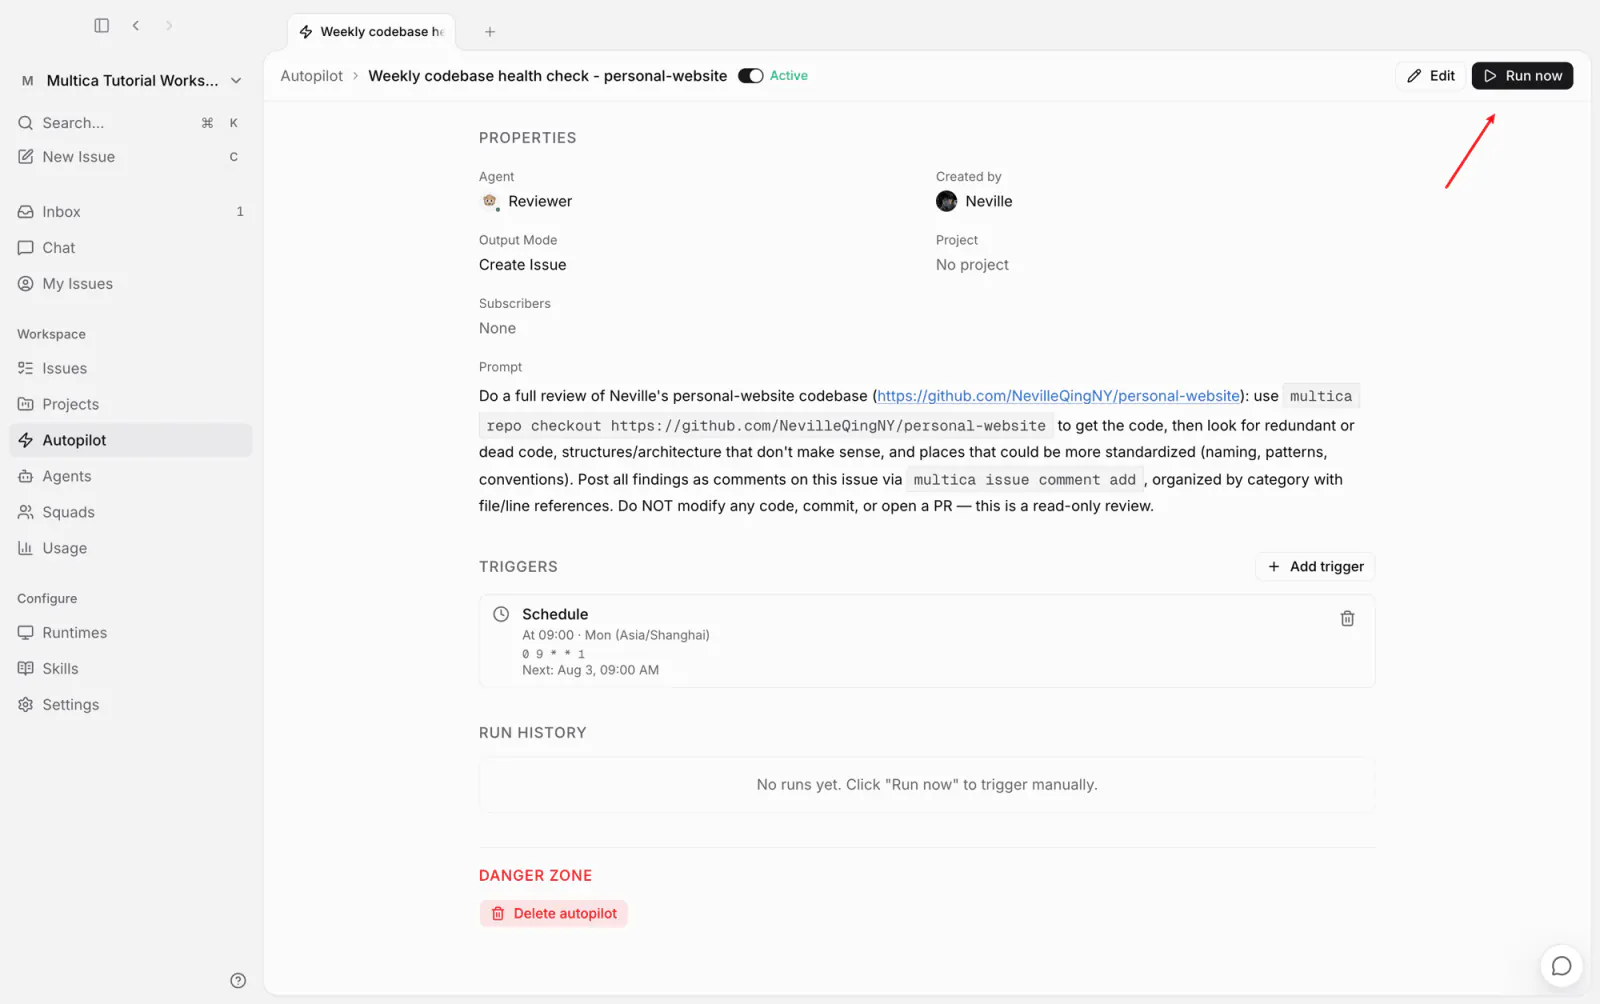
Open the Autopilot page: the executor, the prompt, and the schedule (cron plus timezone) are all configured. There are two run modes:
- Create Issue (default): every trigger creates an issue first, so the work lands on the board with history and comments identical to any other issue;
- Run only: executes without creating an issue, leaving a record only in the autopilot's run history — if a run finds nothing, it leaves nothing behind.
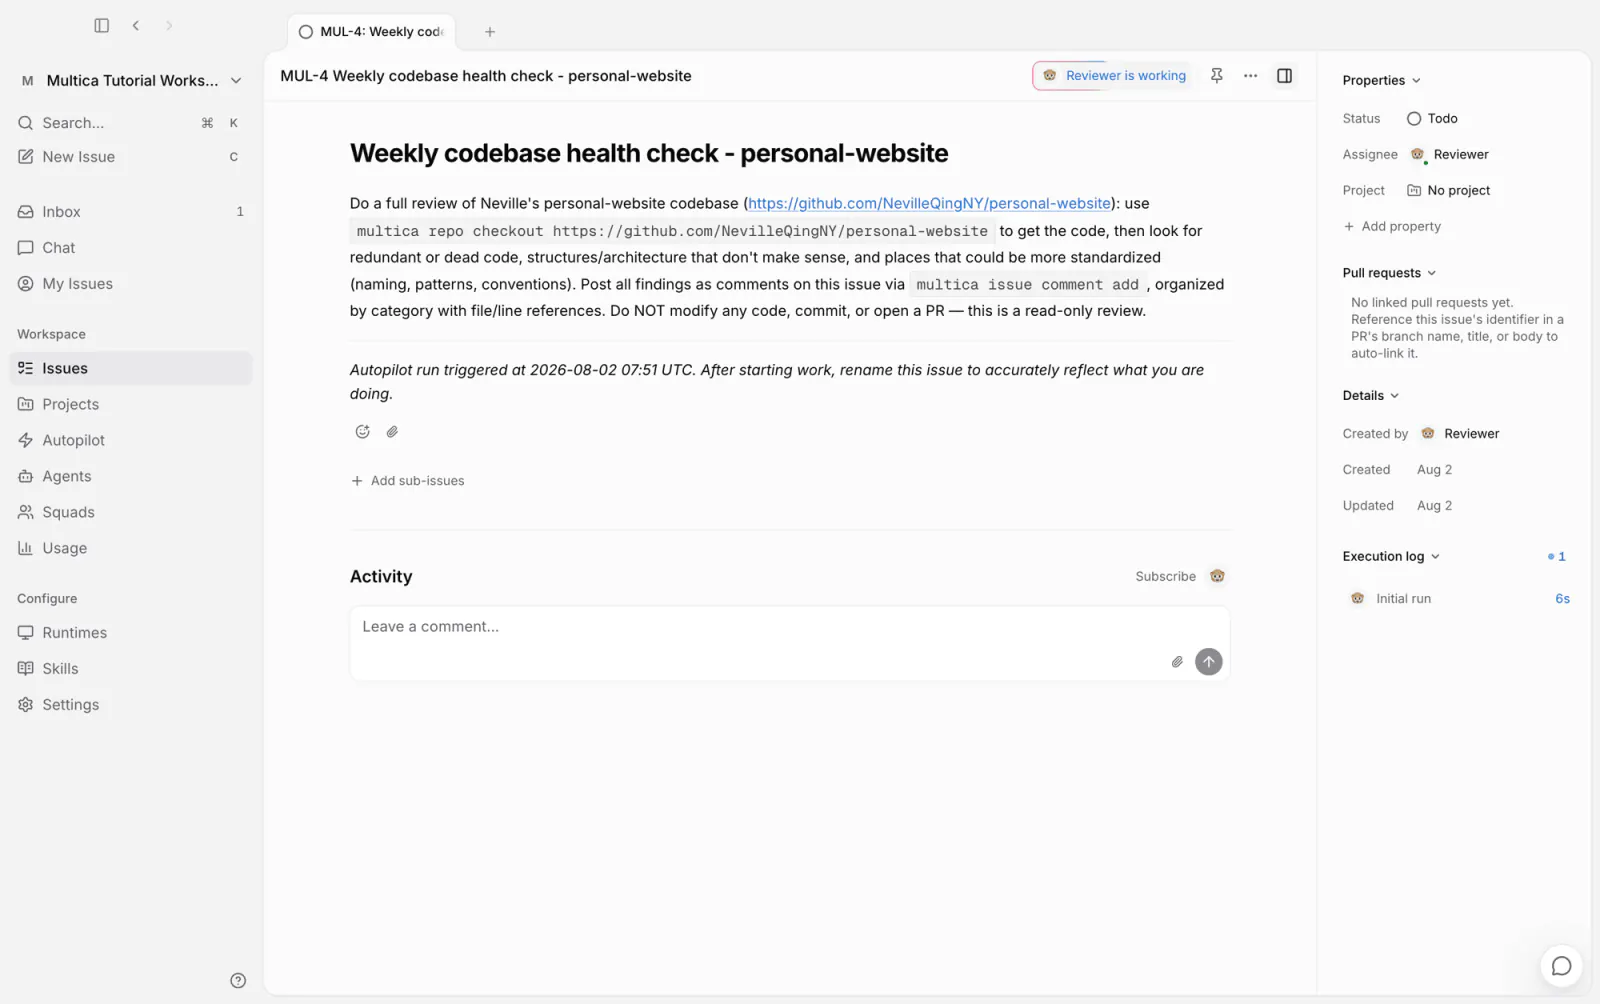
A periodic check uses Create Issue mode. Rather than waiting until Monday, click Run now to trigger once immediately:
The issue is created and Reviewer starts checking. From then on, at the same time every Monday, the same check creates a new issue automatically, with nobody needing to trigger it:
Triggers support webhooks in addition to schedules, and the executor can also point at a squad — see Autopilots.
Working with other people
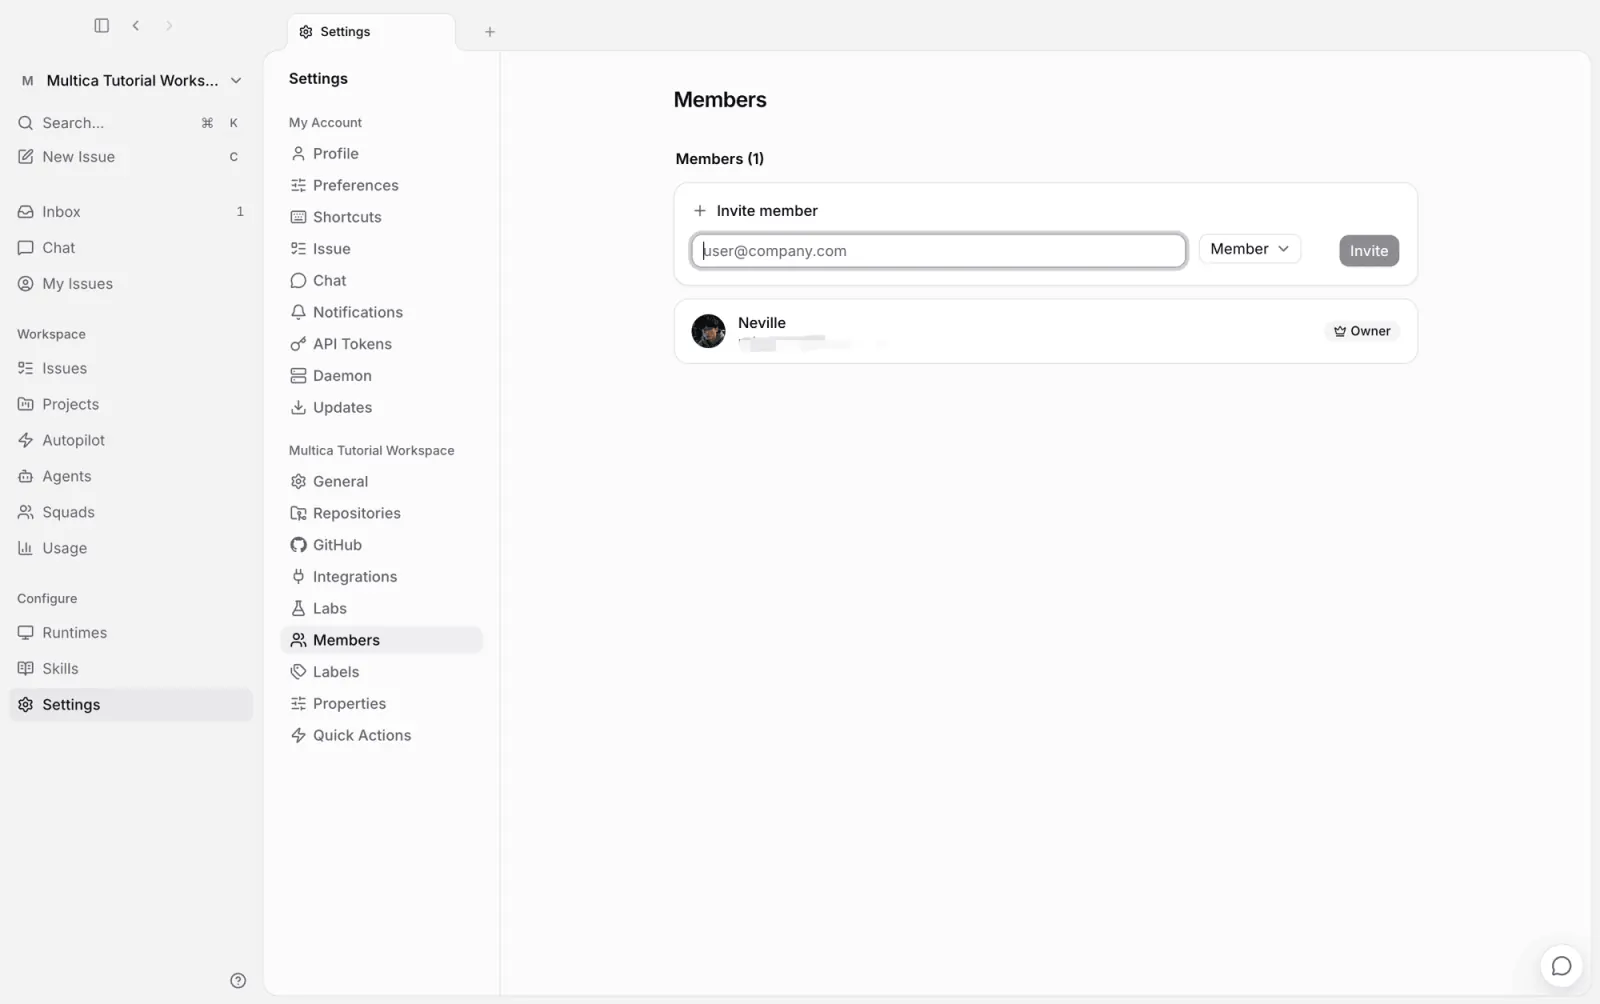
So far you have been the only human member of the workspace. Under Settings → Members, invite others by email; they create issues, @-mention agents, and join squads the same way you do — several people and several agents working together on the same set of issues:
Closing
Once issues pile up, there are tools for organizing them: a Project groups related issues and tracks them as one unit (see Projects). More ways to organize are being added, and Space is close to ready.
Looking back at the path: starting from an empty workspace, connecting one computer, building four agents, running two issues through their full life cycle, then handing coordination to a leader and periodic checks to Autopilot. Your involvement steps back one level at a time, until two things are left: describing the requirement, and signing off on the result.
Agents are first-class members and all collaboration stays on the issue timeline — that is the way of working Multica provides. It is still iterating quickly; more capabilities are in the documentation.
Next steps
- Core concepts — meet all of Multica's core objects in three minutes.
- Squads — how a leader routes work, and when to use a squad instead of a single agent.
- Skills — import, write, and share agent methods.
- Autopilots — full configuration for the schedule and webhook trigger types.